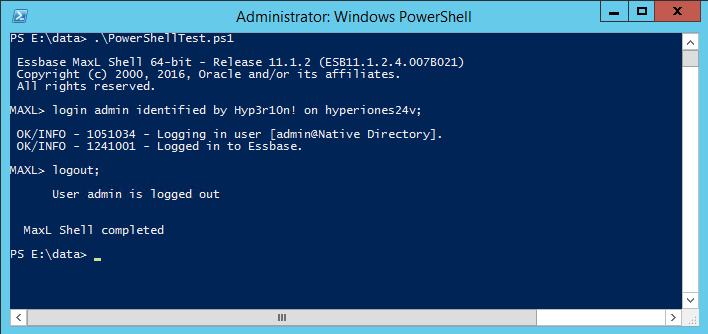
There are no less than three blog posts about running a batch script from Workspace floating around the internet. I believe the first originated from Celvin here. While this method works great for executing a batch, you are still stuck with a batch. Not only that, but if you update that batch, you have to go through the process of replacing your existing batch. This sounds easy, but if you want to keep your execution history, it isn’t. Today we’ll use a slightly modified version of what Celvin put together all those years ago. Instead of stopping with a batch file, we’ll execute PowerShell from Workspace.
Introduction to PowerShell
In short, PowerShell is a powerful shell built into most modern versions of Windows (both desktop and server) meant to provide functionality far beyond your standard batch script. Imagine a world where you can combine all of the VBScript that you’ve linked together with your batch scripts. PowerShell is that world. PowerShell is packed full of scripting capabilities that make things like sending e-mails no longer require anything external (except a mail server of course). Basically, you have the power of .NET in batch form.
First an Upgrade
We’ll start out with a basic batch, but if you look around at all of the posts available, none of them seem to be for 11.1.2.4. So, let’s take his steps and at least give them an upgrade to 11.1.2.4. Next, we’ll extend the functionality beyond basic batch files and into PowerShell. First…the upgrade.
Generic Job Applications
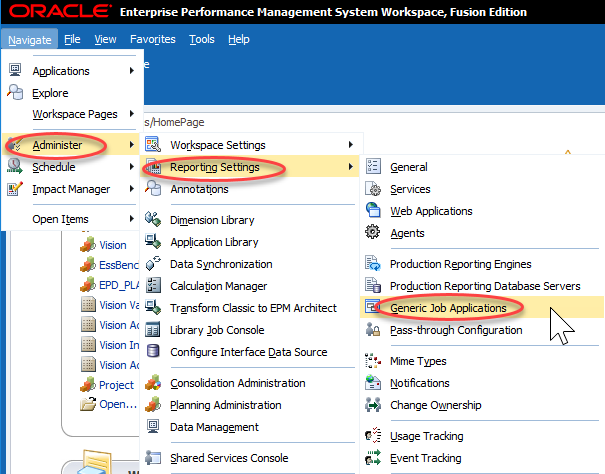
I’ll try to provide a little context along with my step-by-step instructions. You are probably thinking…what is a Generic Job Application? Well, that’s the first thing we create. Essentially we are telling Workspace how to execute a batch file. To execute a batch file, we’ll use cmd.exe…just like we would in Windows. Start by clicking Administer, then Reporting Settings, and finally Generic Job Applications:
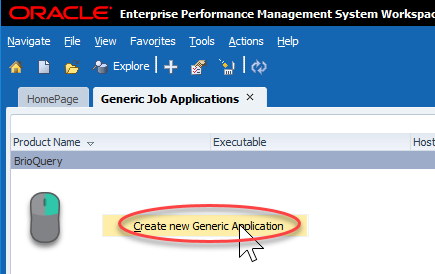
This will bring up a relatively empty screen. Mine just has BrioQuery (for those of you that remember what that means…I got a laugh). To create a new Generic Job Application, we have to right-click pretty much anywhere and click Create new Generic Application:
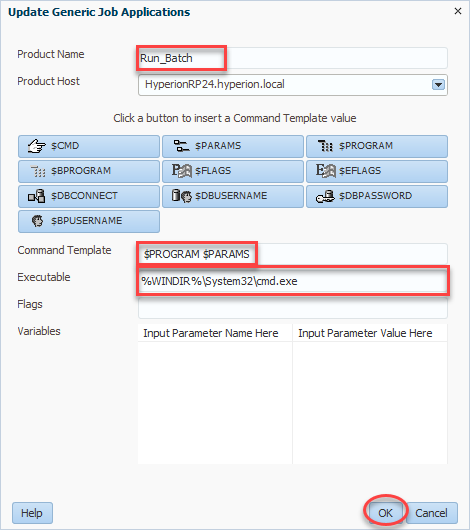
For product name, we’ll enter Run_Batch (or a name of your choosing). Next we select a product host which will be your R&A server. Command template tells Workspace how to call the program in question. In our case we want to call the program ($PROGRAM) followed by any parameters we wish to define ($PARAMS). All combined, our command template should read $PROGRAM $PARAMS. Finally we have our Executable. This will be what Workspace uses to execute our future job. In our case, as preiovusly mentioned, this will be the full path to cmd.exe (%WINDIR%\System32\cmd.exe). We’ll click OK and then we can move on to our actual batch file:
The Batch
Now that we have something to execute our job, we need…our job. In this case we’ll use a very simple batch script with just one line. We’ll start by creating this batch script. The code I used is very simple…call PowerShell script:
%WINDIR%\system32\WindowsPowerShell\v1.0\powershell.exe e:\data\PowerShellTest.ps1
So, why don’t I just use my batch file and perform all of my tasks? Simple…PowerShell is unquestionably superior to a batch file. And if that simple reason isn’t enough, this method also let’s us separate the job we are about to create from the actual code we have to maintain in PowerShell. So rather than making changes and having to figure out how to swap out the updated batch, we have this simple batch that calls something else on the file system of the reporting server. I’ve saved my code as BatchTest.bat and now I’m ready to create my job.
The Job
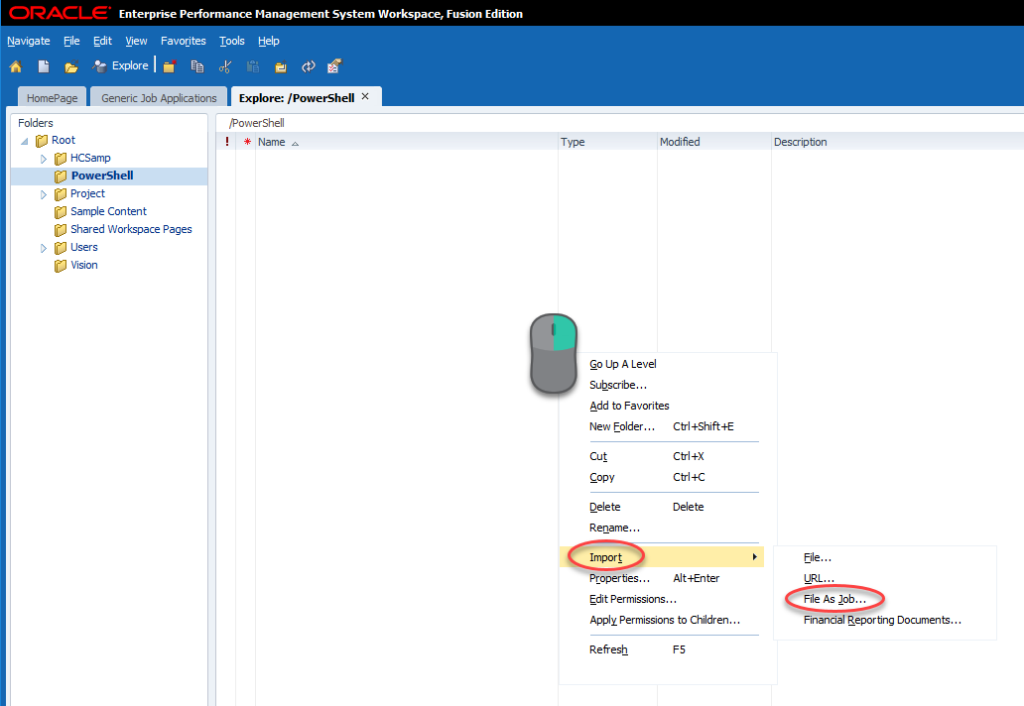
We’ll now import our batch file as a job. To do this we’ll go to Explore, find a folder (or create a folder) that we will secure for only people that should be allowed to execute our batch process. Open that folder, right-click, and click Import and then File As Job…:
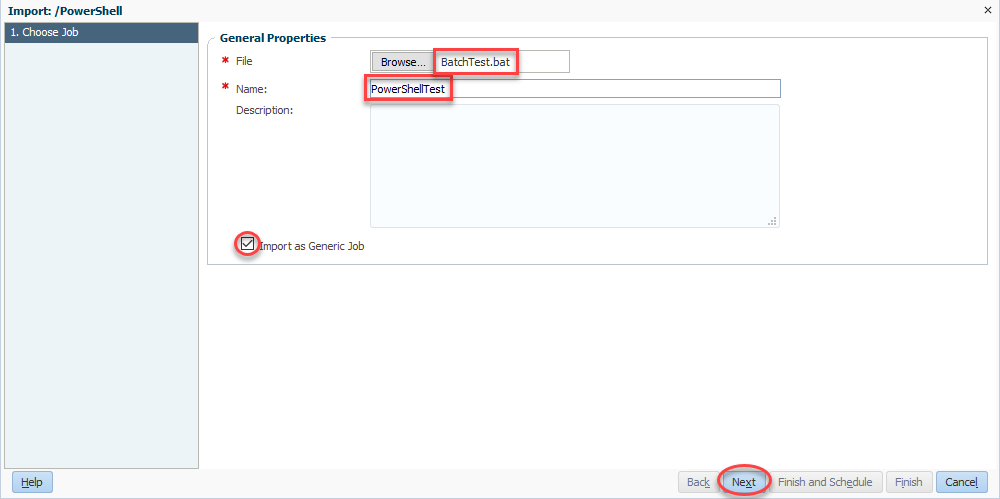
We’ll now select our file (BatchTest.bat) and then give our rule a name (PowerShellTest). Be sure to check Import as Generic Job and click Next:
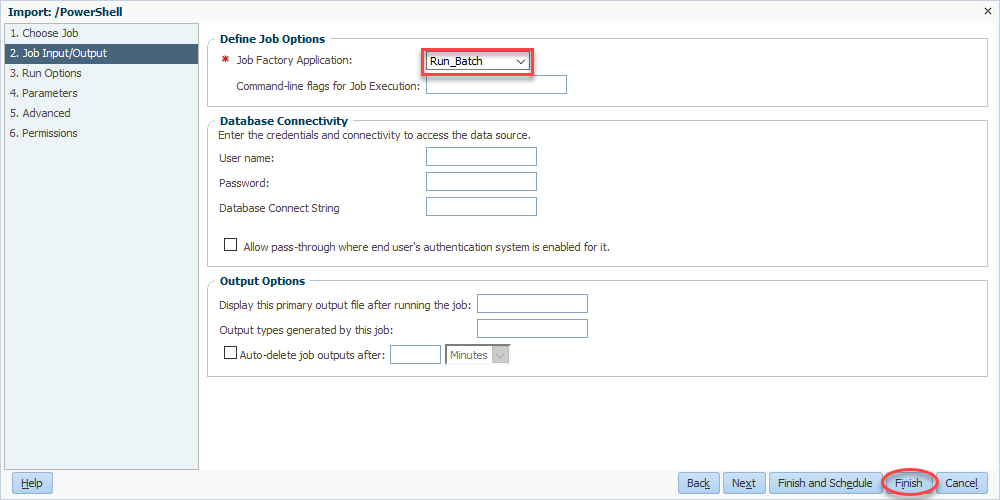
Now we come full circle as we select Run_Batch for our Job Factory Application. Finally, we’ll click finish and we’re basically done:
Simple PowerShell from Workspace
Wait! We’re not actually done! But we are done in Workspace, with the exception of actually testing it out. But before we test it out, we have to go create our PowerShell file. I’m going to start with a very simple script that simple writes the username currently executing PowerShell to the screen. This let’s us do a few things. First, it let’s you validate the account used to run PowerShell. This is always handy to know for permissions issues. Second, it let’s you make sure that we still get the output of our PowerShell script inside of Workspace. Here’s the code:
$User = [System.Security.Principal.WindowsIdentity]::GetCurrent().Name
Write-Output $User
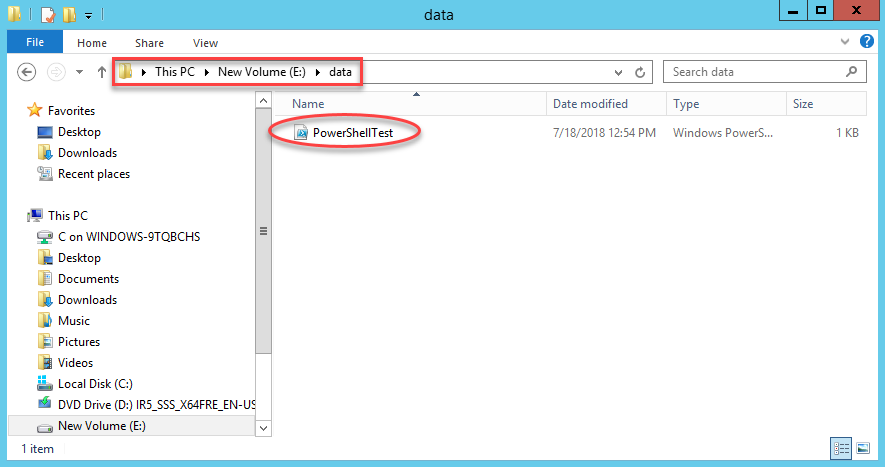
Now we need to make sure we put this file in the right place. If we go back up to the very first step in this entire process, we select our server. This is the server that we need to place this file on. The reference in our batch file above will be to a path on that system. In my case, I need to place the file into e:\data on my HyperionRP24 server:
Give it a Shot
With that, we should be able to test our batch which will execute PowerShell from Workspace. We’ll go to Explore and find our uploaded job, right-click, and click Run Job:
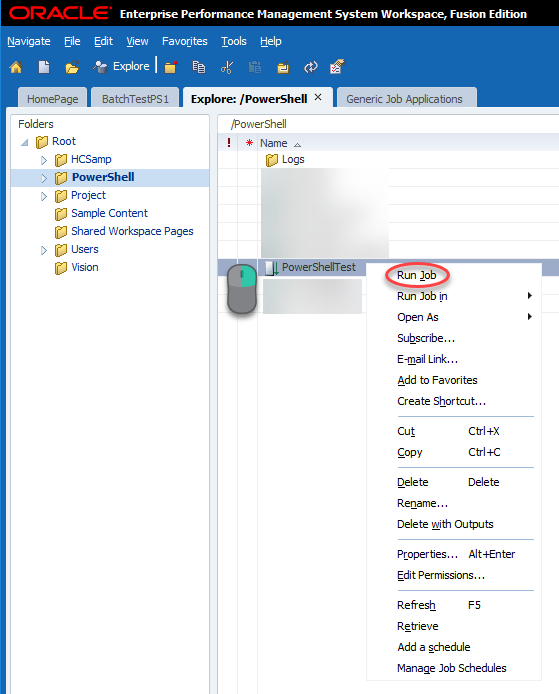
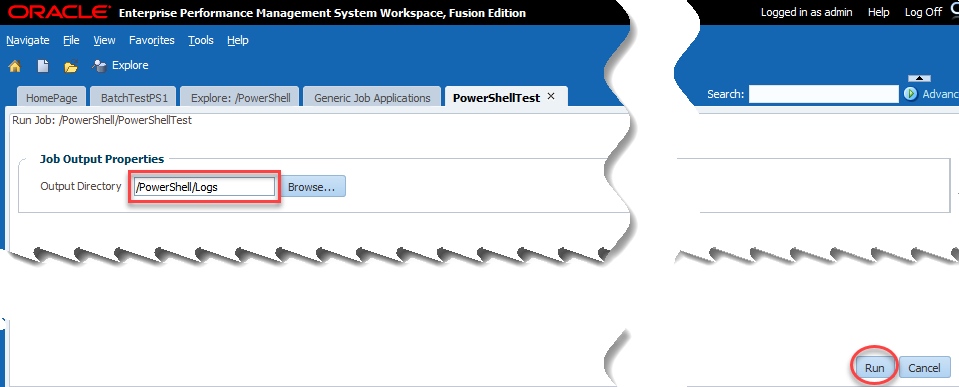
Now we have the single option of output directory. This is where the user selects where to place the log file of our activities essentially. I choose the logs directory that I created:
If all goes according to plan, we should see a username:

As we can see, my PowerShell script was executed by Hyperion\hypservice which makes sense as that’s my Hyperion service used to run all of the Hyperion services.
Now the Fun
We have successfully recreated Celvin’s process in 11.1.2.4. Now we are ready to extend his process further with PowerShell. We already have our job referencing our PowerShell script stored on the server, so anything we choose to do from here on out can be independent of Hyperion. And again, running PowerShell from Workspace gives us so much more functionality, we may as well try some of it out.
One Server or Many?
In most Hyperion environments, you have more than one server. If you have Essbase, you probably still have a foundation server. If you have Planning, you might have Planning, Essbase, and Foundation on three separate machines. The list of servers goes on and on in some environments. In my homelab, I have separate virtual machines for all of the major components. I did this to try to reflect what I see at most clients. The downside is that I don’t have everything installed on every server. For instance, I don’t have MaxL on my Reporting Server. I also don’t have the Outline Load Utility on my Reporting Server. So rather than trying to install all of those things on my Reporting Server, some of which isn’t even supporting, why not take advantage of PowerShell. PowerShell has the built-in capability to execute commands on remote servers.
Security First
Let’s get started by putting our security hat on. We need to execute a command remotely. To do so, we need to provide login credentials for that server. We generally don’t want to do this in plain text as somebody in IT will throw a flag on the play. So let’s fire up PowerShell on our reporting server and encrypt our password into a file using this command:
read-host -prompt "Password?" | ConvertTo-SecureString -AsPlainText -Force | ConvertFrom-SecureString | Out-File "PasswordFile.pass"
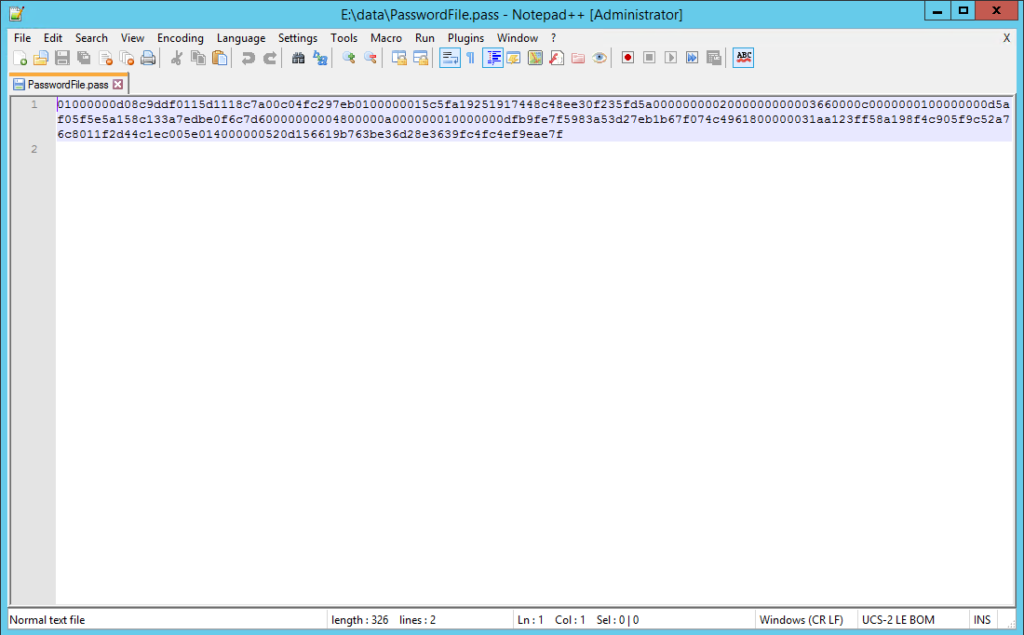
This command requires that you type in your password which is then converted to a SecureString and written to a file. It’s important to note that this encrypted password will only work on the server that you use to perform the encryption. Here’s what this should look like:

If we look at the results, we should have an encrypted password:
Now let’s build our PowerShell script and see how we use this password.
Executing Remotely
I’ll start with my code which executes another PowerShell command on our remote Essbase Windows Server:
###############################################################################
#Created By:	Brian Marshall
#Created Date:	7/19/2018
#Purpose:		Sample PowerShell Script for EPMMarshall.com
###############################################################################

###############################################################################
#Variable Assignment
###############################################################################
#Define the username that we will log into the remote server
$PowerShellUsername = "Hyperion\hypservice"
#Define the password file that we just created
$PowerShellPasswordFile = "E:\Data\PasswordFile.pass"
#Define the server name of the Essbase server that we will be logging into remotely
$EssbaseComputerName = "HyperionES24V"
#Define the command we will be remotely executing (we'll create this shortly)
$EssbaseCommand = {E:\Data\RemoteSample\RemoteSample.ps1}

###############################################################################
#Create Credential for Remote Session
###############################################################################
$PowerShellCredential=New-Object -TypeName System.Management.Automation.PSCredential -ArgumentList $PowerShellUsername, (Get-Content $PowerShellPasswordFile | ConvertTo-SecureString)

###############################################################################
#Create Remote Session Using Credential
###############################################################################
$EssbaseSession = New-PSSession -ComputerName $EssbaseComputerName -credential $PowerShellCredential


###############################################################################
#Invoke the Remote Job
###############################################################################
$EssbaseJob = Invoke-Command -Session $EssbaseSession -Scriptblock $EssbaseCommand 4>&1
echo $EssbaseJob

###############################################################################
#Close the Remote Session
###############################################################################
Remove-PSSession -Session $EssbaseSession
Basically we assign all of our variables, including the use of our encrypted password. Then we create a credential using those variables. We then use that credential to create a remote session on our target Essbase Windows Server. Next we can execute our remote command and write out the results to the screen. Finally we close out our remote connection. But wait…what about our remote command?
Get Our Remote Server Ready
Before we can actually remotely execute on a server, we need to start up PowerShell on that remove server and enable remote connectivity in PowerShell. So…log into your remote server and start PowerShell, and execute this command:
Enable-PSRemoting -Force
If all goes well, it should look like this:

If all doesn’t go well, make sure that you started PowerShell as an Administrator. Now we need to create our MaxL script and our PowerShell script that will be remotely executed.
The MaxL
First we need to build a simple MaxL script to test things out. I will simply log in and out of my Essbase server:
login $1 identified by $2 on $3;

logout;
The PowerShell
Now we need a PowerShell script to execute the MaxL script:
###############################################################################
#Created By:	Brian Marshall
#Created Date:	7/19/2018
#Purpose:		Sample PowerShell Script for EPMMarshall.com
###############################################################################

###############################################################################
#Variable Assignment
###############################################################################

$MaxLPath = "E:\Oracle\Middleware\user_projects\Essbase1\EssbaseServer\essbaseserver1\bin"
$MaxLUsername = "admin"
$MaxLPassword = "myadminpassword"
$MaxLServer = "hyperiones24v"

###############################################################################
#MaxL Execution
###############################################################################
& $MaxLPath\StartMaxL.bat E:\Data\RemoteSample\RemoteSample.msh $MaxLUsername $MaxLPassword $MaxLServer
This is as basic as we can make our script. We define our variables around usernames and servers and then we execute our MaxL file that logs in and out.
Test It First
Now that we have that built, let’s test it from the Essbase Windows Server first. Just fire up PowerShell and go to the directory where you file exists and execute it:
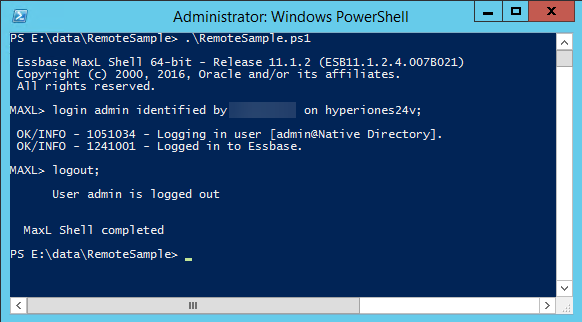
Assuming that works, now let’s test the remote execution from our reporting server:

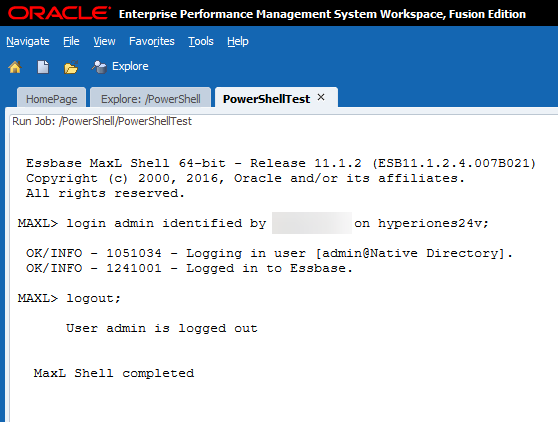
Looking good so far.. Now let’s head back to Workspace to see if we are done:
Conclusion
That’s it! We have officially executed a PowerShell script which remotely executes a PowerShell script which executes a MaxL script…from Workspace. And the best part is that we get to see all of the results from Workspace and the logs are stored there until we delete them. We can further extend this to do things like load dimensions using the Outline Load Utility or using PowerShell to send e-mail confirmations. The sky is the limit with PowerShell!
Brian Marshall
July 19, 2018
If you attended my recent presentation at Kscope18, I covered this topic and provided a live demonstration of MDXDataCopy. MDXDataCopy provides an excellent method for creating functionality similar to that of Smart Push in PBCS. While my presentation has all of the code that you need to get started, not everyone likes getting things like this out of a PowerPoint and the PowerPoint doesn’t provide 100% of the context that delivering the presentation provides.
Smart Push
In case you have no idea what I’m talking about, Smart Push provides the ability to push data from one cube to another upon form save. This means that I can do a push from BSO to an ASO reporting cube AND map the data at the same time. You can find more information here provided in the Oracle PBCS docs. This is one of the features we’ve been waiting for in On-Premise for a long time. I’ve been fortunate enough to implement this functionality at a couple of client that can’t go to the cloud yet. Let’s see how this is done.
MDXDataCopy
MDXDataCopy is one of the many, many functions included with Calculation Manager. These are essentially CDF’s that are registered with Essbase. As the name implies, it simply uses MDX queries pull data from the source cube and then map it into the target cube. The cool part about this is that it works with ASO perfectly. But, as with many things Oracle, especially on-premise, the documentation isn’t very good. Before we can use MDXDataCopy, we first have some setup to do:
- Generate a CalcMgr encyrption key
- Encrypt your username using that key
- Encrypt your password using that key
Please note that the encryption process we are going through is similar to what we do in MaxL, yet completely different and separate. Why would we want all of our encryption to be consistent anyway? Let’s get started with our encrypting.
Generate Encryption Key
As I mentioned earlier, this is not the same process that we use to encrypt usernames and passwords with MaxL, so go ahead and set your encrypted MaxL processes and ideas to the side before we get started. Next, log into the server where Calculation Manager is installed. For most of us, this will be where Foundation Services happens to also be installed. First we’ll make sure that the Java bin folder is in the path, then we’ll change to our lib directory that contains calcmgrCmdLine.jar, and finally we’ll generate our key:
path e:\Oracle\Middleware\jdk160_35\bin
cd Oracle\Middleware\EPMSystem11R1\common\calcmgr\11.1.2.0\lib
java -jar calcmgrCmdLine.jar –gk
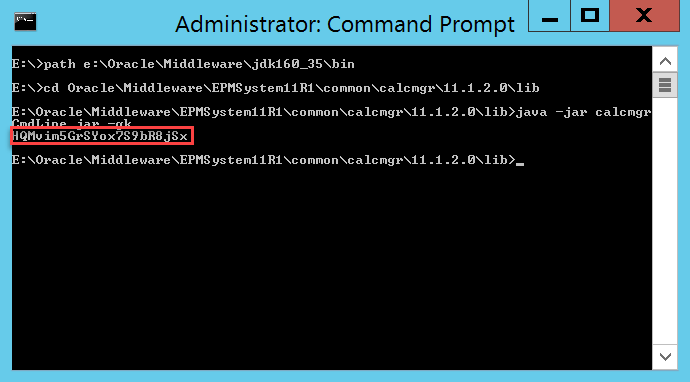
This should generate a key:

We’ll copy and paste that key so that we have a copy. We’ll also need it for our next two commands.
Encrypt Your Username and Password
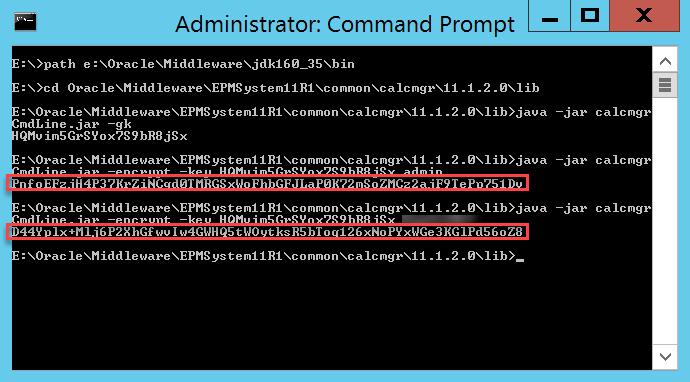
Now that we have our key, we should be ready to encrypt our username and then our password. Here’s the command to encrypt using the key we just generated (obviously your key will be different):
java -jar calcmgrCmdLine.jar -encrypt -key HQMvim5GrSYox7S9bR8jSx admin
java -jar calcmgrCmdLine.jar -encrypt -key HQMvim5GrSYox7S9bR8jSx GetYourOwnPassword
This will produce two keys for us to again copy and paste somewhere so that we can reference them in our calculation script or business rule:
Now that we have everything we need from our calculation manager server, we can log out and continue on.
Vision
While not as popular as Sample Basic, the demo application that Hyperion Planning (and PBCS) comes with is great. The application is named Vision and it comes with three BSO Plan Types ready to go. What it doesn’t come with is an ASO Plan Type. I won’t go through the steps here, but I basically created a new ASO Plan Type and added enough members to make my demonstration work. Here are the important parts that we care about (the source and target cubes):

Now we need a form so that we have something to attach to. I created two forms, one for the source data entry and one to test and verify that the data successfully copied to the target cube. Our source BSO cube form looks like this:

Could it get more basic? I think not. And then for good measure, we have a matching form for the ASO target cube:

Still basic…exactly the same as our BSO form. That’s it for changes to our Planning application for now.
Calculation Script
Now that we have our application ready, we can start by building a basic (I’m big on basic today) calculation script to get MDXDataCopy working. Before we get to building the script, let’s take a look at the parameters for our function:
- Key that we just generated
- Username that we just encrypted
- Password that we just encrypted
- Source Essbase Application
- Source Essbase Database
- Target Essbase Application
- Target Essbase Database
- MDX column definition
- MDX row definition
- Source mapping
- Target mapping
- POV for any dimensions in the target, but not the source
- Number of rows to commit
- Log file path
Somewhere buried in that many parameters you might be able to find the meaning of life. Let’s put this to practical use in our calculation script:
RUNJAVA com.hyperion.calcmgr.common.cdf.MDXDataCopy
"HQMvim5GrSYox7S9bR8jSx"
"PnfoEFzjH4P37KrZiNCgd0TMRGSxWoFhbGFJLaP0K72mSoZMCz2ajF9TePp751Dv"
"D44Yplx+Mlj6P2XhGfwvIw4GWHQ5tWOytksR5bToq126xNoPYxWGe3KGlPd56oZ8"
"VisionM"
"Plan1"
"VMASO"
"VMASO"
"{[Jul]}"
"CrossJoin({[No Account]},CrossJoin({[FY16]},CrossJoin({[Forecast]},CrossJoin({[Working]},CrossJoin({[No Entity]},{[No Product]})))))"
""
""
""
"-1"
"e:\\mdxdatacopy.log";
Let’s run down the values used for our parameters:
- HQMvim5GrSYox7S9bR8jSx (Key that we just generated)
- PnfoEFzjH4P37KrZiNCgd0TMRGSxWoFhbGFJLaP0K72mSoZMCz2ajF9TePp751Dv (Username that we just encrypted)
- D44Yplx+Mlj6P2XhGfwvIw4GWHQ5tWOytksR5bToq126xNoPYxWGe3KGlPd56oZ8 (Password that we just encrypted)
- VisionM (Source Essbase Application)
- Plan1 (Source Essbase Database)
- VMASO (Target Essbase Application)
- VMASO (Target Essbase Database)
- {[Jul]} (MDX column definition, in this case just the single member from our form)
- CrossJoin({[No Account]},CrossJoin({[FY16]},CrossJoin({[Forecast]},CrossJoin({[Working]},CrossJoin({[No Entity]},{[No Product]}))))) (MDX row definition, in this case it requires a series of nested crossjoin functions to ensure that all dimensions are represented in either the rows or the columns)
- Blank (Source mapping which is left blank as the two cubes are exactly the same)
- Also Blank (Target mapping which is left blank as the two cubes are exactly the same)
- Also Blank (POV for any dimensions in the target, but not the source which is left blank as the two cubes are exactly the same)
- -1 (Number of rows to commit which is this case is essentially set to commit everything all at once)
- e:\\mdxdatacopy.log (Log file path where we will verify that the data copy actually executed)
The log file is of particular importance as the script will execute with success regardless of the actual result of the script. This means that especially for testing purposes we need to check the file to verify that the copy actually occurred. We’ll have to log into our Essbase server and open the file that we specified. If everything went according to plan, it should look like this:

This gives us quite a bit of information:
- The query that was generated based on our row and column specifications
- The user that was used to execute the query
- The source and target applications and databases
- The rows to commit
- The query and copy execution times
- And the actual data that was copied
If you have an error, it will show up in this file as well. We can see that our copy was successful. For my demo at Kscope18, I just attached this calculation script to the form. This works and shows us the data movement using the two forms. Let’s go back to Vision and give it a go.
Back to Vision
The last step to making this fully functional is to attach our newly created calculation script to our form. Notice that we’ve added the calculation script and set it to run on save:

Now we can test it out. Let’s change our data:

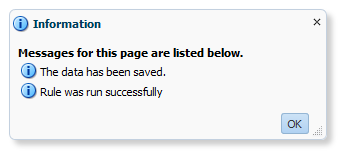
Once we save the data, we should see it execute the script:
Now we can open our ASO form and we should see the same data:

The numbers match! Let’s check the log file just to be safe:

The copy looks good here, as expected. Our numbers did match after all.
Conclusion
Obviously this is a proof of concept. To make this production ready, you would likely want to use a business rule so that you can get context from the form for your data copy. There are however some limitations compared to PBCS. For instance, I can get context for anything that is a variable or a form selection in the page, but I can’t get context from the grid itself. So I need to know what my rows and columns are and hard-code that. You could use some variables for some of this, but at the end of the day, you may just need a script or rule for each form that you with to enable Smart Push on. Not exactly the most elegant solution, but not terrible either. After all, how often do your forms really change?
Brian Marshall
July 8, 2018
If you are 11.1.2.4 and you use ASO Plan Types, you may be aware of a bug that prevents drill-through from working properly. Essentially, I can define drill-through in BSO and everything works fine, but ASO just doesn’t work. You can see the intersection as being available for drill-through, but when you attempt to actually drill through…you get this:

Well that sucks. But wait, there is now hope! First, you need 11.1.2.4.004. Then, you need the recently released intermediate patch 23023767. Now if we look at the read-me, we see this:
 That is not terribly promising. In fact, it just plainly says absolutely nothing about drill-through. It doesn’t even mention ASO at all. But hey, let’s follow the instructions and patch our system anyway. Flash forward a few minutes, or hours depending on your installation and we should be ready to try it out again:

Now that looks better! Working drill-through from an ASO Plan Type! The cool part is that we can use FDMEE…or something else. Be on the lookout for another post on using DrillBridge with Planning AND PBCS.
Brian Marshall
April 26, 2016
Someone asked me today…how do I easily delete Plan Type in Hyperion Planning. I thought to myself…why would they ask that? In 11.1.2.3 they added a cool new Plan Type Manager that allows you to add, delete, and rename Plan Types. But hey, I’ll fire up Planning and take some screenshots.
First, let’s look at the 11.1.2.3 to make sure that Brian hasn’t lost his mind:

Fantastic…I may be losing my mind, but at least I’m not quite there yet. Clearly you can rename and delete Plan Types. So then I fired up 11.1.2.4:

That looks totally different! First, there are no text boxes to rename Plan Types. Second, there is no delete button at all. Interesting. For grins, let’s look at PBCS:

I guess I shouldn’t be surprised that they look the same… So now let’s try to add a new Plan Type:

It seems there is no reason to check the documentation. They seem to have removed this functionality on purpose. While I’m sure they had their reasons, I’m not a fan of removing functionality. Just for fun, here are the release notes for 11.1.2.3 where they specifically call out the additional new features:
https://docs.oracle.com/cd/E40248_01/epm.1112/planning_new_features/planning_new_features.html
And if you scroll way down you should see this:

When I have some more time, I’ll be posting an article on deleting Plan Types using the Planning repository. And then when I have even more time…I’ll show you how to do it on PBCS. In the meantime, I’m off to delete a Plan Type the hard way.
Brian Marshall
March 14, 2016
In my last entry I demonstrated the use of dynamic members in Custom Plan Types. In today’s installment we’ll actually put dynamic members to a more practical use. The main benefit of dynamic members is to give the end-user the ability to add (or remove) their own members. But, if they have to go to the Business Rules section of Planning every time to do so, the process will get old in a hurry. Additionally, if you’ve never used menu’s in Planning, we’ll make excellent use of them today.
The first step in this process is to create out custom menus. Follow these steps to create the necessary menus:
- Click Administration, then Manage, then Menus.

- Click the Add Menu button.

- Enter Manage Entities for the name and click OK.

- Click on the newly created Manage Entities and click the Edit Menu button.

- Click on the Add Child button.

- Enter the following and click Save:

- Click on the newly added Managed Entities parent menu item and click the Add Child button.

- Enter the following and click Save (remember we created our business rule in Part 1):

- Click on the newly added Add Entity child and click the Add Sibling button.

- Enter the following and click Save:

Once we have our menu ready, we can create our form and add the newly created menus. Follow these steps to create the new form:
- Create a new form.

- Enter the following and click Next.

- Modify your dimension to match the following and click Next.

- Add Manage Entities to the Selected Menus list and click Finish.

- Open the form and test out your new right-click menu.

Now you have a form that can be used to allow users to input their own members in a custom plan type!
Now that I have my Rapid Deployment completed, I can start to use some of the new features in 11.1.2.4. Today we will focus on the new ability to create dynamic members in Planning. Now, I know what you are thinking, “We can already do that in 11.1.2.3.” And to a point you would be right. As long as you just want to add new members one of the module Plan Types (Workforce, CapEx, PFP), you can add dynamic members. But, for those of us that have custom Plan Types (yes…everyone), Oracle has finally added this functionality beyond the modules. In part 1 of this 2-part series, we’ll run through the entire process of enabling dynamic members in a custom Plan Type. In part 2, we’ll use custom menu’s and a form to quickly enable users to add and delete those custom members. Here we go…
- Open the Dimension section of your Planning application (I’ll be using the Vision application that we created here).
- Select the Entity dimension.
- Create a Sibling Member to the Management Rollup member (or any member of your choice).
- Enter details as shown here:
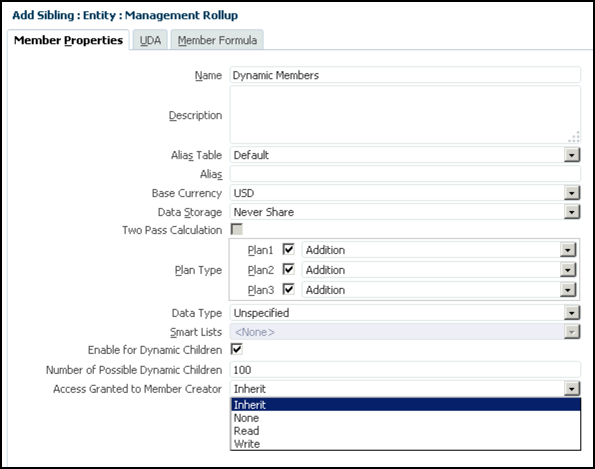
That takes care of the easy steps. You can now add up to 100 members to the new Dynamic Members parent. We chose inherit for the access granted. This let’s us maintain the proper level of security for these members based on the security of the parent. You can also say they have no access to the members by selecting None, read-only access by selecting Read, and write-back access using Write. It’s important to note that if you want to give the users the ability to delete members, you must give them Write access.
Now that we’ve created the parent, let’s take a look at what happens on the back-end in Essbase. Be sure to refresh the database from Planning, and then open the outline in EAS. You should see something like this:
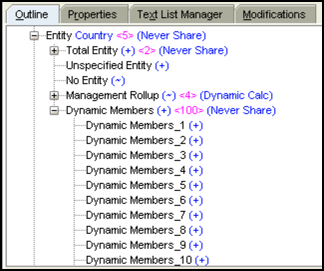
Compared to this in Planning:
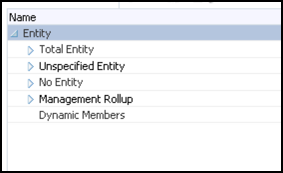
So the data is stored in Essbase just like a traditional TBD would be in the “old days”, but we don’t actually show the members in Planning. This makes things a bit tricky from an Essbase Add-In perspective, but this is 11.1.2.4, so you should be two versions removed from that (or if you are like me…you still have it installed with the In2Hyperion Add-In). We’ll revisit this shortly, once we get Planning to actually let us add a member. So let’s go ahead and enable the end-user to actually add members:
- We’ll start by adding a run-time prompt. Open Calculation Manager and open the Variable Designer.

- Expand Planning and then expand Vision. Right-click on Plan1 and click New.
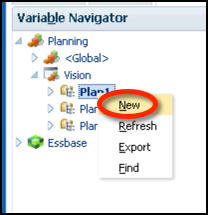
- Enter the details and shown here:

- Now let’s go back to the System View and create our two business rules (one for add, one for delete). Expand Planning,Vision, and Plan1. Right-click on Rules and click New.
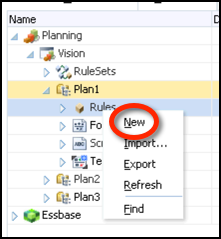
- Enter the details shown here:
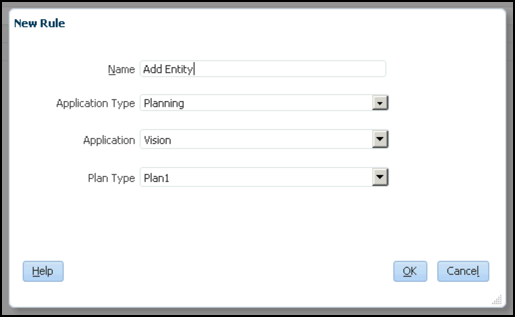
- Enter the details shown here:
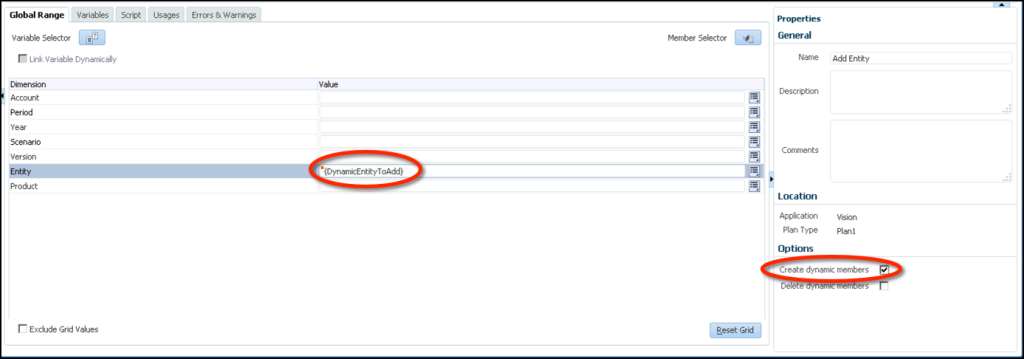
- Save the Rule.
- Modify the rule as show here:
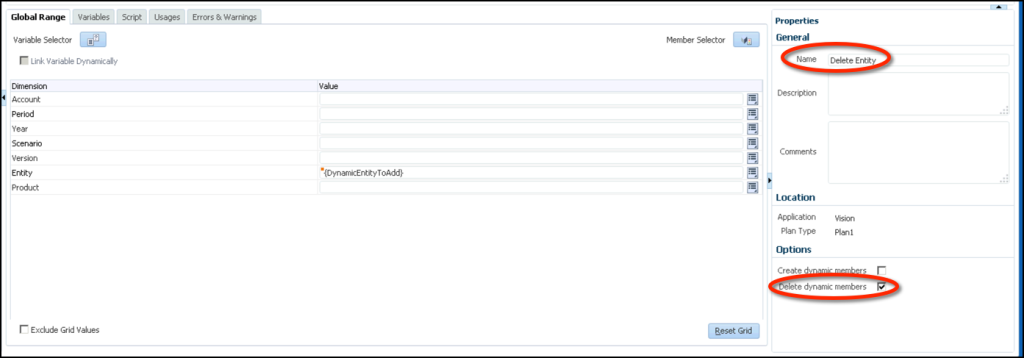
- Save the rule as:
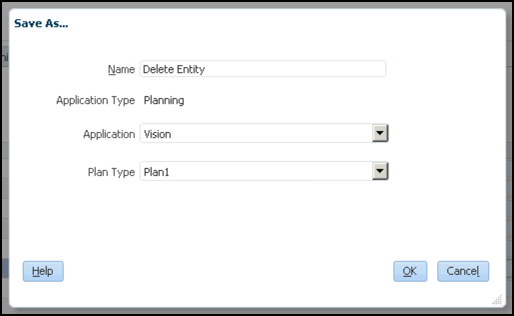
- Deploy the rules to Planning.
Now we should be able to run our newly created Business Rule and actually add a member. The business rule should have one prompt, the member name:
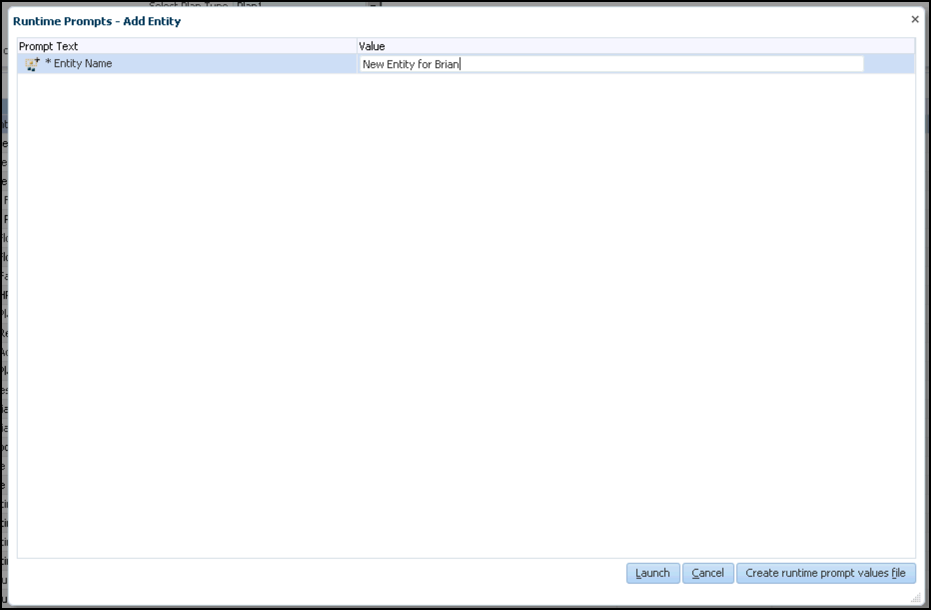
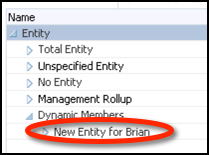
Once we’ve entered a member name and launched the rule, we should be able to see the new member in the Entity dimension:
Now what does this look like in Essbase? First let’s take a look at it without refreshing Essbase:

Now let’s refresh the database from Planning and see what we get:
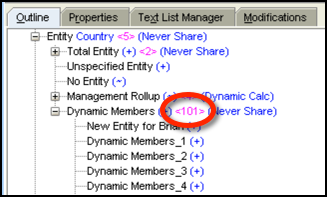
The first thing we see is that the new member exists in Essbase now. So the TBD logic has been converted over to a physical member. Next we notice that the number of children for our Dynamic Members parent is now 101. So the refresh process has reset the number of members that we can dynamically add back to 100. And that’s it…we now have dynamic members working in custom Plan Types.
In the next post on this topic we’ll go into how we actually make this useful. Because having the users go through and launch a Business Rule as necessary is not exactly user friendly.
So you finally get everything working on your shiny new 11.1.2.4 Rapid Deployment and now its time to finally take a look at Planning. The problem is, we don’t have an app. The even bigger problem (for me and anyone else used to SQL Server) is that we don’t even have a data source for our application if we had one. For those of you that are familiar with Oracle 11g, this probably isn’t a problem and you are already using a fresh application that you just created. If, however, you are still reading…then you might be a little lost as to what to do next. Before we go through these steps…I’m the furthest thing imaginable from an Oracle DBA, so if anything I’m doing isn’t necessarily “Best Practice”, feel free to leave me a comment on how we could do it better.
Before we can create a Planning application, we of course need our repository. Since we used a Rapid Deployment, unless we want to install SQL Server, we have to use Oracle 11g as our data source. We’ll start by opening up Enterprise Manager so that we can create a new user. Follow these steps to get your user set up:
- Navigate to Database Control – admin in the start menu:

- Once Enterprise Manager has opened in your browser, enter SYSTEM for the username and the password you defined for your Rapid Deployment as the password while leaving Normal selected.

- Click on Server in the top menu area.

- Click on Users under the Security section.

- With the ADMIN user and Create Like action selected, click Go.

- Enter Vision for Name, enter a password twice, and click OK.

- Verify that the user was created successfully.

Once our database user has been created, we are ready to create our actual Planning sample application. Follow these steps to set up your sample application:
- Log into workspace and click Navigate, Administer, Planning Administration.

- Click on Manage Data Source and click the add data source plus sign.

- Enter localhost for Server, 1521 for Port, admin for SID, Vision for User, and your password for Password under Application Database. Enter localhost for Server, admin for User, and your Rapid Deployment password for Password under Essbase Server. Validate your connections and then click Save.

- Click Manage Applications and click the add application plus sign.

- Select your Vision data source, enter Vision for Application, select Sample for Application Type and click Next.

- Verify the information and click Create.

- Wait for the application to be created and populated with meta-data and data.

- Enjoy your new sample app rather than creating one from scratch.
So with that, you should be ready to start working with Planning on your Rapid Deployment!
So 11.1.2.4 just came out and you are thinking to yourself…I bet that’s cool. Well, there’s only one way to find out. Set it up! In this post we’ll go through the absolute quickest way to start playing with 11.1.2.4 in your very own virtual machine. So what’s the fastest way (not necessarily the best…but I’m impatient)? Rapid deployment!
Before we get started, let’s talk about what Rapid Deployment is. Essentially, Oracle has given us a wizard to install all of the required product related to Hyperion Planning on a Windows system with very little required to make it all work. What do you get?
- Planning
- Essbase
- Calculation Manager
- Financial Reports
- Smart View for Office (assuming you have Office 2010 installed on your server instance)
- Oracle Database 11g
- Weblogic Server
What don’t you get?
- EPMA
- Standalone Essbase Connectivity via Smart View
- Pre-installed Sample Applications
So now that we know what we’re getting when we are done, let’s get started! First, we’ll need to get a virtual machine configured. I’ll leave the steps on this to you, as if you are reading this, there is a good chance you don’t need these steps anyway. Here are the recommended specifications of your server or virtual server as the case may be:
- Quad Core CPU
- 16GB RAM (I find that 12 is likely plenty for those of you with 16GB laptops that still want to be able to actually use them)
- 200GB Storage (I set my VM up with 60GB and after I’m completely done, I still have nearly 20GB free)
You can use VMWare on your laptop, something cloud-based (like AWS), or in my case VMWare ESXi on my server at home (yes, I’m a nerd, just ask my wife). Now that we have our hardware ready, we need to install some software:
- Microsoft Windows Server 2008 R2 (it may work on 2012 since it is now officially supported, but guide says 2008 R2)
- Microsoft Office 2010
- Microsoft .net 4.0
- Firefox (because who uses IE any more anyway?)
- 7-zip and Notepad++ (so these may not be required, but I always find them handy to have around)
So we finally have our system ready to go, it’s time to start downloading 11.1.2.4. You can refer to the Rapid Deployment guide from Oracle here:
http://docs.oracle.com/cd/E57185_01/epm.1112/epm_planning_rapid_deploy/epm_planning_rapid_deploy.html
This guide is actually pretty complete, but there are a few problems. First, at the time of this blog post, the edelivery site doesn’t actually have 11.1.2.4. This means thats outside of Oracle Database 11g, you can’t actually get anything you need from edelivery. Use this link to get to the files you need for now:
http://www.oracle.com/technetwork/middleware/performance-management/downloads/index.html
Once you go to this link, you will have to spend a bit of time finding all the files needed, but they are all there. Between these files and your Oracle DB files, you should have all of the following:
Unzip all of these files into one directory with no spaces and you should be ready to go. Beyond this, the guide should get you from start to finish with no major issues. I will say that I had to run through the Wizard twice, as the first time I clicked back and forth between the command line that opened to install Oracle 11g and the Wizard. For whatever reason, that seems to have bombed the installation. So just let it go and don’t click on anything!
If everything went as planned, you should be able to fire up Firefox (or IE if you really want to), and go to your shiny new workspace:

Now we have everything installed and all of our services are started and everything is great. But wait! We don’t have a Planning application to play with. And surely we don’t want to create one from scratch (again…impatient). Our next post will continue with the impatient theme and get you into a sample application in a hurry. Having always used SQL Server, there was a bit of a learning curve for me.


 That is not terribly promising. In fact, it just plainly says absolutely nothing about drill-through. It doesn’t even mention ASO at all. But hey, let’s follow the instructions and patch our system anyway. Flash forward a few minutes, or hours depending on your installation and we should be ready to try it out again:


