I’ve spent a lot of time lately on homelab topics, so I thought I would take a break and put together a post on an EPM topic! Today we’ll be talking about PBCS backups.
Why Do We Need PBCS Backups
You might be thinking, “Why do I need PBCS backups when Oracle does that for me?” That’s an excellent question. The problem is that while Oracle does perform nightly backups of PBCS, they overwrite that backup each night. So at any given time I only have one backup. To make things even worse, Oracle has a size limit on your PBCS instance. That limit is 150GB. This means that even if we had multiple backups on our pod, we’ll eventually start losing them to the data retention policies.
So what do we do? We generate a new backup every night and download it to a local server. The good news is that you almost certainly have a local server already running EPM Automate. EPM Automate is the automation tool for Oracle’s EPM Cloud suite. You can use EPM Automate to load data, execute calculations, update meta-data, and…perform backups. So, we’ve established that we likely need more than a single night of backups, but how many do we need? This will depend on a few things like the size of your applications and the frequency of change. For our example, we will keep 30 days of daily backups.
Batch vs. PowerShell
Now that we have determined what we are backing up and how many backups we need to keep, we need to move on to actually performing the backups. With EPM Automate, we have two commonly used options. First, we have the old-school method of a batch file. Batch files are great because they just work and you can find a ton of information on the web about how to do things. Batch are, however, very limited in their ability to do things like e-mail notifications and remote calls without external tools. That brings us to PowerShell. PowerShell is essentially a batch that has the full set of .NET programming capability along with other goodies not directly from .NET. What does that mean exactly? That means there is very little I can’t do in PowerShell.
Directory Configuration
Before we configure anything, we need to get a folder structure put together to support scripting, logging, and the actual backup files. You may already have a structure for your automation processes, but for our example, it will look something like this:
- C:\Oracle
- C:\Oracle\Automation
- C:\Oracle\Automation\Backup
- C:\Oracle\Automation\Log
EPM Automate Configuration
EPM Automate is a great tool, but we do need to perform a little bit of setup to get going. For instance, while EPM Automate supports plain text passwords, that wouldn’t pass muster with most IT security groups. So before we get into PowerShell, let’s encrypt our password. This is a fairly easy process. We’ll start up a command prompt and change directory to our EPM Automate bin directory:
cd\
cd Oracle\EPM_Automate\bin
Once we are in the right directory, we can encrypt our password:
epmautomate.bat encrypt YourPasswordGoesHere PickYourKey c:\Oracle\Automation\password.epw
Here are the parameters:
- Command – the command EPM Automate will execute
- Password – the password of the account you plan to use
- Key – you specify anything you want to use to encrypt the password
- Password File – The full path and file name of the password file that will be generated
- c:\Oracle\Automation\password.epw
Once we execute the command, we should have our password file so that we can continue. It should look something like this:

Backing Up PBCS with PowerShell
For our first part of this mini-series, we’ll stick with just a basic backup that deletes older backups. In our next part of the series, we’ll go deeper into error handling and notifications. Here’s the code..
Path Variables
#Path Variables
$EpmAutomatePath = "C:\Oracle\EPM_Automate\bin\epmautomate.bat"
$AutomationPath = "C:\Oracle\Automation"
$LogPath = "C:\Oracle\Automation\Log"
$BackupPath = "C:\Oracle\Automation\Backup"
We’ll start by defining our path variables. This will include paths to EPM Automate, our main automation directory, our log path, and our backup path.
Date Variables
#Date Variables
$DaysToKeep = "-30"
$CurrentDate = Get-Date
$DatetoDelete = $CurrentDate.AddDays($DaysToKeep)
$TimeStamp = Get-Date -format "yyyyMMddHHmm"
$LogFileName = "Backup" + $TimeStamp + ".log"
Next we’ll define all of our data related variables. This includes our days to keep (which is negative on purpose as we are going back in time), our current date, the math that gets us back to our deletion period, a timestamp that will be used for various things, and finally our log file name based on that timestamp.
PBCS Variables
#PBCS Variables
$PBCSdomain = "yourdomain"
$PBCSurl = "https://usaadmin-test-yourdomain.pbcs.us2.oraclecloud.com"
$PBCSuser = "yourusername"
$PBCSpass = "c:\Oracle\Automation\password.epw"
Now we need to set our PBCS variables. This will include our domain, the URL to our instance of PBCS, the username we’ll use to log in, and the path to the password file that we just finished generating.
Snapshot Variables
#Snapshot Variables
$PBCSExportName = "Artifact Snapshot"
$PBCSExportDownloadName = $PBCSExportName + ".zip"
$PBCSExportRename = $PBCSExportName + $TimeStamp + ".zip"
We’re nearing the end of variables as we define our snapshot specific variables. These variables will tell us the name of our export, the name of the file that we are downloading based on that name, and the new name of our snapshot that will include our timestamp.
Start Logging
#Start Logging
Start-Transcript -path $LogPath\$LogFileName
I like to log everything so that if something does go wrong, we have a chance to figure it out after the fact. This uses the combination of our log path and log file name variables.
Log Into PBCS
#Log into PBCS
Write-Host ([System.String]::Format("Login to source: {0}", [System.DateTime]::Now))
&$EpmAutomatePath "login" $PBCSuser $PBCSpass $PBCSurl $PBCSdomain
We can finally log into PBCS! We’ll start by displaying our action and the current system time. This way we can see how long things take when we look at the log file. We’ll then issue the login command using all of our variables.
Create the Snapshot
#Create PBCS snapshot
Write-Host ([System.String]::Format("Export snapshot from source: {0}", [System.DateTime]::Now))
&$EpmAutomatePath exportsnapshot $PBCSExportName
Again we’ll display our action and current system time. We then kick off the snapshot process. We do this because we want to ensure that we have the most recent snapshot for our archiving purposes.
Download the Snapshot
#Download PBCS snapshot
Write-Host ([System.String]::Format("Download snapshot from source: {0}", [System.DateTime]::Now))
&$EpmAutomatePath downloadfile $PBCSExportName
Once the snapshot has been created, we’ll move on to downloading the snapshot after we display our action and current system time.
Archive the Snapshot
#Rename the file using the timestamp and move the file to the backup path
Write-Host ([System.String]::Format("Rename downloaded file: {0}", [System.DateTime]::Now))
Move-Item $AutomationPath\$PBCSExportDownloadName $BackupPath\$PBCSExportRename
Once the file has been downloaded, we can then archive the snapshot to our backup folder as we rename the file.
Delete Old Snapshots
#Delete snapshots older than $DaysToKeep
Write-Host ([System.String]::Format("Delete old snapshots: {0}", [System.DateTime]::Now))
Get-ChildItem $BackupPath -Recurse | Where-Object { $_.LastWriteTime -lt $DatetoDelete } | Remove-Item
Now that we have everything archived, we just need to delete anything older than our DateToDelete variable.
Log Out of PBCS
#Log out of PBCS
Write-Host ([System.String]::Format("Logout of source: {0}", [System.DateTime]::Now))
&$EpmAutomatePath "logout"
We’re almost done and we can now log out of PBCS.
Stop Logging
#Stop Logging
Stop-Transcript
Now that we have completed our process, we’ll stop logging
The Whole Shebang
#Path Variables
$EpmAutomatePath = "C:\Oracle\EPM_Automate\bin\epmautomate.bat"
$AutomationPath = "C:\Oracle\Automation"
$LogPath = "C:\Oracle\Automation\Log"
$BackupPath = "C:\Oracle\Automation\Backup"

#Date Variables
$DaysToKeep = "-30"
$CurrentDate = Get-Date
$DatetoDelete = $CurrentDate.AddDays($DaysToKeep)
$TimeStamp = Get-Date -format "yyyyMMddHHmm"
$LogFileName = "Backup" + $TimeStamp + ".log"

#PBCS Variables
$PBCSdomain = "yourdomain"
$PBCSurl = "https://usaadmin-test-yourdomain.pbcs.us2.oraclecloud.com"
$PBCSuser = "yourusername"
$PBCSpass = "c:\Oracle\Automation\password.epw"

#Snapshot Variables
$PBCSExportName = "Artifact Snapshot"
$PBCSExportDownloadName = $PBCSExportName + ".zip"
$PBCSExportRename = $PBCSExportName + $TimeStamp + ".zip"

#Start Logging
Start-Transcript -path $LogPath\$LogFileName

#Log into PBCS
Write-Host ([System.String]::Format("Login to source: {0}", [System.DateTime]::Now))
&$EpmAutomatePath "login" $PBCSuser $PBCSpass $PBCSurl $PBCSdomain

#Create PBCS snapshot
Write-Host ([System.String]::Format("Export snapshot from source: {0}", [System.DateTime]::Now))
&$EpmAutomatePath exportsnapshot $PBCSExportName

#Download PBCS snapshot
Write-Host ([System.String]::Format("Download snapshot from source: {0}", [System.DateTime]::Now))
&$EpmAutomatePath downloadfile $PBCSExportName

#Rename the file using the timestamp and move the file to the backup path
Write-Host ([System.String]::Format("Rename downloaded file: {0}", [System.DateTime]::Now))
Move-Item $AutomationPath\$PBCSExportDownloadName $BackupPath\$PBCSExportRename

#Delete snapshots older than $DaysToKeep
Write-Host ([System.String]::Format("Delete old snapshots: {0}", [System.DateTime]::Now))
Get-ChildItem $BackupPath -Recurse | Where-Object { $_.LastWriteTime -lt $DatetoDelete } | Remove-Item

#Log out of PBCS
Write-Host ([System.String]::Format("Logout of source: {0}", [System.DateTime]::Now))
&$EpmAutomatePath "logout"

#Stop Logging
Stop-Transcript
The Results
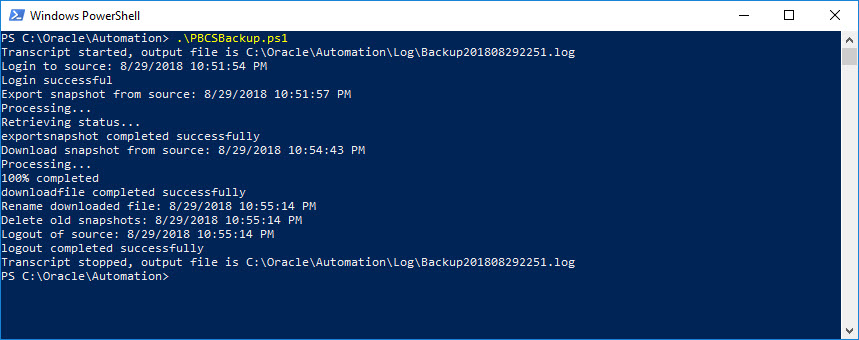
Once you execute the PowerShell script, you should see something like this:

Conclusion
There we have it…a full process for backing up your PBCS instance. The last step would be to set up a scheduled task to execute once a day avoiding your maintenance window.
Brian Marshall
August 29, 2018
There are no less than three blog posts about running a batch script from Workspace floating around the internet. I believe the first originated from Celvin here. While this method works great for executing a batch, you are still stuck with a batch. Not only that, but if you update that batch, you have to go through the process of replacing your existing batch. This sounds easy, but if you want to keep your execution history, it isn’t. Today we’ll use a slightly modified version of what Celvin put together all those years ago. Instead of stopping with a batch file, we’ll execute PowerShell from Workspace.
Introduction to PowerShell
In short, PowerShell is a powerful shell built into most modern versions of Windows (both desktop and server) meant to provide functionality far beyond your standard batch script. Imagine a world where you can combine all of the VBScript that you’ve linked together with your batch scripts. PowerShell is that world. PowerShell is packed full of scripting capabilities that make things like sending e-mails no longer require anything external (except a mail server of course). Basically, you have the power of .NET in batch form.
First an Upgrade
We’ll start out with a basic batch, but if you look around at all of the posts available, none of them seem to be for 11.1.2.4. So, let’s take his steps and at least give them an upgrade to 11.1.2.4. Next, we’ll extend the functionality beyond basic batch files and into PowerShell. First…the upgrade.
Generic Job Applications
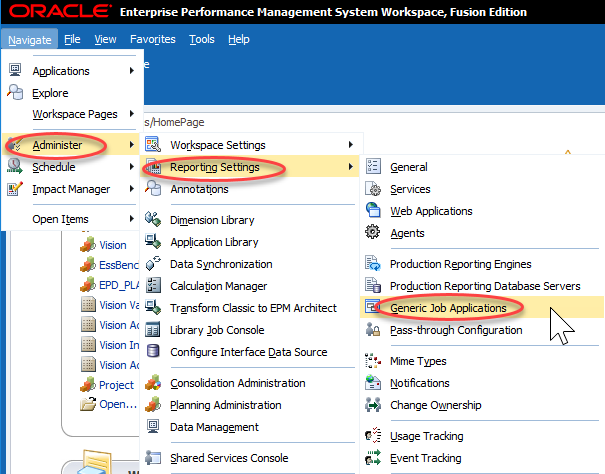
I’ll try to provide a little context along with my step-by-step instructions. You are probably thinking…what is a Generic Job Application? Well, that’s the first thing we create. Essentially we are telling Workspace how to execute a batch file. To execute a batch file, we’ll use cmd.exe…just like we would in Windows. Start by clicking Administer, then Reporting Settings, and finally Generic Job Applications:
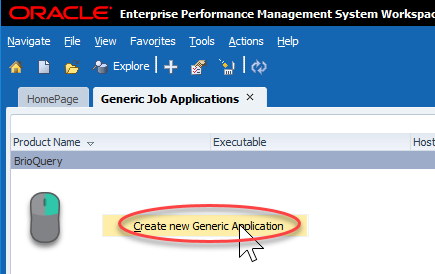
This will bring up a relatively empty screen. Mine just has BrioQuery (for those of you that remember what that means…I got a laugh). To create a new Generic Job Application, we have to right-click pretty much anywhere and click Create new Generic Application:
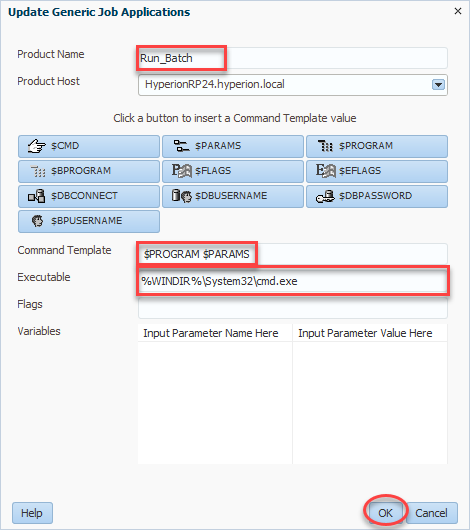
For product name, we’ll enter Run_Batch (or a name of your choosing). Next we select a product host which will be your R&A server. Command template tells Workspace how to call the program in question. In our case we want to call the program ($PROGRAM) followed by any parameters we wish to define ($PARAMS). All combined, our command template should read $PROGRAM $PARAMS. Finally we have our Executable. This will be what Workspace uses to execute our future job. In our case, as preiovusly mentioned, this will be the full path to cmd.exe (%WINDIR%\System32\cmd.exe). We’ll click OK and then we can move on to our actual batch file:
The Batch
Now that we have something to execute our job, we need…our job. In this case we’ll use a very simple batch script with just one line. We’ll start by creating this batch script. The code I used is very simple…call PowerShell script:
%WINDIR%\system32\WindowsPowerShell\v1.0\powershell.exe e:\data\PowerShellTest.ps1
So, why don’t I just use my batch file and perform all of my tasks? Simple…PowerShell is unquestionably superior to a batch file. And if that simple reason isn’t enough, this method also let’s us separate the job we are about to create from the actual code we have to maintain in PowerShell. So rather than making changes and having to figure out how to swap out the updated batch, we have this simple batch that calls something else on the file system of the reporting server. I’ve saved my code as BatchTest.bat and now I’m ready to create my job.
The Job
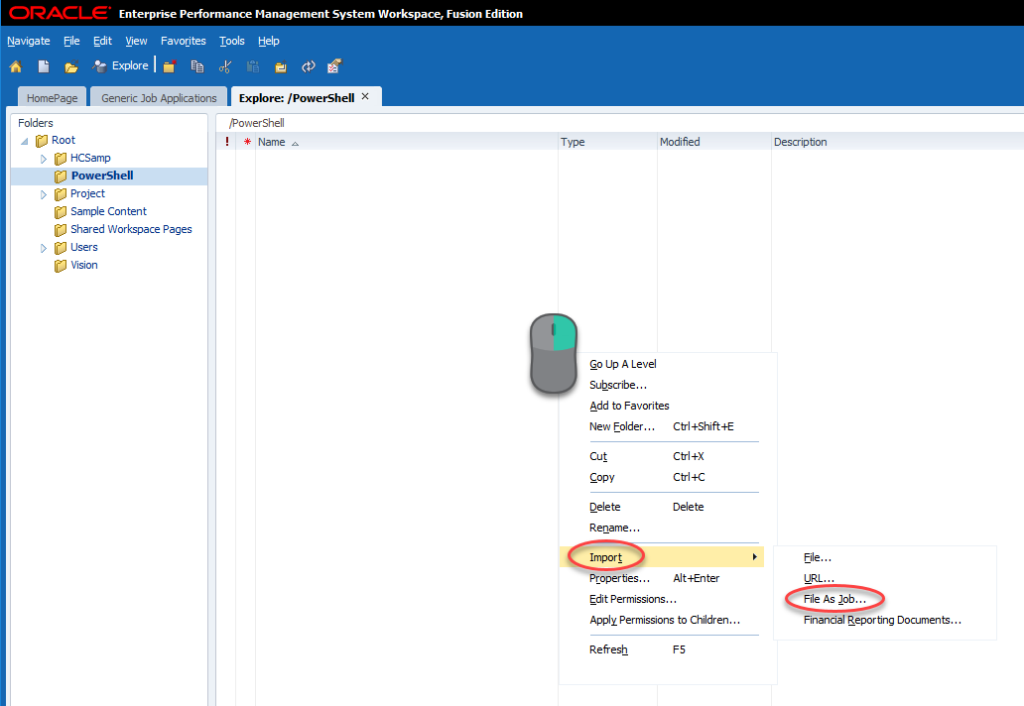
We’ll now import our batch file as a job. To do this we’ll go to Explore, find a folder (or create a folder) that we will secure for only people that should be allowed to execute our batch process. Open that folder, right-click, and click Import and then File As Job…:
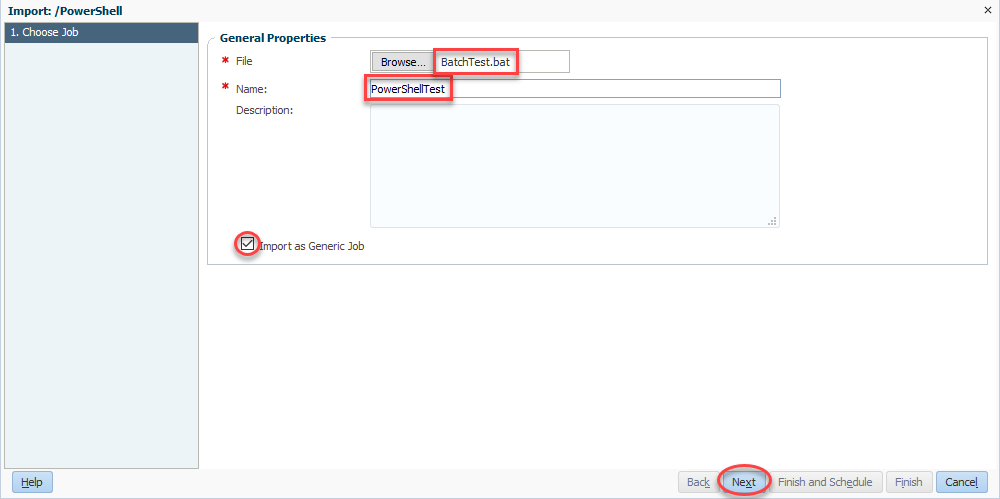
We’ll now select our file (BatchTest.bat) and then give our rule a name (PowerShellTest). Be sure to check Import as Generic Job and click Next:
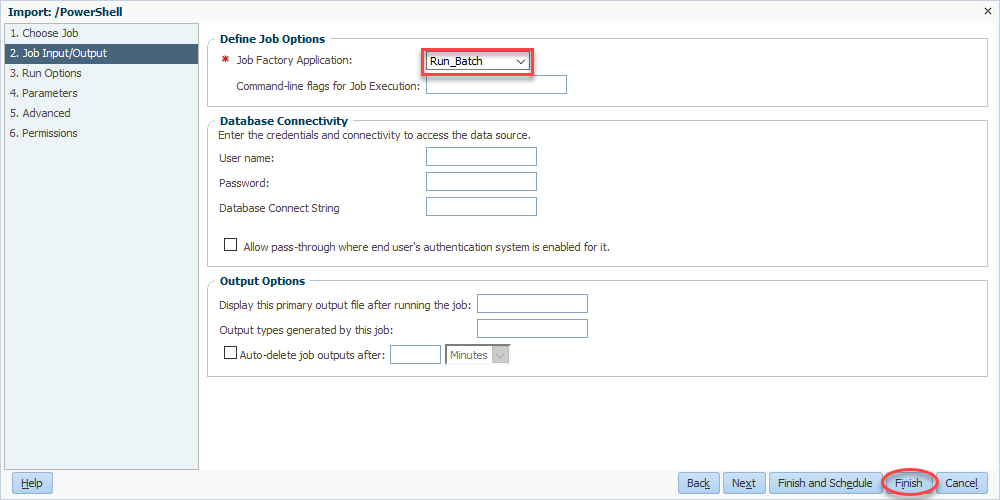
Now we come full circle as we select Run_Batch for our Job Factory Application. Finally, we’ll click finish and we’re basically done:
Simple PowerShell from Workspace
Wait! We’re not actually done! But we are done in Workspace, with the exception of actually testing it out. But before we test it out, we have to go create our PowerShell file. I’m going to start with a very simple script that simple writes the username currently executing PowerShell to the screen. This let’s us do a few things. First, it let’s you validate the account used to run PowerShell. This is always handy to know for permissions issues. Second, it let’s you make sure that we still get the output of our PowerShell script inside of Workspace. Here’s the code:
$User = [System.Security.Principal.WindowsIdentity]::GetCurrent().Name
Write-Output $User
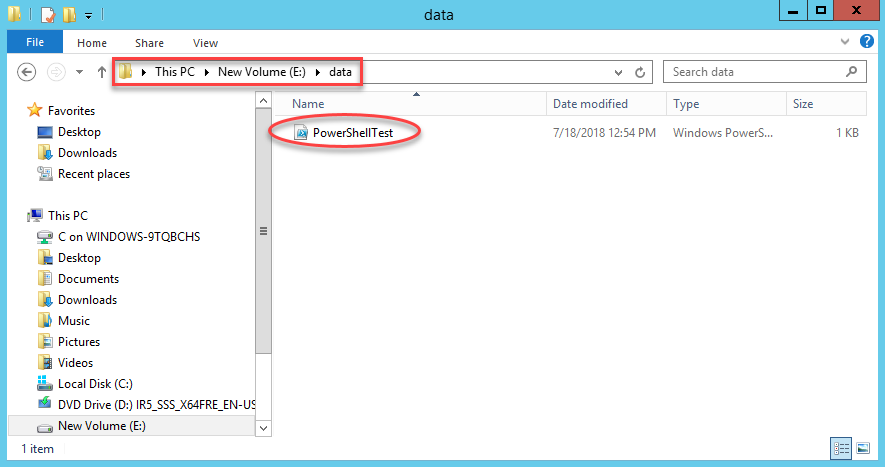
Now we need to make sure we put this file in the right place. If we go back up to the very first step in this entire process, we select our server. This is the server that we need to place this file on. The reference in our batch file above will be to a path on that system. In my case, I need to place the file into e:\data on my HyperionRP24 server:
Give it a Shot
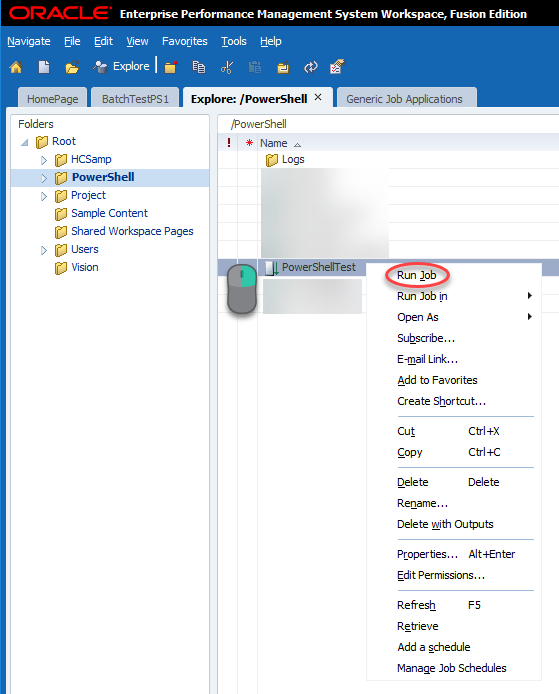
With that, we should be able to test our batch which will execute PowerShell from Workspace. We’ll go to Explore and find our uploaded job, right-click, and click Run Job:
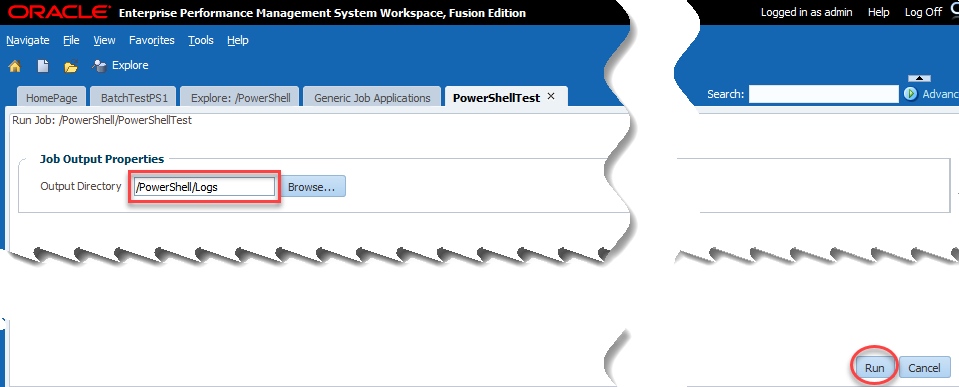
Now we have the single option of output directory. This is where the user selects where to place the log file of our activities essentially. I choose the logs directory that I created:
If all goes according to plan, we should see a username:

As we can see, my PowerShell script was executed by Hyperion\hypservice which makes sense as that’s my Hyperion service used to run all of the Hyperion services.
Now the Fun
We have successfully recreated Celvin’s process in 11.1.2.4. Now we are ready to extend his process further with PowerShell. We already have our job referencing our PowerShell script stored on the server, so anything we choose to do from here on out can be independent of Hyperion. And again, running PowerShell from Workspace gives us so much more functionality, we may as well try some of it out.
One Server or Many?
In most Hyperion environments, you have more than one server. If you have Essbase, you probably still have a foundation server. If you have Planning, you might have Planning, Essbase, and Foundation on three separate machines. The list of servers goes on and on in some environments. In my homelab, I have separate virtual machines for all of the major components. I did this to try to reflect what I see at most clients. The downside is that I don’t have everything installed on every server. For instance, I don’t have MaxL on my Reporting Server. I also don’t have the Outline Load Utility on my Reporting Server. So rather than trying to install all of those things on my Reporting Server, some of which isn’t even supporting, why not take advantage of PowerShell. PowerShell has the built-in capability to execute commands on remote servers.
Security First
Let’s get started by putting our security hat on. We need to execute a command remotely. To do so, we need to provide login credentials for that server. We generally don’t want to do this in plain text as somebody in IT will throw a flag on the play. So let’s fire up PowerShell on our reporting server and encrypt our password into a file using this command:
read-host -prompt "Password?" | ConvertTo-SecureString -AsPlainText -Force | ConvertFrom-SecureString | Out-File "PasswordFile.pass"
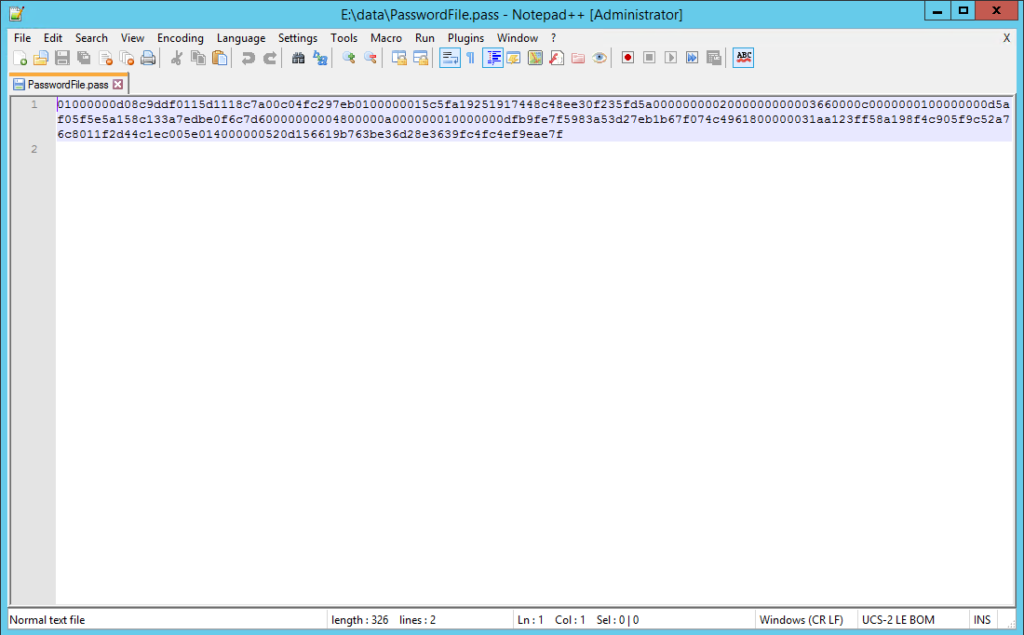
This command requires that you type in your password which is then converted to a SecureString and written to a file. It’s important to note that this encrypted password will only work on the server that you use to perform the encryption. Here’s what this should look like:

If we look at the results, we should have an encrypted password:
Now let’s build our PowerShell script and see how we use this password.
Executing Remotely
I’ll start with my code which executes another PowerShell command on our remote Essbase Windows Server:
###############################################################################
#Created By:	Brian Marshall
#Created Date:	7/19/2018
#Purpose:		Sample PowerShell Script for EPMMarshall.com
###############################################################################

###############################################################################
#Variable Assignment
###############################################################################
#Define the username that we will log into the remote server
$PowerShellUsername = "Hyperion\hypservice"
#Define the password file that we just created
$PowerShellPasswordFile = "E:\Data\PasswordFile.pass"
#Define the server name of the Essbase server that we will be logging into remotely
$EssbaseComputerName = "HyperionES24V"
#Define the command we will be remotely executing (we'll create this shortly)
$EssbaseCommand = {E:\Data\RemoteSample\RemoteSample.ps1}

###############################################################################
#Create Credential for Remote Session
###############################################################################
$PowerShellCredential=New-Object -TypeName System.Management.Automation.PSCredential -ArgumentList $PowerShellUsername, (Get-Content $PowerShellPasswordFile | ConvertTo-SecureString)

###############################################################################
#Create Remote Session Using Credential
###############################################################################
$EssbaseSession = New-PSSession -ComputerName $EssbaseComputerName -credential $PowerShellCredential


###############################################################################
#Invoke the Remote Job
###############################################################################
$EssbaseJob = Invoke-Command -Session $EssbaseSession -Scriptblock $EssbaseCommand 4>&1
echo $EssbaseJob

###############################################################################
#Close the Remote Session
###############################################################################
Remove-PSSession -Session $EssbaseSession
Basically we assign all of our variables, including the use of our encrypted password. Then we create a credential using those variables. We then use that credential to create a remote session on our target Essbase Windows Server. Next we can execute our remote command and write out the results to the screen. Finally we close out our remote connection. But wait…what about our remote command?
Get Our Remote Server Ready
Before we can actually remotely execute on a server, we need to start up PowerShell on that remove server and enable remote connectivity in PowerShell. So…log into your remote server and start PowerShell, and execute this command:
Enable-PSRemoting -Force
If all goes well, it should look like this:

If all doesn’t go well, make sure that you started PowerShell as an Administrator. Now we need to create our MaxL script and our PowerShell script that will be remotely executed.
The MaxL
First we need to build a simple MaxL script to test things out. I will simply log in and out of my Essbase server:
login $1 identified by $2 on $3;

logout;
The PowerShell
Now we need a PowerShell script to execute the MaxL script:
###############################################################################
#Created By:	Brian Marshall
#Created Date:	7/19/2018
#Purpose:		Sample PowerShell Script for EPMMarshall.com
###############################################################################

###############################################################################
#Variable Assignment
###############################################################################

$MaxLPath = "E:\Oracle\Middleware\user_projects\Essbase1\EssbaseServer\essbaseserver1\bin"
$MaxLUsername = "admin"
$MaxLPassword = "myadminpassword"
$MaxLServer = "hyperiones24v"

###############################################################################
#MaxL Execution
###############################################################################
& $MaxLPath\StartMaxL.bat E:\Data\RemoteSample\RemoteSample.msh $MaxLUsername $MaxLPassword $MaxLServer
This is as basic as we can make our script. We define our variables around usernames and servers and then we execute our MaxL file that logs in and out.
Test It First
Now that we have that built, let’s test it from the Essbase Windows Server first. Just fire up PowerShell and go to the directory where you file exists and execute it:
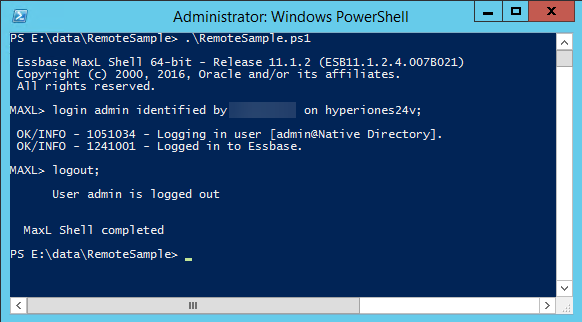
Assuming that works, now let’s test the remote execution from our reporting server:

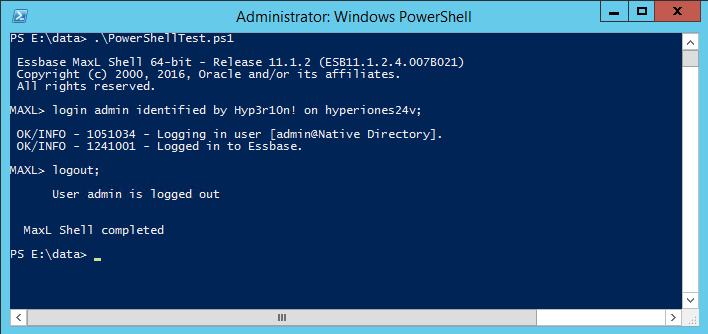
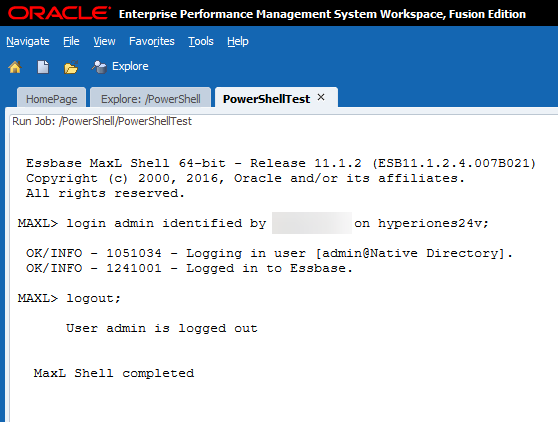
Looking good so far.. Now let’s head back to Workspace to see if we are done:
Conclusion
That’s it! We have officially executed a PowerShell script which remotely executes a PowerShell script which executes a MaxL script…from Workspace. And the best part is that we get to see all of the results from Workspace and the logs are stored there until we delete them. We can further extend this to do things like load dimensions using the Outline Load Utility or using PowerShell to send e-mail confirmations. The sky is the limit with PowerShell!
Brian Marshall
July 19, 2018
In our last PowerShell post, we covered using the Outline Load Utility with Hyperion Planning from PowerShell. But, now we have MaxL scripts doing data loads and Outline Load Utility scripts doing meta-data loads and they are happening on two different servers. We need a nice way to join all of this together in a single batch process controlled by one server. This let’s us have a true start-to-finish process that we can rely on.
But wait…how do we do that exactly? First we have some pre-work to get out of the way before we can actually execute a process remotely. To execute a process remotely, PowerShell has an invoke command that will create a remote session on another server with specified credentials and then execute a script. First, log into the server on which you will be executing remote commands. Start PowerShell with Administrative rights and execute this command:
Enable-PSRemoting -Force
Because we are passing credentials, we need to keep our password out of plain text. So, let’s start by opening up PowerShell and executing this command to generate an encrypted copy of our password:
"YourPasswordGoesHere" | ConvertTo-SecureString -AsPlainText -Force | ConvertFrom-SecureString | Out-File "PasswordFile.pass"
One quick note on passwords. If you have special characters that cause login failures, use the ` as an escape character in front of your special character. I’m using the password to my Hyperion Service account from my Hyperion domain. This generates a nice new file that we’ll use to pass our password later. For now, let’s focus on the reason you’re here…free code:
###############################################################################
#Created By:	Brian Marshall
#Created Date:	2/16/2016
#Purpose:		Sample PowerShell Script for HyperionEPM.com
###############################################################################

###############################################################################
#Variable Assignment
###############################################################################

$PowerShellUsername = "Hyperion\hypservice"
$PowerShellPasswordFile = "PasswordFile.pass"
$PlanningComputerName = "HyperionPL"
$PlanningCommand = {C:\Data\HyperionEPM\PowerShell\Blog2Sample1.ps1}

###############################################################################
#Create Credential for Remote Session
###############################################################################
$PowerShellCredential=New-Object -TypeName System.Management.Automation.PSCredential -ArgumentList $PowerShellUsername, (Get-Content $PowerShellPasswordFile | ConvertTo-SecureString)

###############################################################################
#Create Remote Session Using Credential
###############################################################################
$PlanningSession = New-PSSession -ComputerName $PlanningComputerName -credential $PowerShellCredential


###############################################################################
#Invoke the Remote Job
###############################################################################
$PlanningJob = Invoke-Command -Session $PlanningSession -Scriptblock $PlanningCommand
echo $PlanningJob

###############################################################################
#Close the Remote Session
###############################################################################
Remove-PSSession -Session $PlanningSession
And there you have it…set our variables, create a new credential for our connection, use that credential to create a remote session, execute a job, and kill the session. So what happens when we execute this?

Uh oh…is the PG version of what I actually said when I received this nice little message. But, upon some research, it appears that the Outline Load Utility uses more than 150 MB of memory on execution. But, the default limit for a remote session is 150 MB. So now we have to connect to our remote server and start up a administrative command prompt. Once you’ve done that, execute this:
winrm set winrm/config/winrs @{MaxMemoryPerShellMB="2048"}
You should get something like this if it goes properly:

Now then…we can try again…

We have a winner! We have officially remotely executed an Outline Load Utility script…on another computer. Cool isn’t it?
Brian Marshall
March 21, 2016
I was reminded recently that I promised to continue with PowerShell in my last PowerShell blog post, but that I hadn’t done it yet. I may have gotten a little caught up in my home lab series. So, if you were waiting and waiting for this, my apologies.
Now that we have a little bit of PowerShell working knowledge and we have it working with MaxL, let’s get serious about some of our other batch commands. Today we’ll focus on the outline load utility for Planning. If you’ve used this utility in your batch commands before, you can probably skip the first part of this blog post. If not, let’s first talk about what the outline load utility is. It may be the worst named utility that I’ve ever used. The outline load utility doesn’t actually load an outline at all. And to make matters worse…it’s not even just a meta-data tool.
The outline load utility allows us to load meta-data, numeric data, text-based data, build smart lists, and generally manage the back-end of Hyperion Planning from a batch script (or PowerShell). Today we’ll focus on getting the utility working in PowerShell. So where is this mythical utility? You should be able to find it here:
<epm install drive>:\Oracle\Middleware\user_projects\epmsystem1\Planning\planning1
You will actually find quite a few utilities in this directory. There are utilities for imports, exports, running business rules. This directory is why I will never wake up one day and say “I wish I had something to blog about.” I’ll literally never run out of content with all of these hidden gems out there. Here’s a sample:

Next we need to decide what we want to do with the utility and give it a shot. There are so many things that we can do with it, I’m going to stick with something really simple and use the 11.1.2.3.500 Sample Vision app for the demonstration. This way you should all be able to reproduce what we are doing.
So let’s first log into our Vision sample app and take an export of the Product dimension. Once inside our app, click on Administration then Import and Export and then Export Metadata to File.
Select our Product dimension from the list and click Run and we should have a great file to start playing with. When prompted, just save the file away and we’ll come back for it later.
Now let’s get back to our Planning server and start up PowerShell. Once we have our window open, let’s just change our directory and run the CMD file and see what happens:

You should get something totally useful like this:

Before we go any further, we need to go ahead and generate a password file for the load utility. This will allow us to execute our PowerShell script without needing to enter a password each time. To do this we just type in PasswordEncryption.cmd PasswordFile.pass. It should prompt you for a password. This will be the password to the username that we will eventually tell the load utility to use. Enter your password, press enter, and the file we need should be produced.

Now we are ready to load the file that we exported earlier from Workspace. I placed my exported file directly into the planning1 folder with the utility for my first execution just to make things simple. So first let’s look at the command, then we’ll pick it apart:
.\OutlineLoad.cmd -f:PasswordFile.pass /A:Vision /U:admin /I:admin_ExportedMetadata_Product.csv /D:Product /L:Product.log /X:Product.exc
| Parameter | Description | Value |
| -F: | Specifies the password file that we just generated so that we don't need to enter a password. | PasswordFile.pass |
| /A | Specifies the application that we are connecting to. | Vision |
| /U | Specifies the username that we are connecting with. | admin |
| /I | Specifies the file that we will be importing. | admin_ExportedMetadata_Product.csv |
| /D | Specifies the dimension that we will be loading. | Product |
| /L | Specifies the file to log our results to. | Product.log |
| /X | Specifies the file to write exceptions to. | Product.exc |
So what happens?

Success! And how about our log and exception files?

Great…they are there. Now let’s make this something worthy of PowerShell. To do that, we’ll make everything into a variable. I’ve created a folder on my Planning server to store my files and referenced that file in the following PowerShell script:
###############################################################################
#Created By:	Brian Marshall
#Created Date:	12/16/2015
#Purpose:		Sample PowerShell Script for HyperionEPM.com
###############################################################################

###############################################################################
#Variable Assignment
###############################################################################

$PlanningPath = "C:\Oracle\Middleware\user_projects\epmsystem1\Planning\planning1"
$PlanningUsername = "admin"
$PlanningPasswordFile = "PasswordFile.pass"
$PlanningApp = "Vision"
$PlanningDim = "Product"
$PlanningDimFile = "admin_ExportedMetadata_Product.csv"

$PlanningWorkingFolder = "C:\Data\HyperionEPM\PowerShell"

###############################################################################
#Outline Load Utility Execution
###############################################################################

& $PlanningPath\OutlineLoad.cmd -f:$PlanningPath\$PlanningPasswordFile /A:$PlanningApp /U:$PlanningUsername /I:$PlanningWorkingFolder\$PlanningDimFile /D:$PlanningDim /L:$PlanningWorkingFolder\$PlanningDim.log /X:$PlanningWorkingFolder\$PlanningDim.exc
Along with the file above, I’ve placed the Product file that we exported from Workspace. I’ve set the PlanningWorkingFolder variable to reflect the name of my folder and I should be ready to execute my new Product PowerShell script. But wait…I don’t want to schedule this process to run on the Planning server and another process to run on the Essbase server. I need them to run from the same place. We’ll cover that exact need in our next post…stay tuned!
Brian Marshall
February 29, 2016
It’s been a little while since my last post. Things have managed to get busy both at work and at home, but I’m happy to get back to it tonight. This post will focus on providing an introduction to PowerShell and how we can use it with Hyperion products.
So what is PowerShell and why do I care? If you use *nix…you don’t. But for those of us that have our Hyperion installations in a Windows environment, you should! In short, PowerShell is a powerful shell built into most modern versions of Windows (both desktop and server) meant to provide functionality far beyond your standard batch script. Imagine a world where you can combine all of the VBScript that you’ve linked together with your batch scripts. PowerShell is that world. PowerShell is packed full of scripting abilities that make things like sending e-mails no longer require anything external (except a mail server of course).
Where do I get PowerShell? Chances are, you already have it. If you are running Windows 7 or above, it is included by default. If you are running Window Server 2008 R2 or above, it is included by default. If for some reason you still don’t have it, go get it here:
https://www.microsoft.com/en-us/download/details.aspx?id=40855&WT.mc_id=rss_alldownloads_all
The building blocks of PowerShell are called cmdlets. Cmdlets can do things as simple as a directory listing or file copy and as complex as parsing logs and sending e-mails when errors occur. So let’s start by taking a look at a very simple PowerShell script:
#############################################################
#Created By:	Brian Marshall
#Created Date:	11/8/2015
#Purpose:		Sample PowerShell Script for HyperionEPM.com
#############################################################

dir
So that’s pretty simple. It looks very similar to a normal batch file. This just has comments at the beginning to let us know what the script is followed by a single command: dir. Before we dig a little deeper, let’s just try to execute this script:

Ok..maybe not simple? If you are running this on Windows Server 2008 R2 (or above), you will get the above. By default, it does not allow you run execute your own PowerShell scripting files. So let’s change that setting. Open a PowerShell window as an Administrator and execute this command:
Set-ExecutionPolicy RemoteSigned
Answer yes (Y) and we should be ready to try our code again:

And the script results:

Alright…now we’re headed in the right direction. So what just happened? It looks just like a batch script, right? Looks can be deceiving. What actually happened then? In PowerShell, the dir command is an alias for another command. Just like members can have aliases in the Hyperion world, cmdlets can have aliases in the PowerShell world. So what does dir actually do then? It executes the Get-ChildItem cmdlet. This cmdlet was intended to replicate the dir command functionality and adds a little more to it. If you are really interested in the Get-ChildItem cmdlet, check out TechNet for more information here:
https://technet.microsoft.com/en-us/library/ee176841.aspx
Now let’s try something we actually care about…MaxL! Let’s start with something simple, like starting MaxL from PowerShell:
###############################################################################
#Created By:	Brian Marshall
#Created Date:	11/8/2015
#Purpose:		Sample PowerShell Script for HyperionEPM.com
###############################################################################

###############################################################################
#Variable Assignment
###############################################################################

$MaxLPath = "C:\Oracle\Middleware\user_projects\epmsystem1\EssbaseServer\essbaseserver1\bin"

###############################################################################
#MaxL Execution
###############################################################################

& $MaxLPath\StartMaxL.bat
Looking at the script, we see that we first assign a variable. The syntax for this is simple (and similar to MaxL). We prefix the variable name with a dollar sign and set it equal to a value. Once the path to MaxL has been set to our variable, we can then execute MaxL. Notice that we use an ampersand followed by the variable for the path and then the rest of the path to the executable is just plain text on the line. So what happens?

As expected…MaxL starts. Now let’s do something slightly more complex (but still pretty simple) and actually execute a MaxL script:
###############################################################################
#Created By:	Brian Marshall
#Created Date:	11/8/2015
#Purpose:		Sample PowerShell Script for HyperionEPM.com
###############################################################################

###############################################################################
#Variable Assignment
###############################################################################

$MaxLPath = "C:\Oracle\Middleware\user_projects\epmsystem1\EssbaseServer\essbaseserver1\bin"
$MaxLUsername = "admin"
$MaxLPassword = "password"
$MaxLServer = "hyperiones"

###############################################################################
#MaxL Execution
###############################################################################

& $MaxLPath\StartMaxL.bat Blog1MaxL1.msh $MaxLUsername $MaxLPassword $MaxLServer
We’ve established a few more variables and chosen a MaxL file to execute. Let’s look athe MaxL while we’re at it:
login $1 identified by $2 on $3;

logout;
Ok…the world’s simplest MaxL script. And the results:

And there we have it! We’ve successfully integrated MaxL and PowerShell. Up next…we’ll start looking into combining Essbase and Planning…on different servers! While you wait, you can check out more PowerShell information here:
https://technet.microsoft.com/en-us/library/dd772285.aspx
Brian Marshall
November 9, 2015


