• The Planning Repository: HSP_OBJECT and HSP_OBJECT_TYPE


    Welcome to the first of a long series of posts describing the Planning Repository.  The point of this series is to describe many of the tables and their purpose inside of the relational repository that supports your Hyperion Planning applications.  Additionally, we’ll take a look at things like deleting a dimension or years from your application.

    First…a few disclaimers:

    • This is the fun stuff…that voids your warranty.  Not that you have to tell Oracle that you poke around here, but if you do, they will blame anything and everything that’s wrong on you for being in there.
    • The content here has been tested and validated against 11.1.2.3.500 and 11.1.2.4.
    • The content here has been tested and validated against Microsoft SQL Server and Oracle 11g.
    • The content here is based on the Vision sample application.
    • The content here is totally unsupported by Oracle (in case you missed the first bullet).

    We’ll start the series with the HSP_OBJECT table.  The HSP_OBJECT table is essentially the foundation for the repository.  Every object in Planning (forms, dimension members, task lists, etc.) will have a record in this table.  Let’s start by taking a look at the columns that make up the HSP_OBJECT table:

    Field NameSQL Server TypeOracle TypeDescription
    OBJECT_IDintNUMBER(38,0)The unique ID of the object. ÊThis is not an identity or auto-number field, rather it is actually generated internally by Hyperion Planning. ÊThe ID will be referenced throughout the repository in virtually every other table.
    OBJECT_NAMEvarchar(80)VARCHAR2(80 CHAR)The name of the object in Planning.
    OBJECT_DESCRIPTIONintNUMBER(38,0)The key value from the HSP_STRINGS table that references the description of the object.
    OBJECT_TYPEsmallintNUMBER(38,0)We'll cover this a little later when we get to the HSP_OBJECT_TYPE table. But in short, this is an integer value representing the type of object for the record (form, member, etc.). Sometimes this integer can be found in the HSP_OBJECT_TYPE table, sometimes it can't. More on this later.
    PARENT_IDintNUMBER(38,0)The OBJECT_ID of the parent for object.
    OWNER_IDintNUMBER(38,0)The OBJECT_ID of the owner of the object.
    GENERATIONintNUMBER(38,0)The generation of the object if applicable and 0 if not. Objects like members and Planning Units have generations while things like forms do not.
    POSITIONfloatFLOATThe sort-order for the object in relation to other objects in the hierarchy.
    HAS_CHILDRENsmallintNUMBER(38,0)The flag that determines if a member is a leaf or not. If the member has children and is therefore not a leaf, the value is 1, otherwise it is 0. So if you are looking for leaves, look for 0.
    MARKED_FOR_DELETEsmallintNUMBER(38,0)Members that have been deleted from Planning but not refreshed to Essbase will be marked for deletion with a value of 1. Otherwise this value should be 0.
    CREATEDdatetimeDATEThe date and time that the object was created.
    MODIFIEDdatetimeDATEThe date and time that the object was last modified.
    MOVEDdatetimeDATEThe date and time that the object was last moved.
    OLD_NAMEvarchar(80)VARCHAR2(80 CHAR)This field is used to maintain data in Essbase when a member is renamed. Prior to refreshing Essbase, the old name of the member will be here. Once the refresh is complete, the OBJECT_NAME and OLD_NAME will be the same.
    SECCLASS_IDintNUMBER(38,0)No longer used.
    REMOVABLEsmallintNUMBER(38,0)The flag that determins if a member can be deleted. If an object can be deleted, the value is 1, otherwise it is 0.
    MODIFIED_BYvarchar(80)VARCHAR2(80 CHAR)The user ID of the last user to modify the member. If you want any additional auditing of modifications to members, you have to hit the audit tables assuming you have them turned on.

    This table, for all of its importance to Planning isn’t all that interesting.  There are really only two fields that require a little more information than the table above.  The first is OBJECT_TYPE and the second is DESCRIPTION.  The OBJECT_TYPE field is of particular interest if you really look at the data.  For instance, if we were to check the OBJECT_TYPE contents against the HSP_OBJECT_TYPE table, we’ll find that not all types have made it into the table.  I’ve gone through and identified all of the types that I have in my sample application.  Here’s the full list:

    OBJECT_TYPETYPE_NAME from HSP_OBJECT_TYPETYPE_NAME Made Up By Brian
    1Folder
    2Dimension
    4Calendar
    5User
    6Group
    7Form
    9Currency
    10Alias
    11Cube
    12Planning Unit
    23NULLType for the parent of all task lists
    24NULLTask List
    25NULLTask List Item
    31Scenario
    32Account
    33Entity
    34Time Period
    35Version
    38Year
    39NULLPlanning Unit Hierarchy
    45Shared Member
    50User Defined Dimension Member
    51NULLPlanning Unit Selection
    103NULLMenu
    107NULLComposite Form
    115NULLCalculation Manager Rule
    116NULLCalculation Manager Rule Set
    117NULLCalculation Manager Variable
    118NULLType for the parent of Calculation Manager Rules
    119NULLType for the parent of Calculation Manager Rule Sets
    120NULLType for the parent of Calculation Manager Variables
    143NULLGood questionÉsomething related to Business Metrics

    Now let’s talk about DESCRIPTION.  This is the first occurence of the HSP_STRINGS table.  This table itself is pretty simple.  It’s just a list of strings used in various places inside of Planning.  I believe the idea here was to save space in the HSP_OBJECT table.  Descriptions could be quite (up to 255 characters) so why allocate space in a table for long strings when you can separate them out?  So how do we actually see the description?  A simple join:

    SQL Server and Oracle Code: 

    SELECT 
    	OBJECT_ID
    	,OBJECT_NAME
    	--,DESCRIPTION
    	,THE_STRING
    	,OBJECT_TYPE
    	,PARENT_ID
    	,OWNER_ID
    	,GENERATION
    	,POSITION
    	,HAS_CHILDREN
    	,MARKED_FOR_DELETE
    	,CREATED
    	,MODIFIED
    	,MOVED
    	,OLD_NAME
    	,SECCLASS_ID
    	,REMOVABLE
    	,MODIFIED_BY
    FROM 
    	HSP_OBJECT o
    LEFT JOIN
    	HSP_STRINGS s ON o.DESCRIPTION = s.STRING_SEQ

     The results of the query should render all of our objects along with their description (and every other field in the HSP_OBJECT table):

    SQL Server (Management Studio):

    HSP_OBJECT_QUERY_M

    Oracle (SQL Developer):

    HSP_OBJECT_QUERY_O

    That’s it for the HSP_OBJECT table!  Next we’ll start looking at the way Planning stores meta-data (the HSP_DIMENSION table first and then HSP_MEMBER). 

  • Adding Dynamic Members from a Form in 11.1.2.4


    In my last entry I demonstrated the use of dynamic members in Custom Plan Types.  In today’s installment we’ll actually put dynamic members to a more practical use.  The main benefit of dynamic members is to give the end-user the ability to add (or remove) their own members.  But, if they have to go to the Business Rules section of Planning every time to do so, the process will get old in a hurry.  Additionally, if you’ve never used menu’s in Planning, we’ll make excellent use of them today.

    The first step in this process is to create out custom menus.  Follow these steps to create the necessary menus:

    1. Click Administration, then Manage, then Menus.DynamicMembers17
    2. Click the Add Menu button.DynamicMembers18
    3. Enter Manage Entities for the name and click OK.DynamicMembers19
    4. Click on the newly created Manage Entities and click the Edit Menu button.DynamicMembers20
    5. Click on the Add Child button.DynamicMembers21
    6. Enter the following and click Save:DynamicMembers24
    7. Click on the newly added Managed Entities parent menu item and click the Add Child button.DynamicMembers23
    8. Enter the following and click Save (remember we created our business rule in Part 1):DynamicMembers24
    9. Click on the newly added Add Entity child and click the Add Sibling button.DynamicMembers25
    10. Enter the following and click Save:DynamicMembers26

    Once we have our menu ready, we can create our form and add the newly created menus.  Follow these steps to create the new form:

    1. Create a new form.DynamicMembers27
    2. Enter the following and click Next.DynamicMembers28
    3. Modify your dimension to match the following and click Next.DynamicMembers29
    4. Add Manage Entities to the Selected Menus list and click Finish.DynamicMembers30
    5. Open the form and test out your new right-click menu.DynamicMembers31

    Now you have a form that can be used to allow users to input their own members in a custom plan type!

  • Enabling Dynamic Members in Custom Plan Types in 11.1.2.4


    Now that I have my Rapid Deployment completed, I can start to use some of the new features in 11.1.2.4.  Today we will focus on the new ability to create dynamic members in Planning.  Now, I know what you are thinking, “We can already do that in 11.1.2.3.”  And to a point you would be right.  As long as you just want to add new members one of the module Plan Types (Workforce, CapEx, PFP), you can add dynamic members.  But, for those of us that have custom Plan Types (yes…everyone), Oracle has finally added this functionality beyond the modules.  In part 1 of this 2-part series, we’ll run through the entire process of enabling dynamic members in a custom Plan Type.  In part 2, we’ll use custom menu’s and a form to quickly enable users to add and delete those custom members.  Here we go…

    1. Open the Dimension section of your Planning application (I’ll be using the Vision application that we created here).
    2. Select the Entity dimension.
    3. Create a Sibling Member to the Management Rollup member (or any member of your choice).
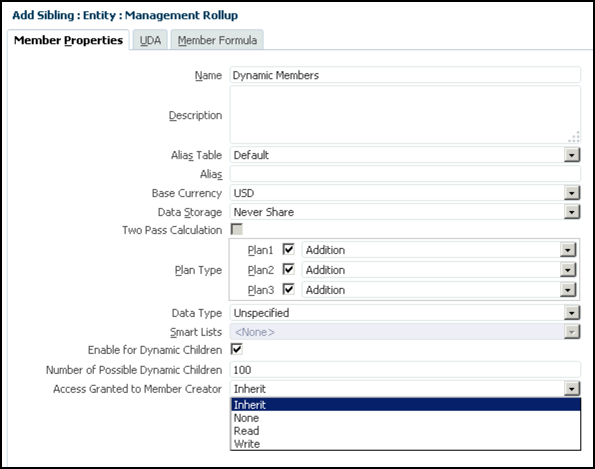
    4. Enter details as shown here:DynamicMembers01

    That takes care of the easy steps.  You can now add up to 100 members to the new Dynamic Members parent.  We chose inherit for the access granted.  This let’s us maintain the proper level of security for these members based on the security of the parent.  You can also say they have no access to the members by selecting None, read-only access by selecting Read, and write-back access using Write.  It’s important to note that if you want to give the users the ability to delete members, you must give them Write access.

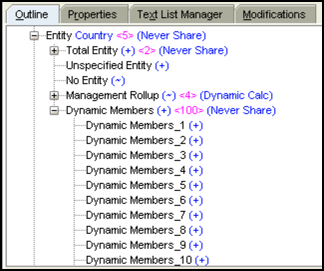
    Now that we’ve created the parent, let’s take a look at what happens on the back-end in Essbase.  Be sure to refresh the database from Planning, and then open the outline in EAS.  You should see something like this:

    DynamicMembers02

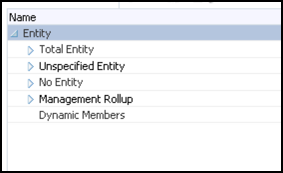
    Compared to this in Planning:

    DynamicMembers03

    So the data is stored in Essbase just like a traditional TBD would be in the “old days”, but we don’t actually show the members in Planning.  This makes things a bit tricky from an Essbase Add-In perspective, but this is 11.1.2.4, so you should be two versions removed from that (or if you are like me…you still have it installed with the In2Hyperion Add-In).  We’ll revisit this shortly, once we get Planning to actually let us add a member.  So let’s go ahead and enable the end-user to actually add members:

    1. We’ll start by adding a run-time prompt.  Open Calculation Manager and open the Variable Designer.DynamicMembers04
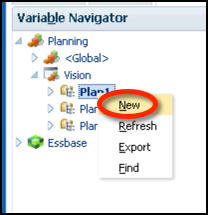
    2. Expand Planning and then expand Vision.  Right-click on Plan1 and click New.DynamicMembers05
    3. Enter the details and shown here:DynamicMembers06
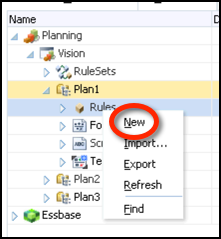
    4. Now let’s go back to the System View and create our two business rules (one for add, one for delete).  Expand Planning,Vision, and Plan1.  Right-click on Rules and click New.DynamicMembers07
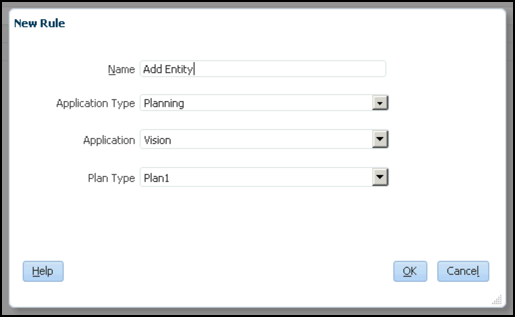
    5. Enter the details shown here:DynamicMembers08
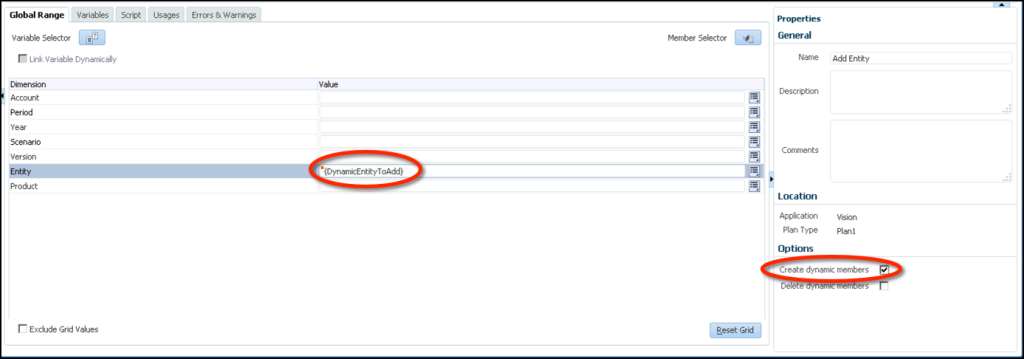
    6. Enter the details shown here:DynamicMembers13
    7. Save the Rule.
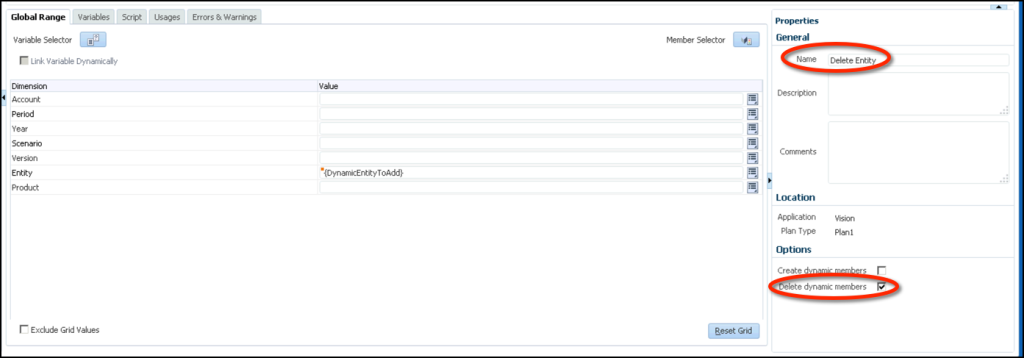
    8. Modify the rule as show here:DynamicMembers12
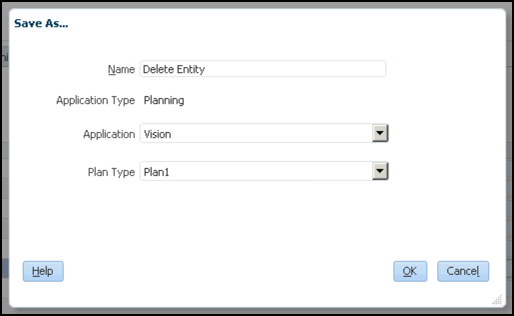
    9. Save the rule as:DynamicMembers11
    10. Deploy the rules to Planning.

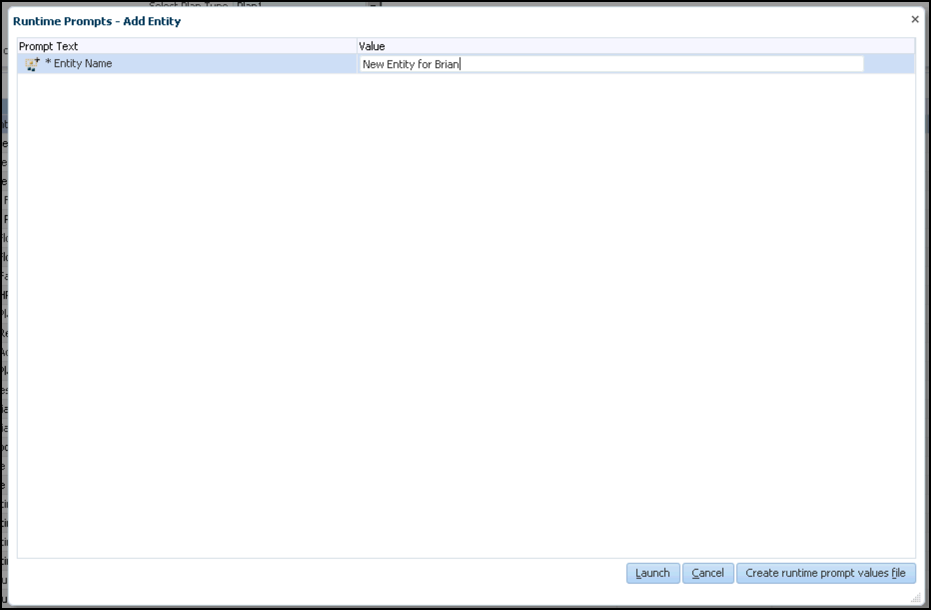
    Now we should be able to run our newly created Business Rule and actually add a member.  The business rule should have one prompt, the member name:

    DynamicMembers14

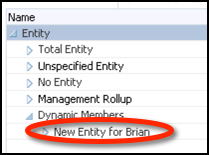
    Once we’ve entered a member name and launched the rule, we should be able to see the new member in the Entity dimension:

    DynamicMembers15

    Now what does this look like in Essbase?  First let’s take a look at it without refreshing Essbase:

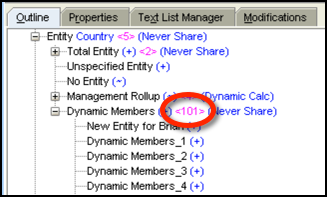
    Now let’s refresh the database from Planning and see what we get:

    DynamicMembers16

    The first thing we see is that the new member exists in Essbase now.  So the TBD logic has been converted over to a physical member.  Next we notice that the number of children for our Dynamic Members parent is now 101.  So the refresh process has reset the number of members that we can dynamically add back to 100.  And that’s it…we now have dynamic members working in custom Plan Types.

    In the next post on this topic we’ll go into how we actually make this useful.  Because having the users go through and launch a Business Rule as necessary is not exactly user friendly.

  • Getting Started With Hyperion Planning 11.1.2.4 and Rapid Deployment (Part 2 of 2)


    So you finally get everything working on your shiny new 11.1.2.4 Rapid Deployment and now its time to finally take a look at Planning.  The problem is, we don’t have an app.  The even bigger problem (for me and anyone else used to SQL Server) is that we don’t even have a data source for our application if we had one.  For those of you that are familiar with Oracle 11g, this probably isn’t a problem and you are already using a fresh application that you just created.  If, however, you are still reading…then you might be a little lost as to what to do next.  Before we go through these steps…I’m the furthest thing imaginable from an Oracle DBA, so if anything I’m doing isn’t necessarily “Best Practice”, feel free to leave me a comment on how we could do it better.

    Before we can create a Planning application, we of course need our repository.  Since we used a Rapid Deployment, unless we want to install SQL Server, we have to use Oracle 11g as our data source.  We’ll start by opening up Enterprise Manager so that we can create a new user.  Follow these steps to get your user set up:

    1. Navigate to Database Control – admin in the start menu:PlanningRapid03
    2. Once Enterprise Manager has opened in your browser, enter SYSTEM for the username and the password you defined for your Rapid Deployment as the password while leaving Normal selected.PlanningRapid04
    3. Click on Server in the top menu area.PlanningRapid05
    4. Click on Users under the Security section.PlanningRapid06
    5. With the ADMIN user and Create Like action selected, click Go.
      PlanningRapid07
    6. Enter Vision for Name, enter a password twice, and click OK.
      PlanningRapid08
    7. Verify that the user was created successfully.
      PlanningRapid09

    Once our database user has been created, we are ready to create our actual Planning sample application.  Follow these steps to set up your sample application:

    1. Log into workspace and click NavigateAdministerPlanning Administration.PlanningRapid10
    2. Click on Manage Data Source and click the add data source plus sign.
      PlanningRapid11
    3. Enter localhost for Server1521 for Port, admin for SID, Vision for User, and your password for Password under Application Database.  Enter localhost for Server, admin for User, and your Rapid Deployment password for Password under Essbase Server.  Validate your connections and then click Save.
      PlanningRapid12
    4. Click Manage Applications and click the add application plus sign.
      PlanningRapid13
    5. Select your Vision data source, enter Vision for Application, select Sample for Application Type and click Next.
      PlanningRapid14
    6. Verify the information and click Create.
      PlanningRapid15
    7. Wait for the application to be created and populated with meta-data and data.
      PlanningRapid16
    8. Enjoy your new sample app rather than creating one from scratch.

    So with that, you should be ready to start working with Planning on your Rapid Deployment!

  • Getting Started With Hyperion Planning 11.1.2.4 and Rapid Deployment (Part 1 of 2)


    So 11.1.2.4 just came out and you are thinking to yourself…I bet that’s cool.  Well, there’s only one way to find out.  Set it up!  In this post we’ll go through the absolute quickest way to start playing with 11.1.2.4 in your very own virtual machine.  So what’s the fastest way (not necessarily the best…but I’m impatient)?  Rapid deployment!

    Before we get started, let’s talk about what Rapid Deployment is.  Essentially, Oracle has given us a wizard to install all of the required product related to Hyperion Planning on a Windows system with very little required to make it all work.  What do you get?

    • Planning
    • Essbase
    • Calculation Manager
    • Financial Reports
    • Smart View for Office (assuming you have Office 2010 installed on your server instance)
    • Oracle Database 11g
    • Weblogic Server

    What don’t you get?

    • EPMA
    • Standalone Essbase Connectivity via Smart View
    • Pre-installed Sample Applications

    So now that we know what we’re getting when we are done, let’s get started!  First, we’ll need to get a virtual machine configured.  I’ll leave the steps on this to you, as if you are reading this, there is a good chance you don’t need these steps anyway.  Here are the recommended specifications of your server or virtual server as the case may be:

    • Quad Core CPU
    • 16GB RAM (I find that 12 is likely plenty for those of you with 16GB laptops that still want to be able to actually use them)
    • 200GB Storage (I set my VM up with 60GB and after I’m completely done, I still have nearly 20GB free)

    You can use VMWare on your laptop, something cloud-based (like AWS), or in my case VMWare ESXi on my server at home (yes, I’m a nerd, just ask my wife).  Now that we have our hardware ready, we need to install some software:

    • Microsoft Windows Server 2008 R2 (it may work on 2012 since it is now officially supported, but guide says 2008 R2)
    • Microsoft Office 2010
    • Microsoft .net 4.0
    • Firefox (because who uses IE any more anyway?)
    • 7-zip and Notepad++ (so these may not be required, but I always find them handy to have around)

    So we finally have our system ready to go, it’s time to start downloading 11.1.2.4.  You can refer to the Rapid Deployment guide from Oracle here:

    http://docs.oracle.com/cd/E57185_01/epm.1112/epm_planning_rapid_deploy/epm_planning_rapid_deploy.html

    This guide is actually pretty complete, but there are a few problems.  First, at the time of this blog post, the edelivery site doesn’t actually have 11.1.2.4.  This means thats outside of Oracle Database 11g, you can’t actually get anything you need from edelivery.  Use this link to get to the files you need for now:

    http://www.oracle.com/technetwork/middleware/performance-management/downloads/index.html

    Once you go to this link, you will have to spend a bit of time finding all the files needed, but they are all there.  Between these files and your Oracle DB files, you should have all of the following:PlanningRapid01


    Unzip all of these files into one directory with no spaces and you should be ready to go.  Beyond this, the guide should get you from start to finish with no major issues.  I will say that I had to run through the Wizard twice, as the first time I clicked back and forth between the command line that opened to install Oracle 11g and the Wizard.  For whatever reason, that seems to have bombed the installation.  So just let it go and don’t click on anything!

    If everything went as planned, you should be able to fire up Firefox (or IE if you really want to), and go to your shiny new workspace:

    Now we have everything installed and all of our services are started and everything is great.  But wait!  We don’t have a Planning application to play with.  And surely we don’t want to create one from scratch (again…impatient).  Our next post will continue with the impatient theme and get you into a sample application in a hurry.  Having always used SQL Server, there was a bit of a learning curve for me.