PowerShell from Workspace: Better Than a Batch
There are no less than three blog posts about running a batch script from Workspace floating around the internet. I believe the first originated from Celvin here. While this method works great for executing a batch, you are still stuck with a batch. Not only that, but if you update that batch, you have to go through the process of replacing your existing batch. This sounds easy, but if you want to keep your execution history, it isn’t. Today we’ll use a slightly modified version of what Celvin put together all those years ago. Instead of stopping with a batch file, we’ll execute PowerShell from Workspace.
Introduction to PowerShell
In short, PowerShell is a powerful shell built into most modern versions of Windows (both desktop and server) meant to provide functionality far beyond your standard batch script. Imagine a world where you can combine all of the VBScript that you’ve linked together with your batch scripts. PowerShell is that world. PowerShell is packed full of scripting capabilities that make things like sending e-mails no longer require anything external (except a mail server of course). Basically, you have the power of .NET in batch form.
First an Upgrade
We’ll start out with a basic batch, but if you look around at all of the posts available, none of them seem to be for 11.1.2.4. So, let’s take his steps and at least give them an upgrade to 11.1.2.4. Next, we’ll extend the functionality beyond basic batch files and into PowerShell. First…the upgrade.
Generic Job Applications
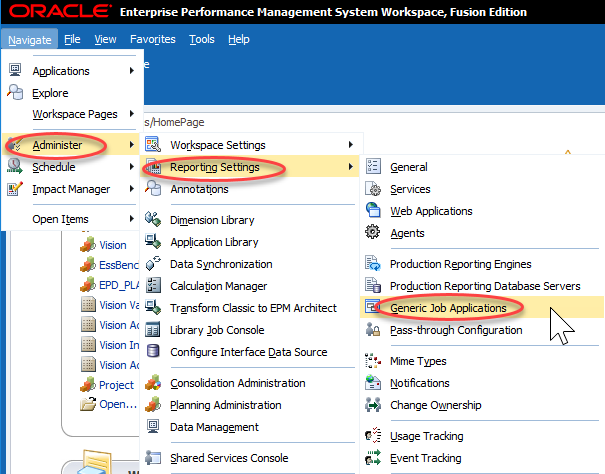
I’ll try to provide a little context along with my step-by-step instructions. You are probably thinking…what is a Generic Job Application? Well, that’s the first thing we create. Essentially we are telling Workspace how to execute a batch file. To execute a batch file, we’ll use cmd.exe…just like we would in Windows. Start by clicking Administer, then Reporting Settings, and finally Generic Job Applications:
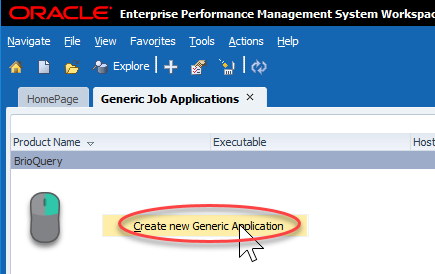
This will bring up a relatively empty screen. Mine just has BrioQuery (for those of you that remember what that means…I got a laugh). To create a new Generic Job Application, we have to right-click pretty much anywhere and click Create new Generic Application:
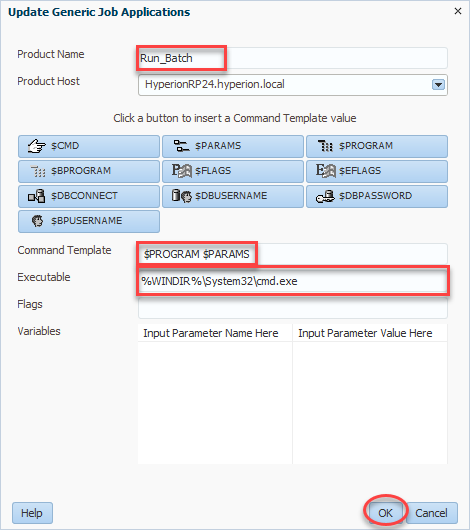
For product name, we’ll enter Run_Batch (or a name of your choosing). Next we select a product host which will be your R&A server. Command template tells Workspace how to call the program in question. In our case we want to call the program ($PROGRAM) followed by any parameters we wish to define ($PARAMS). All combined, our command template should read $PROGRAM $PARAMS. Finally we have our Executable. This will be what Workspace uses to execute our future job. In our case, as preiovusly mentioned, this will be the full path to cmd.exe (%WINDIR%\System32\cmd.exe). We’ll click OK and then we can move on to our actual batch file:
The Batch
Now that we have something to execute our job, we need…our job. In this case we’ll use a very simple batch script with just one line. We’ll start by creating this batch script. The code I used is very simple…call PowerShell script:
%WINDIR%\system32\WindowsPowerShell\v1.0\powershell.exe e:\data\PowerShellTest.ps1
So, why don’t I just use my batch file and perform all of my tasks? Simple…PowerShell is unquestionably superior to a batch file. And if that simple reason isn’t enough, this method also let’s us separate the job we are about to create from the actual code we have to maintain in PowerShell. So rather than making changes and having to figure out how to swap out the updated batch, we have this simple batch that calls something else on the file system of the reporting server. I’ve saved my code as BatchTest.bat and now I’m ready to create my job.
The Job
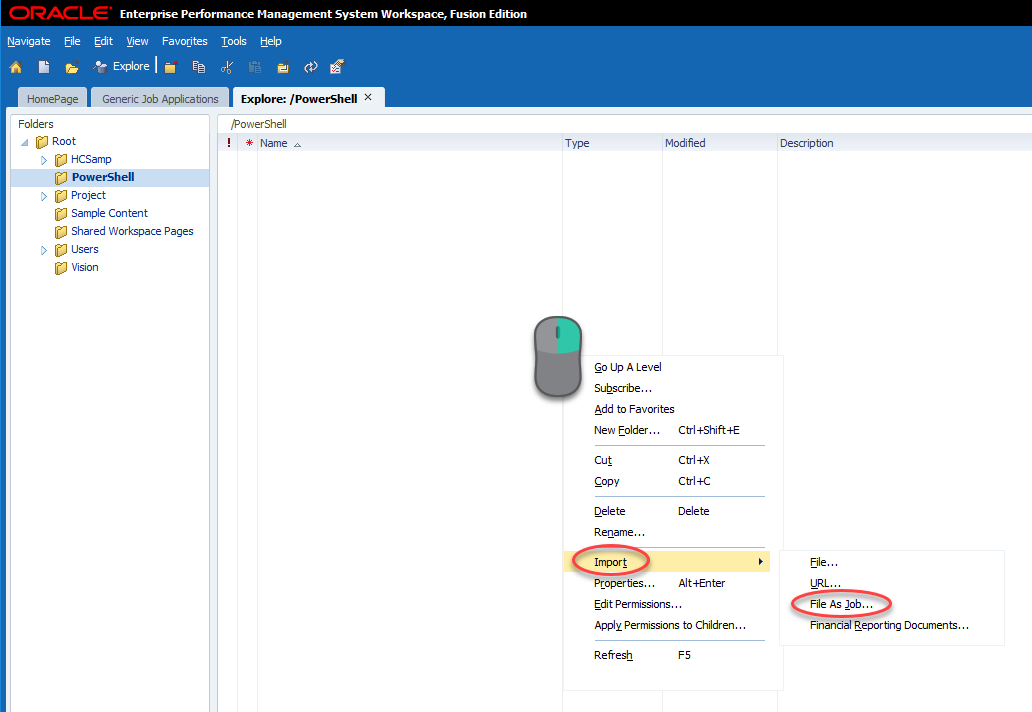
We’ll now import our batch file as a job. To do this we’ll go to Explore, find a folder (or create a folder) that we will secure for only people that should be allowed to execute our batch process. Open that folder, right-click, and click Import and then File As Job…:
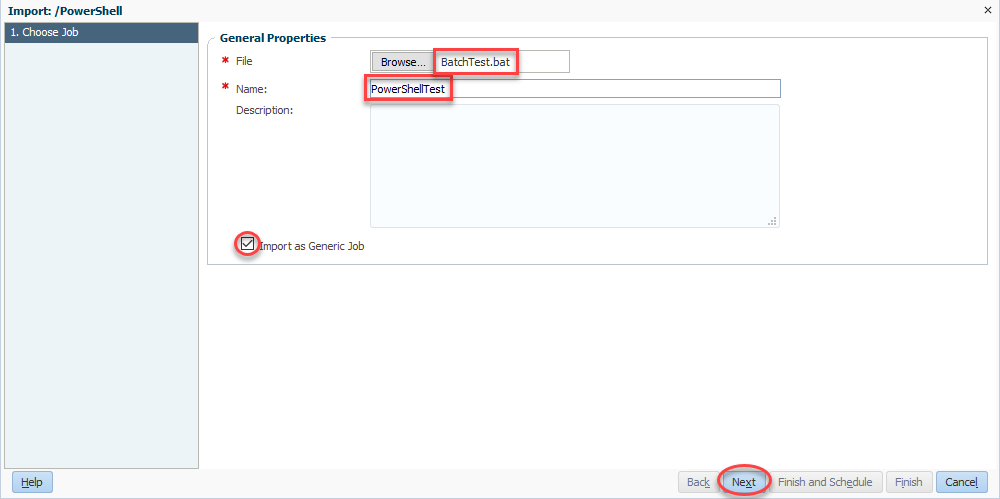
We’ll now select our file (BatchTest.bat) and then give our rule a name (PowerShellTest). Be sure to check Import as Generic Job and click Next:
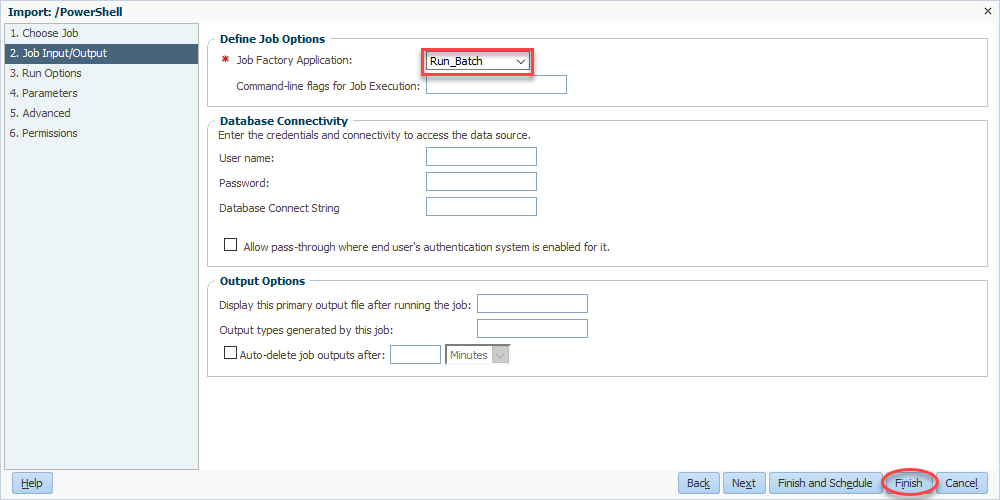
Now we come full circle as we select Run_Batch for our Job Factory Application. Finally, we’ll click finish and we’re basically done:
Simple PowerShell from Workspace
Wait! We’re not actually done! But we are done in Workspace, with the exception of actually testing it out. But before we test it out, we have to go create our PowerShell file. I’m going to start with a very simple script that simple writes the username currently executing PowerShell to the screen. This let’s us do a few things. First, it let’s you validate the account used to run PowerShell. This is always handy to know for permissions issues. Second, it let’s you make sure that we still get the output of our PowerShell script inside of Workspace. Here’s the code:
$User = [System.Security.Principal.WindowsIdentity]::GetCurrent().Name
Write-Output $User
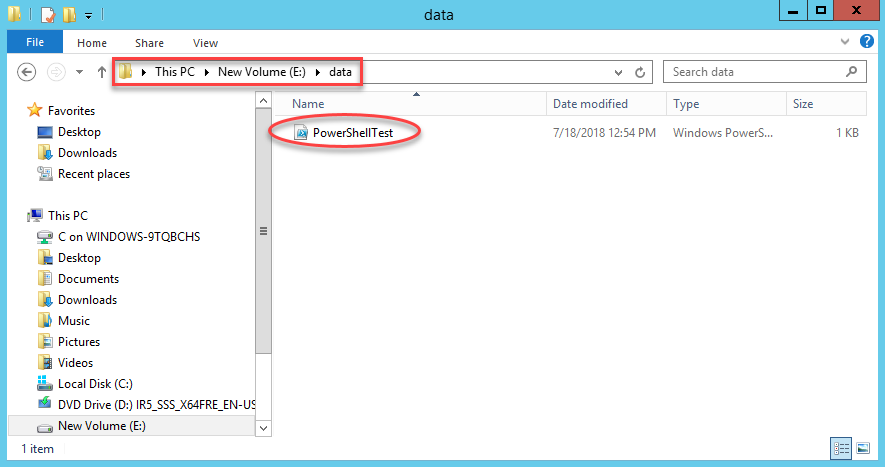
Now we need to make sure we put this file in the right place. If we go back up to the very first step in this entire process, we select our server. This is the server that we need to place this file on. The reference in our batch file above will be to a path on that system. In my case, I need to place the file into e:\data on my HyperionRP24 server:
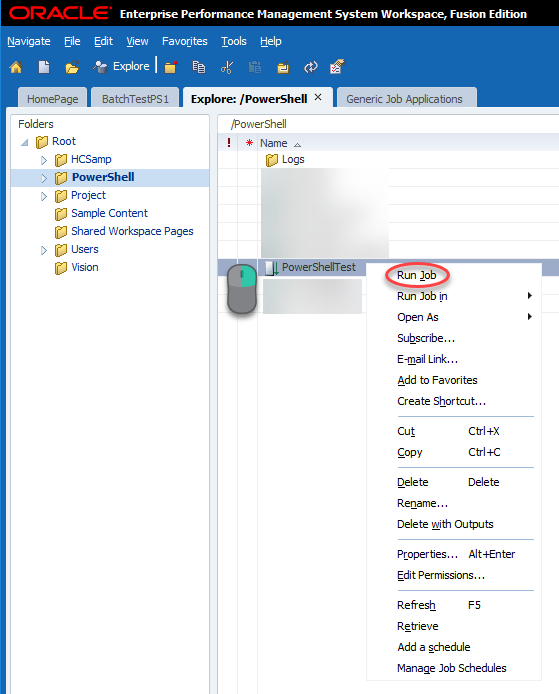
Give it a Shot
With that, we should be able to test our batch which will execute PowerShell from Workspace. We’ll go to Explore and find our uploaded job, right-click, and click Run Job:
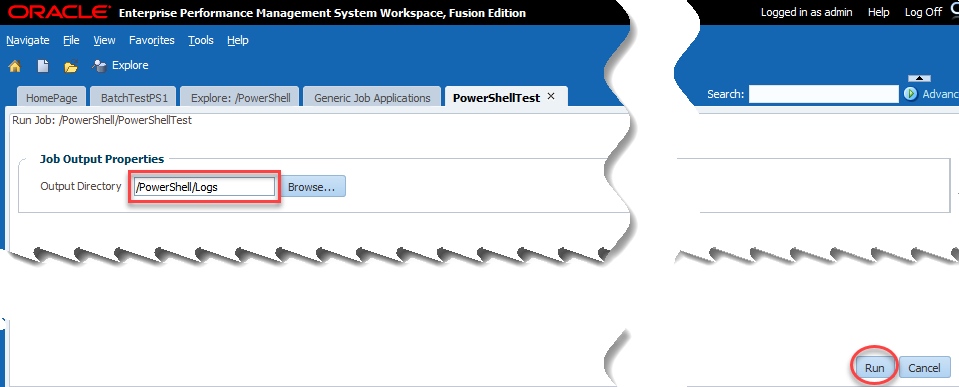
Now we have the single option of output directory. This is where the user selects where to place the log file of our activities essentially. I choose the logs directory that I created:
If all goes according to plan, we should see a username:

As we can see, my PowerShell script was executed by Hyperion\hypservice which makes sense as that’s my Hyperion service used to run all of the Hyperion services.
Now the Fun
We have successfully recreated Celvin’s process in 11.1.2.4. Now we are ready to extend his process further with PowerShell. We already have our job referencing our PowerShell script stored on the server, so anything we choose to do from here on out can be independent of Hyperion. And again, running PowerShell from Workspace gives us so much more functionality, we may as well try some of it out.
One Server or Many?
In most Hyperion environments, you have more than one server. If you have Essbase, you probably still have a foundation server. If you have Planning, you might have Planning, Essbase, and Foundation on three separate machines. The list of servers goes on and on in some environments. In my homelab, I have separate virtual machines for all of the major components. I did this to try to reflect what I see at most clients. The downside is that I don’t have everything installed on every server. For instance, I don’t have MaxL on my Reporting Server. I also don’t have the Outline Load Utility on my Reporting Server. So rather than trying to install all of those things on my Reporting Server, some of which isn’t even supporting, why not take advantage of PowerShell. PowerShell has the built-in capability to execute commands on remote servers.
Security First
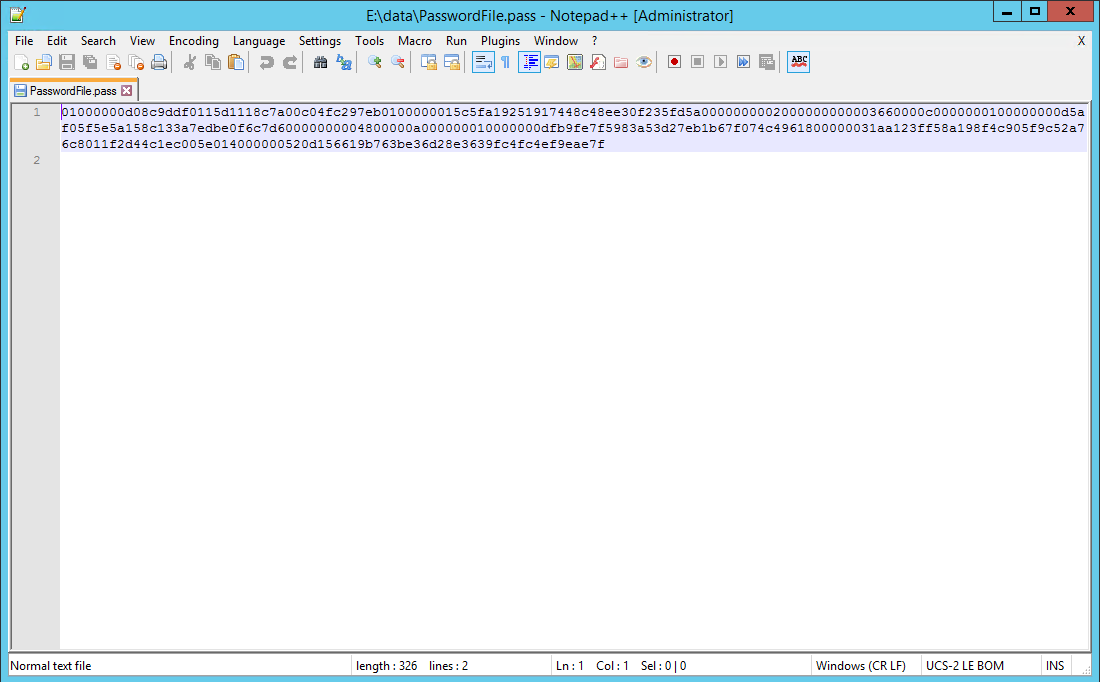
Let’s get started by putting our security hat on. We need to execute a command remotely. To do so, we need to provide login credentials for that server. We generally don’t want to do this in plain text as somebody in IT will throw a flag on the play. So let’s fire up PowerShell on our reporting server and encrypt our password into a file using this command:
read-host -prompt "Password?" | ConvertTo-SecureString -AsPlainText -Force | ConvertFrom-SecureString | Out-File "PasswordFile.pass"
This command requires that you type in your password which is then converted to a SecureString and written to a file. It’s important to note that this encrypted password will only work on the server that you use to perform the encryption. Here’s what this should look like:

If we look at the results, we should have an encrypted password:
Now let’s build our PowerShell script and see how we use this password.
Executing Remotely
I’ll start with my code which executes another PowerShell command on our remote Essbase Windows Server:
###############################################################################
#Created By:	Brian Marshall
#Created Date:	7/19/2018
#Purpose:		Sample PowerShell Script for EPMMarshall.com
###############################################################################

###############################################################################
#Variable Assignment
###############################################################################
#Define the username that we will log into the remote server
$PowerShellUsername = "Hyperion\hypservice"
#Define the password file that we just created
$PowerShellPasswordFile = "E:\Data\PasswordFile.pass"
#Define the server name of the Essbase server that we will be logging into remotely
$EssbaseComputerName = "HyperionES24V"
#Define the command we will be remotely executing (we'll create this shortly)
$EssbaseCommand = {E:\Data\RemoteSample\RemoteSample.ps1}

###############################################################################
#Create Credential for Remote Session
###############################################################################
$PowerShellCredential=New-Object -TypeName System.Management.Automation.PSCredential -ArgumentList $PowerShellUsername, (Get-Content $PowerShellPasswordFile | ConvertTo-SecureString)

###############################################################################
#Create Remote Session Using Credential
###############################################################################
$EssbaseSession = New-PSSession -ComputerName $EssbaseComputerName -credential $PowerShellCredential


###############################################################################
#Invoke the Remote Job
###############################################################################
$EssbaseJob = Invoke-Command -Session $EssbaseSession -Scriptblock $EssbaseCommand 4>&1
echo $EssbaseJob

###############################################################################
#Close the Remote Session
###############################################################################
Remove-PSSession -Session $EssbaseSession
Basically we assign all of our variables, including the use of our encrypted password. Then we create a credential using those variables. We then use that credential to create a remote session on our target Essbase Windows Server. Next we can execute our remote command and write out the results to the screen. Finally we close out our remote connection. But wait…what about our remote command?
Get Our Remote Server Ready
Before we can actually remotely execute on a server, we need to start up PowerShell on that remove server and enable remote connectivity in PowerShell. So…log into your remote server and start PowerShell, and execute this command:
Enable-PSRemoting -Force
If all goes well, it should look like this:

If all doesn’t go well, make sure that you started PowerShell as an Administrator. Now we need to create our MaxL script and our PowerShell script that will be remotely executed.
The MaxL
First we need to build a simple MaxL script to test things out. I will simply log in and out of my Essbase server:
login $1 identified by $2 on $3;

logout;
The PowerShell
Now we need a PowerShell script to execute the MaxL script:
###############################################################################
#Created By:	Brian Marshall
#Created Date:	7/19/2018
#Purpose:		Sample PowerShell Script for EPMMarshall.com
###############################################################################

###############################################################################
#Variable Assignment
###############################################################################

$MaxLPath = "E:\Oracle\Middleware\user_projects\Essbase1\EssbaseServer\essbaseserver1\bin"
$MaxLUsername = "admin"
$MaxLPassword = "myadminpassword"
$MaxLServer = "hyperiones24v"

###############################################################################
#MaxL Execution
###############################################################################
& $MaxLPath\StartMaxL.bat E:\Data\RemoteSample\RemoteSample.msh $MaxLUsername $MaxLPassword $MaxLServer
This is as basic as we can make our script. We define our variables around usernames and servers and then we execute our MaxL file that logs in and out.
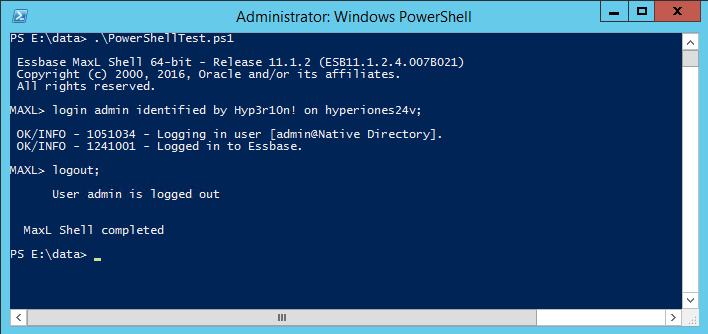
Test It First
Now that we have that built, let’s test it from the Essbase Windows Server first. Just fire up PowerShell and go to the directory where you file exists and execute it:
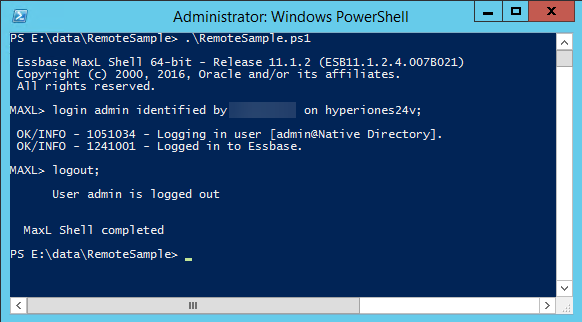
Assuming that works, now let’s test the remote execution from our reporting server:
Looking good so far.. Now let’s head back to Workspace to see if we are done:
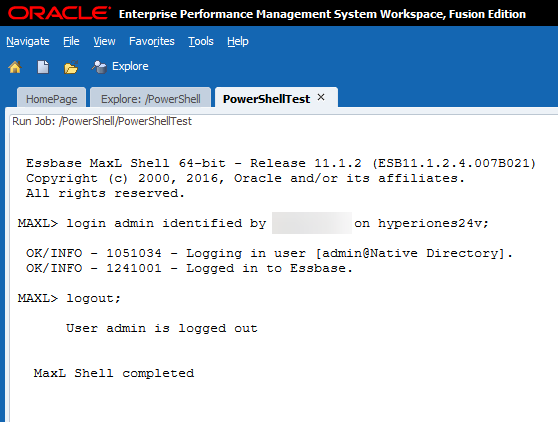
Conclusion
That’s it! We have officially executed a PowerShell script which remotely executes a PowerShell script which executes a MaxL script…from Workspace. And the best part is that we get to see all of the results from Workspace and the logs are stored there until we delete them. We can further extend this to do things like load dimensions using the Outline Load Utility or using PowerShell to send e-mail confirmations. The sky is the limit with PowerShell!