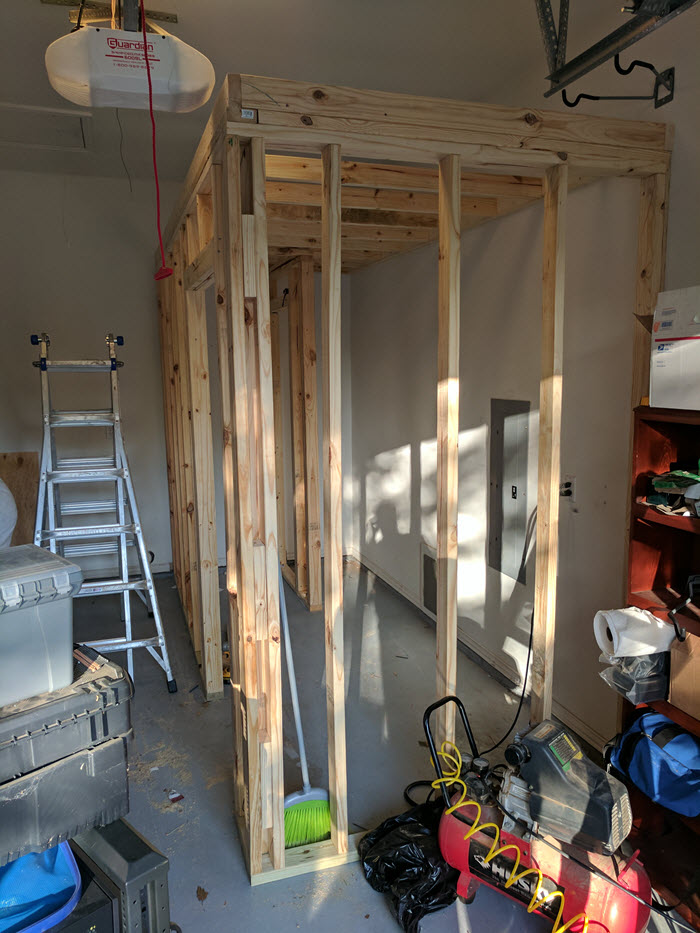
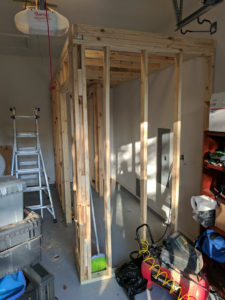
It has been quite some time since my last lab update! I’ve done quite a bit of updating since my post in January. Today we’ll focus on my new Garage Data Center. My Oracle rack has finally filled up for the most part and as a result, it has become a little loud and a little hot to stick around in my office. I decided to put my extra garage to use! I took a corner of my garage and put together my very own garage data center. Check it out:
Fully framed:
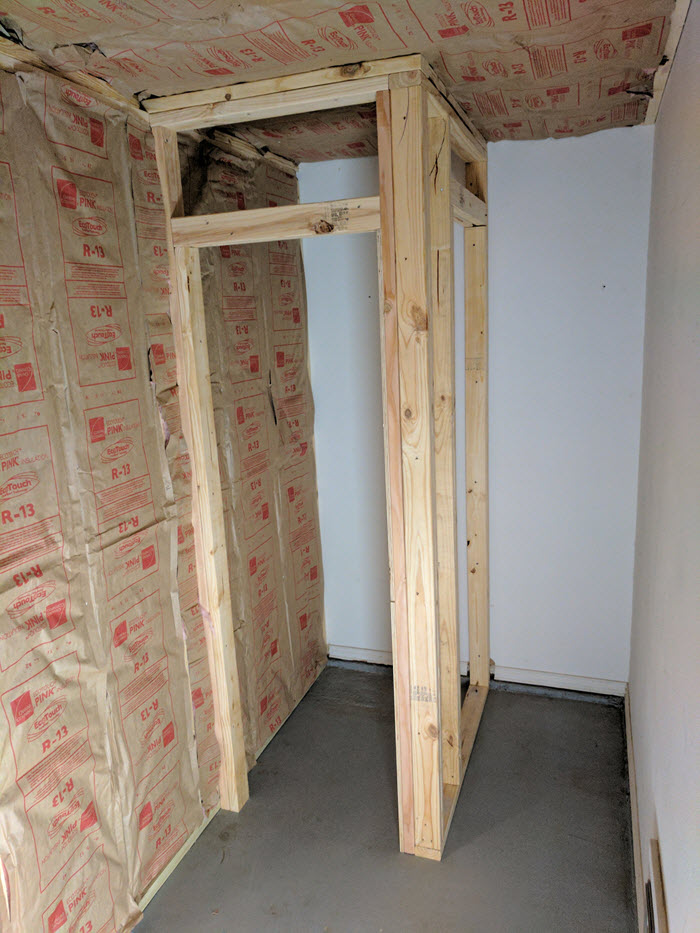
Insulated:

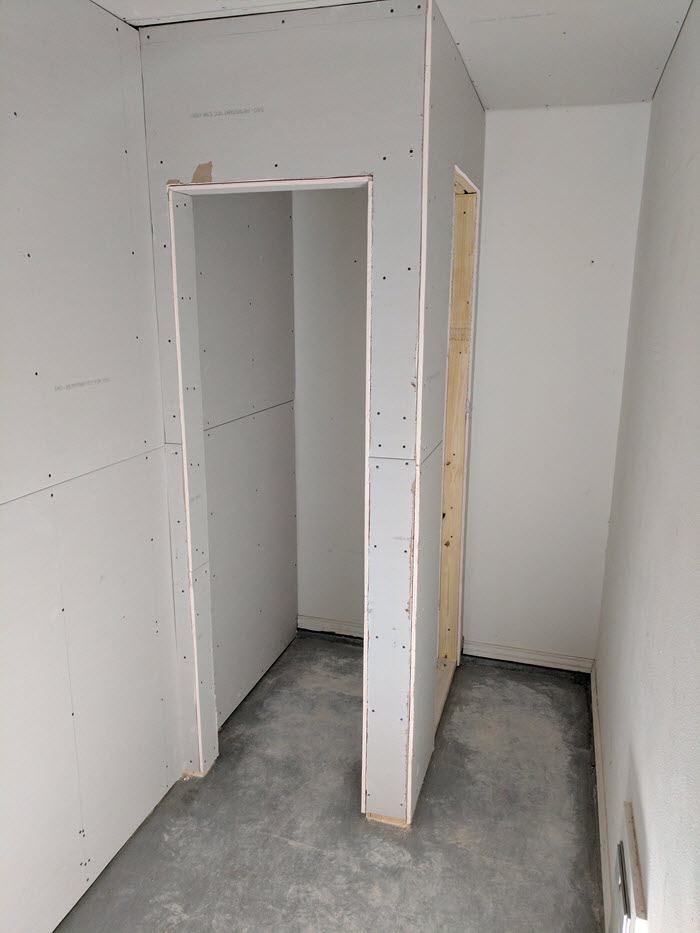
Drywalled:
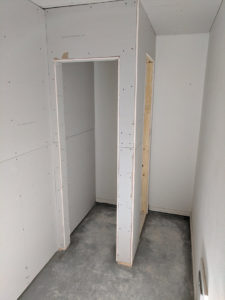
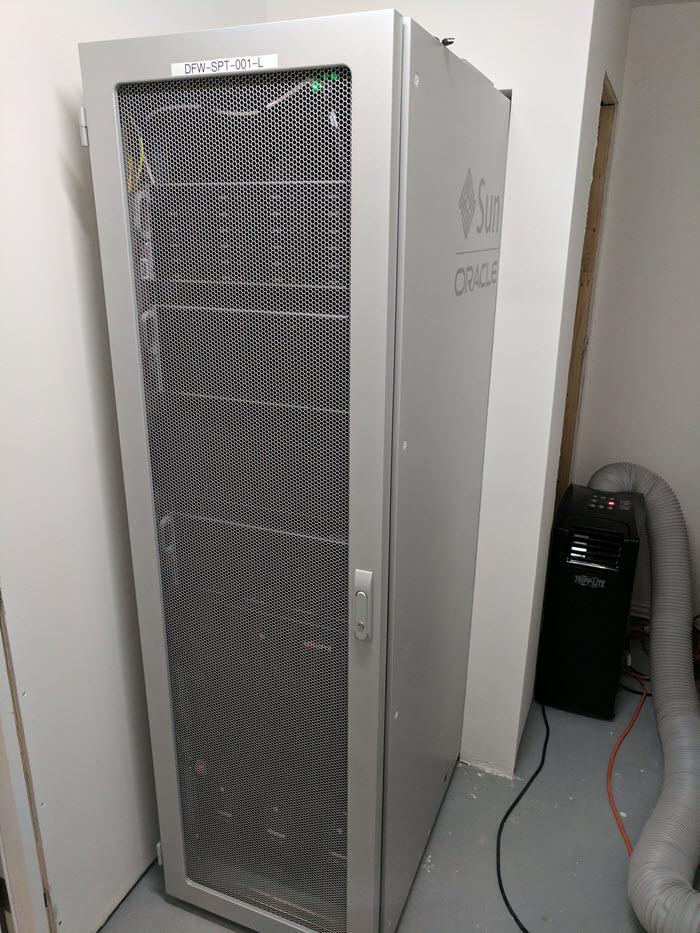
And installed:
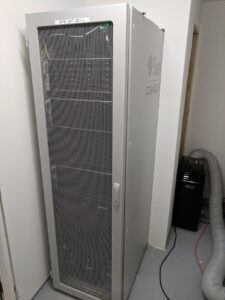
Glamour Shot:

Summer is Hot
The good news is, the servers can be as loud as I want them to be, the bad news is that summer is here and my air conditioner failed. It didn’t even make it a year, which is very disappointing. Luckily I was able to pick one of these up on Craigslist the same day so that my servers didn’t melt in the Texas heat:

Are you married?
Yes! What’s the best way to get your garage cleaned? Promise your husband that he can build a data center. Done! Kscope17 is coming up soon, so I’ll have a post about that early next week. Until then, have a great weekend!
Brian Marshall
June 9, 2017
Welcome to the first installment of a new on-going series about what’s up in my Hyperion Home Lab. First, if you don’t already have your own home lab, why not? Get started by checking out my guide on building your own. And yes…I will get around to updating this series soon. In the meantime, let’s take a look at what’s changed in the lab.
UPS…not just for shipping
I’ve updated the power configuration of the lab to increase the UPS capacity. All servers are now connected to their own 1500VA UPS. This means a total of four (4) UPS’s with a total capacity of 6000VA. I can get roughly 20 minutes of time without power before things fall apart. The next step will be automating the shutdown procedure after a few minutes of power loss.
More Drives
What about server stuff? I’ve expanded my FreeNAS server to include an entirely new chassis devoted to storing drives. This chassis is a Supermicro 45-bay with a pair of SAS2 expanders. These are connected externally to the FreeNAS server to an LSI 9200-8e controller. More on this later…
New Networking Goodies
In support of my FreeNAS fun and eventual VSAN implementation, I replaced my ailing Dell switch with a brand new X1052. This switch is complete with 24 ports of RJ45 gigabit connections along with 4 ports of SFP+ 10G connections. Each server is directly connected to the switch with SFP+ DAC’s. Each server is also connected directly to the FreeNAS server using another SFP+ DAC.
While I made everything faster on the wired side, the wireless was still a bit of a challenge. The majority of the house was just fine, but there were a few select locations that were very problematic. I decided to price out having a network drop or two added. While talking to a potential installer, he suggested I try out an extender. I had tried an extender years before, but it didn’t work well. Based on the installers feedback, I gave it another try. I purchased a Netgear Nighthawk X4.
The extender has been nothing short of awesome. My Nighthawk X6 has a pair of 5GHz radios and this extender allows me to isolate one of those and provide it with a dedicated radio signal. This is about as great as it can get without dropping an actual network connection. We’ve been using it for about a while now and I have nothing but great things to say.
Diagrams Are Cool Right?
Here’s what it all looks like in the form of a really bad Visio diagram:

What’s next?
As I continue my Essbase performance series and prepare for my Kscope17 presentation, I’m making some more modifications. I’ve also finally run out of space on my old file server and I think we have finally reached a point where I can trust my FreeNAS box as my primary file server. First, here’s a sneak peak at what’s coming in my benchmarking box:

That is an Oracle Flash Accelerator. This very drive is found in many Exalytics servers out there. It also happens to be a rebranded Intel P3605. This particular model is the 1.6TB variety with some insane performance. I’ll have a dedicated post for this SSD very soon.
In the meantime, I’ll be installing my capacity expansion to replace my existing file server next weekend when the drives arrive. I’ve ordered 13 3TB drives. I plan on using a pair of RAIDZ1 vdev’s in FreeNAS to give me 30TB of usable storage with a hot spare in the event of failure. I may also be transitioning to a new VM backup strategy at the same time, but more on that another time.
Enough Nerding Out
And that’s it for this update on my Hyperion Home Lab. I should have a few more posts coming in the near future with updates on much of what I’ve talked about broadly here.
Brian Marshall
January 31, 2017
If you read my blog, you know that I am really into having a home lab. I’ve had a small Norco rack for a while to keep my servers in. It’s worked pretty well for the most part, but as you can see, it is pretty full:

You can probably also see that it is very dusty. Now that I’ve decided to finally build my FreeNAS box, I have no place in the rack to put it. At first, I thought I could just set it on top, but with two little kids, that could eventually lead to disaster. Next, I thought about building one myself. I’m handy, it would be a challenge, but to really get one the right size, I was going to end up spending at least $150 in parts alone. Then I have to build it!
So what else could I do? Purchase a new rack from the internet? That sounds pricey, but I looked into it. Sure enough, it is pricey. Luckily, I live in a large metropolitan area. And if you live in such an area, there are likely plenty of data centers getting rid of their old racks as they shrink their footprint in the now more virtualized future. This lead me to Craigslist. As I searched around, I found a few interesting options. There were several Dell racks, a few HP racks, but then one caught my eye. An Oracle rack! I contacted the seller and for $85 I purchased a gently used 42U fully enclosed rack (after I got official wife approval).
I borrowed a truck, and a few strong backs and picked up the rack. It was exactly as advertised and I came home with my very own Oracle rack. Then Kscope came…and went. Finally I was able to get the time to transplant everything over. Here is the result:
My very small intern was here to help get everything set up correctly:

Here’s what it looks like inside (very clean if I do say so myself):

And here is what makes the rack awesome (for an Oracle consultant anyway):

Now I have a place to put my new FreeNAS box. Look for posts on that coming up in the future days and weeks.
Brian Marshall
July 6, 2016
As my lab has grown over the years, so have my storage needs. Today I have an array dedicated to backing up files. That array consists of twelve (12) 2TB drives configured in a RAID 6 array. This gives me roughly 18.1 TB of storage. That sounds like a ton of storage. Unfortunately, I’ve run out of space. I’ve even started saving less back-ups of some of my VM’s to conserve on space. At one point, I had less than 1TB of space remaining.
Obviously, anywhere near 10% free space really isn’t acceptable anyway. This presents a problem…my current file server is a virtual machine on my original ESXi box. This server is completely full of drives. Additionally, I think I’m ready to graduate to a real NAS (network attached storage) system.

Enter FreeNAS. FreeNAS is an open-source operating system designed for network attached storage servers. At its core, it built on FreeBSD with all of the storage being handled by something called ZFS. ZFS is another open-source product, this time a file system. So instead of FAT or NTFS that we see in Windows, ZFS is an enterprise file system that is focused on ensuring data integrity.
On top of ZFS, FreeNAS has an excellent GUI with a variety of additional features that make it an attractive NAS. It has built-in file-sharing features like SMB/CIFS, FS, FTP, iSCSI, and others. It has full support for ZFS snapshots (think virtual machines, but for your system), replication, and encryption. It also has plugins! Media servers, private cloud services, and plenty of other cool things that run in something FreeBSD calls jails. Basically the plugin is walled off from the rest of your server.
And with that, let’s move on to the hardware. To determine what hardware I needed, I first took at look what I need my NAS to do. First and foremost, I need a place to back everything up. So I need at least one array of big traditional disks for that purpose. A good rule of thumb for me has always been to upgrade to at least twice the amount of space you have now. So I have 20TB of RAW storage, I need at least 40TB of RAW storage for this purpose.
Second, I have a series going on Essbase performance. While all of the local storage benchmarks will be very interesting, many (if not most) companies are using network storage for their virtualized environments. The amount of performance here doesn’t really matter as much. I need enough to do high performance network storage testing. So I need some type of SSD-based drive or array for this purpose.
Finally, I would like to have a network-based datastore for my VMware cluster. This needs to be somewhere between the first two. It needs speed, but also a lot of space. This is another area that FreeNAS can help. FreeNAS with ZFS uses RAM to provide a read cache. On top of this, you can plug in a second level of read cache and a second level of write cache in the form of SSD’s. This will give you performance similar to SSD for many activities against your larger data store. This is similar to the tiered storage that is available on many enterprise SAN’s.
This also gives us another way to test Essbase performance. Specifically, we can test how well the write cache works with an Essbase cube. Because the write cache only stages synchronous writes, we’ll get to see how well that works with an Essbase database compared to other types of databases that generally work quite well with this setup.
Back to the rest of our hardware…we definitely need a lot of RAM. Clearly, FreeNAS and ZFS are going to eat up quite a bit of CPU, especially I decide to use any of the plugins. And of course, this is a Network Attached Storage server, so we need some serious network connectivity. Gigabit just won’t do. So what did I decide on? Let’s take a look:
If you happened to read my series on building a home lab, you might recognize some of the parts. I stuck with the E5-2670 as they are even cheaper now than ever before. I did have to move away from ASRock motherboard to a Supermicro board. This board has a built-in SAS2 controller, six (6) PCIe slots, and sixteen (16) DIMM slots. I’m going with 256GB of DDR3 RAM which should support our plugins, our primary caches, and the secondary caches nicely. I’ve also purchased a pair of Intel X520-DA2 network cards to provide four (4) 10GB ports.
I added to the onboard controller a pair of matching LSI-based 2308 controllers to give me 24 ports of SAS2. This fit nicely with my Supermicro 846TQ, which has 24 hot-swap bays and a redundant power supply. And that power supply is connected to a 1500VA UPS so that we can ensure that during a power outage, our data remains intact. FreeNAS again helps us out with built-in UPS integration.
So now that we’ve talked about the server a fair amount, what about the actual storage for the server. I’ll start by setting up a single-disk array with the 1.6TB NVMe SSD. This should provide enough speed to max out a 10GB connection for many of my Essbase related tests.

I’ll also be setting up an 8-disk stripped set of mirrored 2TB drives. This is equivalent to RAID 10 and should provide the best mix of performance and redundancy. I’ll have a ninth drive in there as a hot spare should one of the drives fail. In addition, this is the easiest array to actually expand in ZFS.

I also have a pair of Intel S3700 200GB SSD’s to use as an L2ARC (second level read cache) and/or ZIL/SLOG (write cache). We’ll be testing Essbase performance in three different configurations: just the hard drives, the hard drives with the write cache, and the hard drives with the write cache and the second level read cache. These configurations will closely resemble many of the SAN’s that my clients deal with on a daily basis.
The final piece of the storage component of the new NAS serve at the backup device for the network. I’ll be setting up a 10-disk RAID-Z2 array with 5TB, 6TB, or 8TB drives. This is basically the ZFS version of RAID 6 which will provide me with 40TB, 48TB, or 64TB of storage. Here’s an example of what this will look like:

Now that we’ve covered storage, we can talk about how everything is going to be connected. My lab setup has three ESXi hosts and an X1052 switch. The switch has 48 ports of 1Gb ethernet, but only four (4) ports of 10Gb ethernet. Four ports, four servers! But I really would like to have 10Gb between all of my servers AND 10Gb for my network-based data stores. This is why we have two X520-DA2 cards. This will allow me to connect one port to the switch so that everything is on the 10Gb network and also allow each server to connect directly to the FreeNAS server without a switch.
This means that each server will need two 10Gb ports as well. Two of the servers will have X520-DA2 network cards. One port will connect to the switch, the other will connect to the FreeNAS server directly. The last server will actually have two X520-DA1 network cards. This allows me to test the difference between passing through the X520-DA1 using VT-d and using the built-in network functionality. This will be similar to the testing of passthrough storage and data stores.
The hardware has already started to arrive and I’ve begun assembling the new server when I have free time. I’ll try to actually document this build for the next post before we get into the actual software side of things. Until then…time to stop procrastinating on my final Kscope preparations.
Oh, and here is my final build list of everything I have ordered or will be ordering to complete the system:
- SuperChassis 846TQ-R900B
- (2) E5-2670 @ 2.6 GHz
- Supermicro X9DR7-LN4F-JBOD
- 256GB Registered ECC DDR3 RAM (16 x 16GB)
- Noctua i4 Heatsinks
- (5) Noctua NF-R8 (to bring the noise level down on the chassis)
- (2) SanDisk Cruzer 16GB CZ33
- (2) Supermicro AOC-2308-l8e
- (3) Full-Height LSI Backplates (for the AOC-2308’s and the P3605)
- (6) Mini-SAS Breakout Cables
- (10) 5TB Toshiba X300 Drives, 6TB HGST NAS Drives, or 8TB WD Red Drives
- Intel P3605 1.6TB PCIe SSD
- (9) 2TB HGST Ultrastar 7K3000 Hard Drives
- (4) 10Gb Twinax DAC Cables
- (2) Intel X520-DA2
- CyberPower 1500VA UPS
Brian Marshall
June 21, 2016
Before we go to far, let’s consolidate what we’ve done so far. Here’s a list of the entire series:
Ok, now that we have all of this hardware, what do we do with it? Build a computer! I won’t go too much into the details, as you can find plenty of information about this using Google, but here are the basic steps I took:
- Get the case ready by moving the motherboard stays around to match up to your motherboard. For me, I had a 4U case left over from another project, so I used that rather than the Norco from my guide.
- Install your motherboard. For me, this was an ASRock Server motherboard from the guide.
- Connect your front panel wires: For me, this included the power switch, reset switch, power LED, HD LED, and USB ports.
- Install and connect any case fans. For me, I used the one’s that came with my 4U case.
- Install your processor(s). For me, this was a pair of E5-2670’s.
- Install your memory. For me, this was 16 x 8 GB DDR3 modules.
- Install your power supply and hook it to the motherboard. For me, I chose the slightly cheaper than my guide Seasonic M12II. I may update the guide depending on how I like it.
- Install your heat sinks. For me this was a pair of Noctua 4U compatible models.
- Install any PCIe cards. For me, this included an Intel X520-DA1 10GB network card and an Areca 1880i RAID adapter.
- Install your hard drives. For me, this included one Sandisk Ullra II 960GB drive along with four Samsung 840 Pro’s that I moved from another system.
Here’s a shot of my system during the build:

Ok…we have the computer built…now what? It’s time for software. If you want to go the route of using your new computer as a multi-purpose system, then you will likely want to install VMWare Workstation or Oracle’s VirtualBox. At this point, I would recommend heading over to Jake’s blog, as I have no desire to redo all of the great work he has already done. You can find his entire guide here. You can skip straight to the VMWare stuff here.
But what about ESXi? To start our ESXi installation, we need a way to install ESXi. We also need a place to install ESXi. What if we could use the same location for both? Sounds good…let’s do that. First, we have a few prerequisites:
- Download the installation ISO for VMWare ESXi. I am using ESXi 6.0 with Update 1. The name of my ISO is VMware-VMvisor-Installer-6.0.0.update01-3029758.x86_64.iso.
- Download Rufus. Rufus is a great tool for creating bootable USB thumb drives. You can get the portable version of 2.7 here.
- Purchase a USB thumb drive. I use a 8GB SanDisk Cruzer Fit from Amazon. I’ve used SanDisk drives for this purpose on two other systems.
So I’ve downloaded my ISO, I’ve downloaded Rufus, I’ve purchased my thumb drive and I’m ready to make an ISO. Now what? Try this:
- Fire up Rufus. It may prompt you to elevate to administrator priveledges, so do that. It may also ask you about updates, I just answer No and move on. It should look something like this:

- It may have picked your USB device by default, if not, choose the proper device:

- Make sure that MBR partition scheme for BIOS or UEFI is selected:

- Select FAT32:

- Select 4096 bytes:

- Select ISO Image and then click on the ISO button:

- Select the ESXi ISO image and click Open:

- Enter a volume label:

- Verify all of your settings and click Start.

- Click Yes when it tells you that something is obsolete:

- Click OK to erase the selected device and create your bootable thumb drive:

- Assuming all goes well, it should complete and look something like this:

Now let’s plug our new thumb drive into our new computer! You may need to modify your BIOS/UEFI settings to make the thumb drive your primary boot device. Once you do that, you should be ready to run through the installation.
- You can either hit enter or wait for the automatic boot to take you into the installer:

- The installer will load:

- And load…

- Press Enter to continue:

- Press F11 to agree and continue:

- Select your USB drive from the list and press Enter. The capacity should give it away.

- Press Enter to confirm that you don’t have anything on the USB drive that you care about, because it’s about to be erased:

- Choose your language and press Enter:

- Enter a password for your root account, enter it again, andpress Enter:

- Press F11 to start to installation to your USB drive:

- Watch the progress bar, grab a cup of coffee, get a snack:

- After a reboot, you should be booting into ESXi from your USB drive and see something like this:

And now we have ESXi running on our new computer. Now go build a Hyperion environment! Once you get to this point, I’d highly recommend taking a look at Jake’s series on building out your own environment. You can see the entire series here.
Brian Marshall
March 14, 2016
Before we get started, here’s the entire series in case you need to look back (or ahead):
Now that we’ve made it through all of the different components, let’s summarize everything so that we can get a clear view of the total budget and what exactly it is that we get for the money we are spending.
Our final selections are summarized in a table below each of budget options, so I’ll try to just re-cap each option.
Desktop High Buget
For our high budget option, we are looking at higher end of consumer hardware. We have a high end desktop Intel processor (4 cores and 8 threads), a feature-filled motherboard, 64 GB of RAM, 1 TB of SATA SSD storage, 512 GB of NVMe SSD storage, and 4 TB of back-up storage. All of this leaves us with a total of $1,927.18. Here are the details:
| Intel Core i7 6700k | $414.99 | 1 | $414.99 | Link |
| ASRock Z170M Extreme4 | $124.99 | 1 | $124.99 | Link |
| G.SKILL Ripjaws V Series 64GB | $394.99 | 1 | $394.99 | Link |
| Fractal Design Define Mini | $95.99 | 1 | $95.99 | Link |
| SeaSonic S12G S12G-550 | $79.99 | 1 | $79.99 | Link |
| Samsung 850 EVO 1 TB | $329.99 | 1 | $329.99 | Link |
| Samsung 950 Pro 512 GB | $326.25 | 1 | $326.25 | Link |
| HGST Deskstar NAS 4 TB | $159.99 | 1 | $159.99 | Link |
| Total Desktop High Budget | | | $1,927.18 | |
Desktop Medium Budget
We have two options for our medium budget. They both provide a upper-end Intel processor (4 cores, 4 threads), the same mid-range motherboard, 1 TB of SATA SSD storage, 256 GB of NVMe SSD storage, and 3 TB of back-up storage. The difference between the two is memory. Both offer up 32 GB of RAM, but the more expensive option two chooses to use two 16 GB modules instead of four 8 GB modules. The price difference is relatively low with option one coming in at $1,248.91 and option two (which is again expandable to 64 GB in the future) coming in at $1,298.92.
Details for option 1:
| Intel Core i7 6700 | $349.99 | 1 | $349.99 | Link |
| ASRock H170M Pro4 | $84.99 | 1 | $84.99 | Link |
| Crucial 16GB (2 x 8GB) | $64.99 | 2 | $129.98 | Link |
| Cooler Master N200 | $46.99 | 1 | $46.99 | Link |
| SeaSonic S12G S12G-550 | $79.99 | 1 | $79.99 | Link |
| SanDisk Ultra II 960 GB | $249.99 | 1 | $249.99 | Link |
| Samsung 950 Pro 256 GB | $181.99 | 1 | $181.99 | Link |
| HGST Deskstar NAS 3 TB | $124.99 | 1 | $124.99 | Link |
| Total Desktop Medium Budget Option 1 | | | $1,248.91 | |
Details for option 2:
| Intel Core i7 6700 | $349.99 | 1 | $349.99 | Link |
| ASRock H170M Pro4 | $84.99 | 1 | $84.99 | Link |
| G.SKILL Ripjaws V Series 32GB (2 x 16GB) | $179.99 | 1 | $179.99 | Link |
| Cooler Master N200 | $46.99 | 1 | $46.99 | Link |
| SeaSonic S12G S12G-550 | $79.99 | 1 | $79.99 | Link |
| SanDisk Ultra II 960 GB | $249.99 | 1 | $249.99 | Link |
| Samsung 950 Pro 256 GB | $181.99 | 1 | $181.99 | Link |
| HGST Deskstar NAS 3 TB | $124.99 | 1 | $124.99 | Link |
| Total Desktop Medium Budget Option 2 | | | $1,298.92 | |
Desktop Low Budget
For our low budget desktop, we’ll stick with a single option. This option provides a lower-end but still quad core processor, a lower-end motherboard, only 16 GB of RAM, and a single 3 TB hard drive. The upside is that this can easily support an SSD and an upgrade to 32 GB of RAM for a moderate increase in price. But, as optioned, we’re looking at $499.94. I didn’t even plan on that being under $500…
| Intel Core i5 6400 | $189.99 | 1 | $189.99 | Link |
| ASRock H110M-HDS | $51.99 | 1 | $51.99 | Link |
| Crucial 16GB (2 x 8GB) | $64.99 | 1 | $64.99 | Link |
| Rosewill FBM-01 | $27.99 | 1 | $27.99 | Link |
| EVGA 100-W1-0430-KR 430W | $39.99 | 1 | $39.99 | Link |
| HGST Deskstar NAS 3 TB | $124.99 | 1 | $124.99 | Link |
| Total Desktop Low Budget | | | $499.94 | |
Server High Budget
Now on to the fun stuff…servers. Our high end server was intended for the audience that wants brand new hard ware on the latest server technology. This gives us a pair of six-core processors (with 12 threads), 128 GB of DDR4 RAM, a fancy hot-swap case that supports 24 drives, 1 TB of SATA SSD storage, 400 GB of Enterprise-class NVMe SSD storage, and 4 TB of back-up storage. All for the low, low price of $3,769.90. The parts list in all of its glory:
| Intel Xeon E5-2620 V3 | $429.99 | 2 | $859.98 | Link |
| Supermicro MBD-X10DAI-O | $389.99 | 1 | $389.99 | Link |
| Crucial 64GB (4 x 16GB) Registered ECC DDR4 | $449.99 | 2 | $899.98 | Link |
| NORCO RPC-4224 | $429.99 | 1 | $429.99 | Link |
| SeaSonic G-750 SSR-750RM | $119.99 | 1 | $119.99 | Link |
| Samsung 850 EVO 1 TB | $329.99 | 1 | $329.99 | Link |
| Intel P3600 400 GB | $579.99 | 1 | $579.99 | Link |
| HGST Deskstar NAS 4 TB | $159.99 | 1 | $159.99 | Link |
| Total Server High Budget | | | $3,769.90 | |
Server Medium Budget
Ok…now that we have the insanely expensive option of the way, we can go back to reasonable. So how do we get the performance of insanely expensive but the price of a desktop machine? Head to Ebay for processors and RAM, and then get all new hardware for everything else. What we end up with are two options. Both options include a pair of eight-core processors (with 16 threads), a nice dual processor motherboard with quad-gigabit lan, 1 TB of SATA SSD storage, 400 GB of NVMe SSD storage, and 3 TB of back-up storage.
With option one, we have chosen to go with lower cost 8 GB modules for a total of 128 GB of RAM and a desktop case. The total price for this option is $1,849.94. For option two, we swap out the 8 GB modules for 16 GB modules and throw it into a 4U rackmount case. The total price for this option is $2,721.94.
Details for option 1:
| Intel Xeon E5-2670 | $150.00 | 2 | $300.00 | Link |
| ASRock EP2C602-4L/D16 | $309.99 | 1 | $309.99 | Link |
| Ebay 16 x 8GB DDR3 | $20.00 | 16 | $320.00 | Link |
| Phanteks PH-ES614PC_BK | $94.99 | 1 | $94.99 | Link |
| SeaSonic G-750 SSR-750RM | $119.99 | 1 | $119.99 | Link |
| SanDisk Ultra II 960 GB | $249.99 | 1 | $249.99 | Link |
| Intel 750 400 GB | $329.99 | 1 | $329.99 | Link |
| HGST Deskstar NAS 3 TB | $124.99 | 1 | $124.99 | Link |
| Total Server Medium Budget Option 1 | | | $1,849.94 | |
Details for option 2:
| Intel Xeon E5-2670 | $150.00 | 2 | $300.00 | Link |
| ASRock EP2C602-4L/D16 | $309.99 | 1 | $309.99 | Link |
| Ebay 16 x 16GB DDR3 | $75.00 | 16 | $1,200.00 | Link |
| NORCO RPC-470 | $86.99 | 1 | $86.99 | Link |
| SeaSonic G-750 SSR-750RM | $119.99 | 1 | $119.99 | Link |
| SanDisk Ultra II 960 GB | $249.99 | 1 | $249.99 | Link |
| Intel 750 400 GB | $329.99 | 1 | $329.99 | Link |
| HGST Deskstar NAS 3 TB | $124.99 | 1 | $124.99 | Link |
| Total Server Medium Budget Option 2 | | | $2,721.94 | |
Compared to the high server budget, either option is practically a steal. For almost $2,000 less, we get the same memory capacity (albeit DDR3) and more processor cores (albeit a little slower and a little hotter). So the question is…do you really need new an shiny that much? Only you can decide. I’ve built both (new and shiny, and Ebay Frankenstein), so I get it. I have both sitting in my home lab and I can say I’m actually very happy with both systems. With the options available now..I’m going with Ebay Frankenstein.
Server Low Budget
For our low budget server, we get a quad core single socket Xeon processor (with 4 threads), 32 GB of RAM (expandable to 64 GB for $229.98), 1 TB of SATA SSD storage, and 3 TB of back-up storage. Not bad for $1,180.41. The parts list:
| Intel Xeon E3-1220 V5 | $218.48 | 1 | $218.48 | Link |
| Supermicro X11SSH-F-O | $229.99 | 1 | $229.99 | Link |
| Samsung DDR4-2133 16GB | $114.99 | 2 | $229.98 | Link |
| Cooler Master N200 | $46.99 | 1 | $46.99 | Link |
| SeaSonic S12G S12G-550 | $79.99 | 1 | $79.99 | Link |
| SanDisk Ultra II 960 GB | $249.99 | 1 | $249.99 | Link |
| HGST Deskstar NAS 3 TB | $124.99 | 1 | $124.99 | Link |
| Total Server Low Budget | | | $1,180.41 | |
Tiny Server
Finally, and most tiny, we have our tiny sever option. This server packs a huge punch in a little package and a decent cost. We get a quad core processor (with 8 threads), 64 GB of RAM (expandable to 128 GB for $479), 1 TB of SATA SSD storage, and 3 TB of back-up storage. Again, not bad for $1,504.94. Check out the tiny parts list:
| Intel Xeon D-1520 | $489.99 | 1 | $489.99 | Link |
| Supermicro MBD-X10SDV-4C-TLN2F-O | $0.00 | 1 | $- | Link |
| Supermicro 32GB DDR4 | $239.99 | 2 | $479.98 | Link |
| Supermicro CSE-721TQ-250B | $159.99 | 1 | $159.99 | Link |
| SanDisk Ultra II 960 GB | $249.99 | 1 | $249.99 | Link |
| HGST Deskstar NAS 3 TB | $124.99 | 1 | $124.99 | Link |
| Total Tiny Server Budget | | | $1,504.94 | |
So which server will you build?
I hope this series has been helpful for those of you really interested in a Hyperion Home Lab. Now we can get back to Powershell and some of the great things I have planned for my home lab.
Brian Marshall
February 22, 2016
Happy Friday! There’s nothing quite like needing to restart one or all of your EPM services. First you have to shut it all down and make sure it’s actually down. Then you have to start it up in the right order and then you have to make sure it’s actually up before you send users back in. Lately, I’ve started using the WebLogic Admin Server to help me with this in my Home Lab.
Let me start by saying that I am NOT an infrastructure guy. I work with a lot of infrastructure guys and have done a lot of personal installs in my home lab, but I’m an applications guy. So…if someone on the infrastructure side says this is a horrible idea, I’ll let you take it up with them.
Now that we have that out of the way, let’s get to how we use the Admin Server. As a little bit of a background story, when your installation was completed, you were likely deployed to multiple servers. My deployment is pretty distributed, so I have server for Planning, HFM, Essbase, Shared Services, etc. Each time those servers are configured, they have to be registered with the Admin Server. Once that is complete, the Admin Server doesn’t necessarily need to be running any more, so you may need to start it up.
To start the admin server, find Start Admin Server for Weblogic Server Domain shortcut in the Start Menu on your Foundation Server. It should be named this on both 11.1.2.3 and 11.1.2.4.

Once you click on that shortcut, a command prompt should start up letting you know what’s going on. Eventually, you should get a message saying that the server has changed to a RUNNING state:

Now we can go find the shortcut for the Admin Server Console in the start menu:

This should open up your browser to the Admin Console login screen:

Log in here using youe Weblogic Domain Admin account (typically epm_admin). Once you get logged in, you should see this:

This is 11.1.2.3.500, so it may look moderately different on 11.1.2.4. Let’s stop here for a general warning:
You can do all sorts of things in this console that could do something bad to your environment. So be careful. I just look around…I don’t change things!
Once you see the screen above, expand Environment and then click on Servers:

This should give you a list of all of your services, clusters, machine names, service states, and even the listening ports:

That’s neat and all, but why do I really care outside of seeing service health? Well, when I restart, I’m impatient, but i don’t really want to try out Workspace until I’m sure everything is up. So I end up waiting longer than I need to most of the time. And again, I’m impatient. So on my 11.1.2.4 environment I needed to stop and restart Planning. So first let’s see what it looks like when I have a stopped service:

Now let’s look at the HyperionPL24.hyperion.local services console:

It is in fact down. It also needs to be switched to manual…but I’ll work on that later. So let’s go ahead and restart the service:

That was easy! It’s already running! Except that we all know that the services console lies. It’s not really running, its just running the process that starts the process. So how do we know when it’s really started? Option 1…we can go old school and look at the service logs. It will eventually update to say that the state has been changed to RUNNING. Option 2…we can just go see if it’s there in Workspace. Call me paranoid, but I always feel like I’m going to break something if I don’t wait until it’s done. Option 3…refresh the admin server list from above. It will eventually register that it’s STARTING:

And finally let you know that its RUNNING:

I’m sure that there are plenty of other cool and interesting things that we could break do with the Admin Console, but this is my simple use. I hope some of you find this helpful, or at the very least…interesting.
Brian Marshall
February 19, 2016
Before we get started, here’s the entire series in case you need to look back (or ahead):
It’s finally time for the last piece of our Home Lab before we put it all together. Where do we store our data? There are three main areas that come to mind when we start to put together our storage system: virtual hard drive storage, high performance storage, and backup storage.
First we need a place to store the operating system and installed software for each of our guest virtual machines. With the prices of SSD’s coming down every day, it’s hard not to go that route for our main storage. This is, after all, going to make everything run very fast.
Next, we need some high performance storage. This might still just be SSD storage, or we might want to go with something faster. Maybe RAID or NVMe (we’ll get to this). But when we look at certain applications where disk I/O is important (our databases like Essbase and our Repositories), we might want something faster than our standard storage.
Finally, we should back things up. This is where we will safely leave SSD’s and go straight to old-school magnetic storage. For each of our budget options, we’ll have a slightly different overall configuration. Let’s get started.
Desktop High Budget
For our high budget option, we’ll choose a drive for each of the above areas of concern. We’ll have a large SSD for our virtual machines, and NVMe drive for our high performance area, and a big magnetic drive for our backups. For our main SSD drive, I prefer the Samsung 850 EVO 1TB drive. This drive has impressive performance and longevity making use of the latest in flash technology. With 540 MB/s sequential reads, 520 MB/s sequential writes, 98,000 IOPS for random reads, and 90,000 IOPS for random writes…this drive is pretty great for $329.99.
For our high performance drive, we’ll stick with Samsung, but we’ll upgrade to an NVMe drive. But wait, what’s an NVMe drive and why do we care? Our regular SSD drive will connect to a SATA3 port. SATA3 maxes out at 6 gigabits of bandwidth. NVMe on the otherhand is designed to run directly on the PCIe bus. This means that we have four lanes of PCIe 3.0 to work with. PCIe provides 975 megabytes (not bits) of bandwidth per lane. That means we have nearly four gigabytes (not bits) or bandwidth to play with for our NVMe device. The specific NVMe drive I’ve chosen Samsung 950 Pro 256GB drive, priced at $326.25. If you think the EVO was fast, the 950 Pro sports 2,500 MB/s sequential reads, 1,500 MB/s sequential reads, 300,000 IOPS for random reads, and 110,000 IOPS for random writes.
And now for our nice slow, but plentiful back-up drive. HGST makes a nice NAS-rated 4 TB drive for $159.99. It’s a 7200 RPM drive, so it will provide pretty good sequential performance for our back-up needs.
Desktop Medium Budget
For our medium budget option, we’ll stick with an SSD for our main drive, but we’ll go a little cheaper. The SanDisk Ultra II provides great performance at a much lower price of $249.99 (if you are lucky, you can find them on sale under $200 occasionally). The performance on this drive is 550 MB/s sequential reads, 500 MB/s sequential writes, 99,000 IOPS for random reads, and 83,000 IOPS for random writes. I have one of these drives in my new ESXi box and it’s a solid performer.
For our high performance drive, we’ll just stick with the Samsung, but cut the space and cost in half. At $181.99, the 256 GB version of the 950 Pro sports 2,200 MB/s sequential reads, 900 MB/s sequential reads, 270,000 IOPS for random reads, and 85,000 IOPS for random writes. Still crazy fast…
And for our back-up drive, we’ll cut the costs a little and go with a smaller version of the same drive that our high budget option uses. At $124.99, we’ll save a little money and just keep a smaller number of running back-ups.
Desktop Low Budget
For our low budget option, we’ll do things a little different. As cost is our primary issue here, we’ll stick with a single drive. We’ll stick with the 3 TB HGST NAS drive at $124.99. This gives us some flexibility with the number of VM’s we can handle and it will still be plenty fast for our goal of learning new technology.
Server High Budget
For our server choices, things will change…but just a little. We’ll stick with our Samsung 850 EVO 1 TB drive for our main drive. The 850 Pro is a good choice, but it’s hard to justify the additional cost, so we’ll stick with the EVO.
For our performance drive, we’ll definitely change things up. We’ll go with the Intel DC P3600. This is actually the same drive several models of the Oracle Exalytics systems use and re-brand as a Sun Flash Accelerator. It’s a straight PCIe card rather than an M.2 SSD since we don’t have that type of slot using in our server options. The 400 GB drive cost $579.99 and provides 2,100 MB/s sequential reads, 550 MB/s sequential reads, 320,000 IOPS for random reads, and 30,000 IOPS for random writes.
For our back-up drive, we’ll stick with the 4 TB model at $159.99.
Server Medium Budget
In our medium option, we’ll go back to our desktop medium option where we find our SanDisk drive at $249.99. This is a great option for our lower cost server option.
For our performance drive, we’ll stick with Intel, but we’ll go the Intel 750 drive. At $329.99, it provides 2,200 MB/s sequential reads, 900 MB/s sequential reads, 430,000 IOPS for random reads, and 230,000 IOPS for random writes. So it’s cheaper and faster than the P3600. What gives? Those are peak numbers…and it’s all about firmware. In reality, the P3600 can outpace the 750 in real-world server-level duty loads. The P3600 is also more over-provisioned giving it a longer life.
Like our medium desktop, we’ll stick with the 3 TB HGST drive at $124.99.
Server Low Budget and Tiny Server
For our low budget and our tiny server, we’ll stick with the Ultra II 960 GB drive at $249.99 and our HGST 3 TB back-up drive ast $124.99, but we’ll ditch the performance drive altogether. We’ll just keep it nice and simple.
And now…some pretty tables:
Base Storage:
| Option | Drive | Price | Capacity | S-Read | S-Write | R-Read | R-Write | Link |
| Desktop High | Samsung 850 EVO 1 TB | $329.99 | 1,000 | 540 | 520 | 98,000 | 90,000 | Link |
| Desktop Medium | SanDisk Ultra II 960 GB | $249.99 | 960 | 550 | 500 | 99,000 | 83,000 | Link |
| Desktop Low | HGST Deskstar NAS 3 TB | $124.99 | 3,000 | 164 | 154 | | | Link |
| Server High | Samsung 850 EVO 1 TB | $329.99 | 1,000 | 540 | 520 | 98,000 | 90,000 | Link |
| Server Medium | SanDisk Ultra II 960 GB | $249.99 | 960 | 550 | 500 | 99,000 | 83,000 | Link |
| Server Low | SanDisk Ultra II 960 GB | $249.99 | 960 | 550 | 500 | 99,000 | 83,000 | Link |
| Tiny Server | SanDisk Ultra II 960 GB | $249.99 | 960 | 550 | 500 | 99,000 | 83,000 | Link |
High Performance Storage:
| Option | Drive | Price | Capacity | S-Read | S-Write | R-Read | R-Write | Link |
| Desktop High | Samsung 950 Pro 512 GB | $326.25 | 512 | 2,500 | 1,500 | 300,000 | 110,000 | Link |
| Desktop Medium | Samsung 950 Pro 256 GB | $181.99 | 256 | 2,200 | 900 | 270,000 | 85,000 | Link |
| Server High | Intel P3600 400 GB | $579.99 | 400 | 2,100 | 550 | 320,000 | 30,000 | Link |
Back-Up Storage:
| Option | Drive | Price | Capacity | S-Read | S-Write | R-Read | R-Write | Link |
| Desktop High | HGST Deskstar NAS 4 TB | $159.99 | 4,000 | 164 | 154 | | | Link |
| Desktop Medium | HGST Deskstar NAS 3 TB | $124.99 | 3,000 | 164 | 154 | | | Link |
| Server High | HGST Deskstar NAS 4 TB | $159.99 | 4,000 | 164 | 154 | | | Link |
| Server Medium | HGST Deskstar NAS 3 TB | $124.99 | 3,000 | 164 | 154 | | | Link |
| Server Low | HGST Deskstar NAS 3 TB | $124.99 | 3,000 | 164 | 154 | | | Link |
| Tiny Server | HGST Deskstar NAS 3 TB | $124.99 | 3,000 | 164 | 154 | | | Link |
Now that we have all of our hardware picked out, we can add up the total costs in our next post and see the total damage.
Brian Marshall
February 15, 2016
Before we get started, here’s the entire series in case you need to look back (or ahead):
We’re slowly nearing the exciting completion of our new Hyperion Home Lab! Now that we have all of the key components (besides storage), we need something to power our lab and a place for it to call home. Cases are all about where you plan to put the system and what’s going in it. Power supplies, and making sure that you make a quality choice is far more important. I’ve made sure that I’ve only selected power supplies that I would trust in my own systems.
Desktop High Budget
Because all of our desktop options utilize Micro-ATX form-factor motherboards, this entire section is interchangeable. For our high budget option, I’ve selected the Fractile Design Define Mini. This is a great case with good airflow and a great layout in general. It also has excellent expandability for a Micro-ATX case with six (6) 3.5″ hard drive bays (SSD compatible) and two (2) external 5.25″ bays. This case is also compatible with Mini-ITX motherboards should you have a tiny server you would like to fit in there. At $69.99, this case is really a great deal. If I had a Micro-ATX system to build, this is the case I would go with.
For our power supply, I’ve chosen the SeaSonic S12G S12G-550. Perhaps among the worst-named components out there, this is a very solid power supply that produces 550 Watts and carries an 80 PLUS Gold certification. This basically means that it is insanely efficient. At $79.99, it actually costs more than our case choice. But as a I mentioned, power supplies are far more important from a quality perspective. I have several SeaSonic power supplies and I’ve always had great luck with them.
Desktop Medium Budget
For our medium option, we’ll cut the budget down to $47.99 with the Cooler Master N200. This is another case with a great layout and airflow design. It has a giant intake fan along with space for two (2) 3.5″ hard drives and two (2) 2.5″ hard drives. It also has two (2) external 5.25″ bays for additional expansion. Like the prior choice, it also supports Mini-ITX. If you need a few more hard drives, you may want to go with the slightly higher priced Fractile Design case, but outside of that, it is definitely a solid choice for any of our budgets.
For our power supply, we’re going to stick with the SeaSonic S12G, and we’ll just leave it at that…
Desktop Low Budget
For the absolute cheapest option, check out the Rosewill FBM-01. At $29.99, it definitely has cost going for it. It has two (2) internal 3.5″ hard drive bays, two (2) external 5.25″ bays, and one (1) internal 3.5″ hard drive bays. This is about as traditional of a design as you will find. But…it gets the job done at a low cost and provides some expansion options.
For our power supply, this is where things get a little more interesting. I did a lot of research and found that the EVGA 100-W1-0430-KR is a great low cost option that is pretty high quality. It’s not perfect, but is at least trustworthy. It can be found for $39.99 along with a $20 rebate. It’s hard to beat for effectively $19.99.
Server High Budget
Once you get to servers…things again change. Our top two options use rather large motherboards, so let’s move on from Micro-ATX and into the land of Extended-ATX and EEB. For our high budget option, we’re going all rack. I’ve chosen a case that I’ve used for many years, the Norco RPC-4224. This supports 24 hot-swap 3.5″ bays that are 2.5″ compatible out of the box. Each row of four drives connects with an SFF-8087 connector which allows for great flexibility in how the 24 drives can be connected.
When we talk about power supplies, we have to remember that this is a home lab. For that reason, I went with a consumer power supply for this option. The SeaSonic G-750 SSR-750RM is a 750 Watt power supply with dual 8-pin CPU connectors. This is specifically important for our server options with dual CPU’s. It is also an 80 PLUS Gold certified power supply which brings along with it excellent efficiency.
Server Medium Budget
As we move down the budget scale towards our medium option, I’ve chosen to given a couple of choice for the chassis. Our first option is also a great choice for our high budget option if you want to stay away from rackmounted equipment. The Phanteks Enthoo Pro is the case that a colleague of mine used his build that prompted me to publish this series. He wanted a regular case that would fit a giant motherboard and provide plenty of expansion. At $94.99 and with six (6) 3.5″ bays, one (1) 2.5″ bay, and three (3) external 5.25″ bays, you can load this thing up with drives and a giant motherboard. It has an excellent layout and great airflow.
For our second option, we go back to the rack. This time we go with a much lower cost Norco option, the RPC-470. This is a great 4U rackmount option that has a lot of expansion for the cost. At $86.99, this case supports ten (10) 3.5″ bays and three (3) 5.25″ external bays. If you don’t really care about hot-swap bays and you want to go rackmount, this is the case to go with.
For our power supply…let’s just stick with SeaSonic G-750.
Server Low Budget
We’ll go back to a desktop favorite for our low budget server. Because we chose a Micro-ATX board, we can again go with any of our desktop options. Our choice is the Cooler Master N200.
And for the power supply, we’ll go back to the desktop options to the SeaSonic S12G.
Tiny Server
The tiny server gives us a whole host of options given the Mini-ITX form factor. First, we’ll look at the Supermicro CSE-721TQ-250B. With a name like that, who wouldn’t choose it? This case is specifically designed for the Xeon D platform. It’s compact, comes with a matched high-efficiency 250 Watt power supply, and is reasonably priced at $159.99. It has four (4) hot swap 3.5″ bays and two (2) stationary 2.5″ bays. This lines up nicely with our six ports of SATA3 on our Tiny Server choice of motherboard. And, again, this chassis comes with a power supply, so we can stop there. Of course, the first two options in our desktop section would also do the trick, as they support Micro-ATX.
And here are our options in a nice pair of tables:
Chassis
| Option | Chassis | Price | Link |
| Desktop High | Fractal Design Define Mini | $95.99 | Link |
| Desktop Medium | Cooler Master N200 | $46.99 | Link |
| Desktop Low | Rosewill FBM-01 | $27.99 | Link |
| Server High | NORCO RPC-4224 | $429.99 | Link |
| Server Medium Option 1 | Phanteks PH-ES614PC_BK | $94.99 | Link |
| Server Medium Option 2 | NORCO RPC-470 | $86.99 | Link |
| Server Low | Cooler Master N200 | $46.99 | Link |
| Tiny Server | Supermicro CSE-721TQ-250B | $159.99 | Link |
Power Supplies
| Option | Power Supply | Price | Link |
| Desktop High | SeaSonic S12G S12G-550 | $79.99 | Link |
| Desktop Medium | SeaSonic S12G S12G-550 | $79.99 | Link |
| Desktop Low | EVGA 100-W1-0430-KR 430W | $39.99 | Link |
| Server High | SeaSonic G-750 SSR-750RM | $119.99 | Link |
| Server Medium | SeaSonic G-750 SSR-750RM | $119.99 | Link |
| Server Low | SeaSonic S12G S12G-550 | $79.99 | Link |
And now…we have a place for our home lab to live. The end is near! Next up…storage options. This should be interesting with all of the new options out there these days between standard SSD’s and NVMe hitting the market with a giant surge in performance. Can’t wait!
Brian Marshall
February 12, 2016
Before we get started, here’s the entire series in case you need to look back (or ahead):
We have our first two major components, but now we need memory. After all, memory is what Hyperion craves, and each release seems to need that much more. Each of our budget options has a different level of capacity and functionality. Today we’ll look at an option for memory for each configuration, but keep in mind that memory is a highly volatile market and that prices at the time of publishing this blog may change significantly.
So let’s get started…
Desktop High Budget
As we’ve discussed, all of our desktop options will max out at 64 GB of RAM. In the future, I hope to update the high budget option to use the next generation of high-end desktop processors. These processors will have higher core counts and support at least 128 GB of RAM. But…for now, we are stuck with 64 GB. The cheapest option I’ve found so far is the G.SKILL Ripjaws V Series 64 GB Kit. This kit includes four (4) DDR4 modules at 16 GB a piece and is priced at $394.99. You will see a lot of different options out there around DDR4 speeds, but unless you are a serious gamer and this is a multi-use system, go with inexpensive, as you are unlikely to see a difference in a home lab.
Desktop Medium Budget
For our medium budget configuration, we will go with 32 GB of RAM. This is where the options get a little more complex. The cheaper option is to go with four (4) modules of 8 GB. This can be found for as cheap as $129.98 (two Crucial 16 GB kits at $64.99 each). Alternately, we can choose to use two (2) sticks of 16 GB. This allows us to have 32 GB now and eventually upgrade to 64 GB without needing to replace all of our memory. We can use the 32 GB version of our high budget option: the G.SKILL Ripjaws V Series 32 GB Kit. The price difference isn’t substantial at $179.99.
Desktop Low Budget
The Crucial 16 GB kit is a great choice for our low budget option as well at $64.99. The downside of course is that 16 GB of RAM is only enough to do so much with virtual machines.
Server High Budget
Servers are a little bit of a different animal when it comes to memory. First, most of them require ECC RAM. ECC stands for Error Checking and Correcting. In theory, you can run regular RAM in a server, but your maximum memory goes down to desktop levels, so very few people ever do it…even in a home lab.
Some servers also require registered RAM. Essentially, we use unbuffered RAM in desktop applications and some server types while we use registered RAM for the rest of our server types. We have a bit of a mix in our server options, but all of them use ECC RAM.
In our high budget option, we want a lot of RAM. The challenge is that server motherboards not only want Registered and ECC RAM, but they are often times very picky about brands and speeds of RAM. This is why the motherboard manufacturers publish a list of certified memory. At the same time, memory manufacturers publish a list of motherboards compatible with their memory. This means that we should try to find memory on one of those two lists for our motherboard of choice.
The Crucial 64 GB Kit (16 GB x 4) is guaranteed by Crucial to be 100% compatible with our Supermicro X10DAi motherboard selection. This is also one of the cheaper sets available at $449.99. For our high budget option, I suggest a pair of these kits to give you 128 GB of RAM with the ability to expand to 256 GB using another pair in the future.
Server Medium Budget
The medium budget option is a little more complicated. For one, we won’t be going to Newegg to get our RAM. We could, but it would cost twice as much, or more. Instead we’ll be watching Ebay looking for the right RAM for our motherboard. I have two of the ASRock motherboards that I recommended. One is running Kingston RAM and the other is running Crucial RAM. Samsung and Hynix should both be pretty good as well. So what do we look for on Ebay? If we want the absolute best bang for the buck, we are looking for sixteen (16) stick of 8 GB of registered ECC DDR3. These should be readily available for $15-$20 per stick depending on your patience level. That means for 128 GB of RAM, we only need to spend a little north of $300 depending on the deal you find.
The downside to this option is that we will fill our motherboard to capacity and only get 128 GB of RAM. So our second option is to find eight (8) sticks of 16 GB. The downside here is going to be cost and availability. The 8 GB sticks are literally everywhere. The 16 GB sticks are there as well, but the cost varies greatly. With enough patience, you should be able to find these sticks for $70-$80 each. Notice that our cost is not double, but quadruple that of our 8 GB sticks. So for the same 128 GB of RAM, we pay roughly double the cost. For that doubled cost we have the ability to expand one day to 256 GB of RAM. Is it worth it? I’ll leave that up to you and your significant other to decide.
Server Low Budget
For our low budget option, I’d recommend picking up a pair of 16 GB modules made by Supermicro. They are $114.99 per ECC module and are certified to work on our motherboard selection. This gives us 32 GB to start and allows us to later upgrade to 64 GB without needing all new memory.
Tiny Server
Our tiny server option is a bit interesting. While it may be tiny, it packs a serious punch and has some impressive options for memory expansion. Maxing out at 128 GB of RAM, we can really go as low or as high as we want. For the purposes of this guide, I’ll assume that 64 GB is a good starting point, and you can always add more later if we use the right modules of RAM. So what’s the right module of RAM? Supermicro makes one just for this purpose. For $239.99, you get 32 GB of RAM on a single stick. So we’ll go with a pair of those for our tiny server with a total cost of $479.99.
Just to summarize…here are all of our memory choices with specific pricing and links to purchase what you need. Next up…we need a place to put all of this nice new hardware and a way to power it up. Stay tuned…
| Option | Memory | Type | Total Memory | Price | Qty | Total | Link |
| Desktop High | G.SKILL Ripjaws V Series 64GB | DDR4 | 64 GB | $394.99 | 1 | $394.99 | Link |
| Desktop Medium Option 1 | Crucial 16GB (2 x 8GB) | DDR4 | 32 GB | $64.99 | 2 | $129.98 | Link |
| Desktop Medium Option 2 | G.SKILL Ripjaws V Series 32GB (2 x 16GB) | DDR4 | 32 GB | $179.99 | 1 | $179.99 | Link |
| Desktop Low | Crucial 16GB (2 x 8GB) | DDR4 | 16 GB | $64.99 | 1 | $64.99 | Link |
| Server High | Crucial 64GB (4 x 16GB) Registered ECC DDR4 | DDR4 | 128 GB | $449.99 | 2 | $899.98 | Link |
| Server Medium Option 1 | Ebay 16 x 8GB DDR3 | DDR3 | 128 GB | $20.00 | 16 | $320.00 | Link |
| Server Medium Option 2 | Ebay 16 x 16GB DDR3 | DDR3 | 256 GB | $75.00 | 16 | $1,200.00 | Link |
| Server Low | Supermicro X11SSH-F-O | DDR4 | 32 GB | $114.99 | 2 | $229.98 | Link |
| Tiny Server | Supermicro MBD-X10SDV-4C-TLN2F-O | DDR4 | 64 GB | $239.99 | 2 | $479.98 | Link |
Brian Marshall
February 7, 2016